All posts by admin

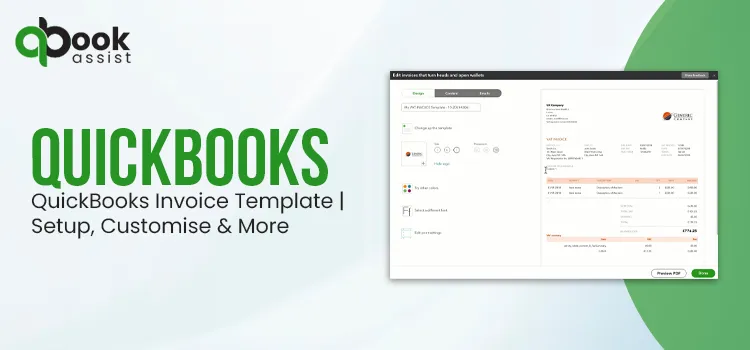
QuickBooks Invoice Template | Setup, Customise & More

A well-designed QuickBooks invoice template has made it more convenient for businesses to send professional invoices while improving brand consistency. QuickBooks allows users to create professional invoices by adding company logos, colors, payment terms, and custom fields both in Online and Desktop.

In this post, you’ll come to know how to set up and customize an invoice template, edit an invoice layout, download or export an invoice template, and fix issues like a QuickBooks invoice template not printing accurately.

What is a QuickBooks Invoice Template?

A QuickBooks Invoice template is a pre-formatted document used by businesses to bill their clients against goods or services within the QuickBooks software. Moreover, it also allows you to add logos, brand colors, and certain business details to these templates, which makes it more. Thus, it helps streamline the payment process. The following are the items that are included on each invoice;

  • Your business contact details
  • Your terms of payment
  • A clear description of the goods and services for which you are billing
  • Date when the invoice is being issued
  • The invoice number allotted to the invoice you are creating
  • If necessary, then add the sales tax component to the sale

How to Set up an Invoice Template in QuickBooks?

By setting up QuickBooks Invoice templates, you can generate professional invoices with your business branding, payment details, and customized fields. You can set up your invoice template in both QuickBooks Online and Desktop.

In QuickBooks Online

  • First, log in to your QuickBooks Online application.
  • After this, hit the Settings icon and choose Custom Form Styles.
  • Tap on the New Style button > Invoice option.
  • Provide a name for your invoice template.
  • Afterwards, you can customize the template as discussed below.
  • Next, preview the invoice to verify the layout.
  • Hit the Save tab to successfully save the invoice template in QuickBooks.

In QuickBooks Desktop

  • Launch the QuickBooks Desktop and move to the Lists menu.
  • After this, choose the Templates and again click Templates from the drop-down list.
  • Hit the New option and pick the template type as Invoice.
  • Also, choose a pre-designed layout or generate a new template.
  • Now, you can select Additional Customization to change.
    • Company details
    • Logo
    • Columns and fields
    • Payment Instructions
    • Fonts & Colors
  • When all the changes are done, save the template using a unique name.
  • At last, hit OK to complete the setup process.

How to Customize QuickBooks Invoice Template?

While customizing an invoice template in QuickBooks, you’ll get three different tabs, i.e, Design, Content, and Email.

1. Design– You can customize the look of your invoice by choosing from a pre-designed template. Otherwise, you can also create a new invoice. You can then adjust the layout, colors, fonts, and logos to align according to your brand identity.

2. Content- Set the invoice details according to your requirements. You can add, edit, and update fields like company name, address, customer details, item descriptions, and more.

3. Email- Design the email message while sending invoices to customers.

  • Click on + New and then the Invoices option.
  • After this, tap on the Customize option.
  • To design the invoice on which you are currently working, head to Edit current. For designing a new template, choose New Style.
  • Make sure to provide a new name to your invoice template.

First Step: Choose a Template

You can select a QuickBooks invoice template from six pre-designed QuickBooks Online invoice templates. Otherwise, you can also generate a new invoice template from scratch.

Second Step: Add a Company Logo

The following are some of the points that you must know about the logos.

  • You can only add around 10 logos to your account.
  • Make sure that the logos are in .gif, .bmp, .jpg, .png, .jpe, or .jpeg format.
  • Each logo must be smaller than 10 MB.
  • The logo should be in a square shape, as rectangles aren’t compatible with QuickBooks.
  • Ensure that the logos are in the standard RGB color space.
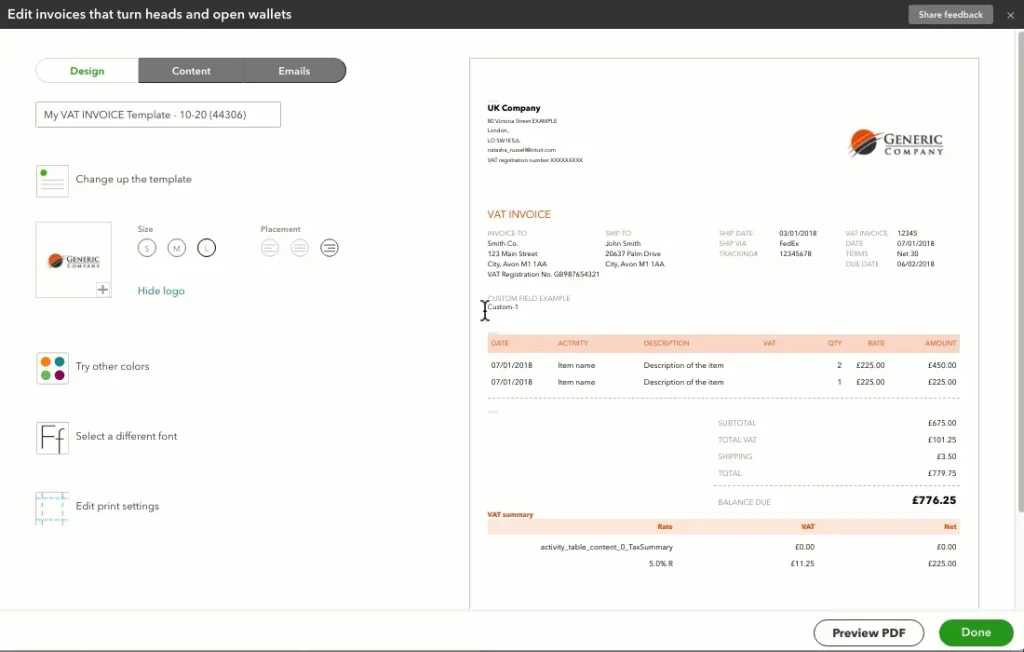
  1. When you are in the Design tab, click Make logo edits.
  2. Locate and choose your logo according to your choice. Then, hit the Open tab.
  3. Pick the Add a logo + tab and then choose your logo. Click the Open tab.
  4. After completing the upload, tap on Save.
standard RGB color space.
  1. Now, select the size of your logo on the invoice, which can be either Small, Medium, or Large.
  2. After doing this, make a decision for the placement of the logo, whether it will be right, left, or center alignment. Note that you can’t change the height or width of the logo.

Third Step: Pick a colour scheme and font style

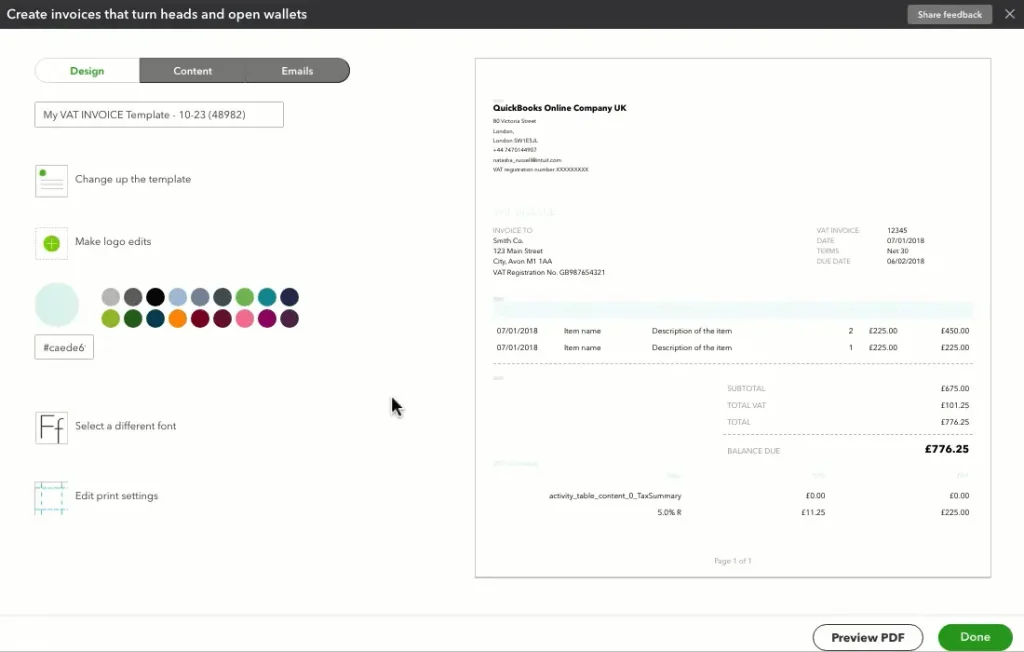
Now, you must select a color scheme and font style that really captures the essence of your brand.

  • For selecting the color, click Try another color.
  • If your business has any particular brand color, enter the HEX Code. The HEX Code is basically a combination of six letters and numbers that represent the color.
Pick a colour scheme and font style
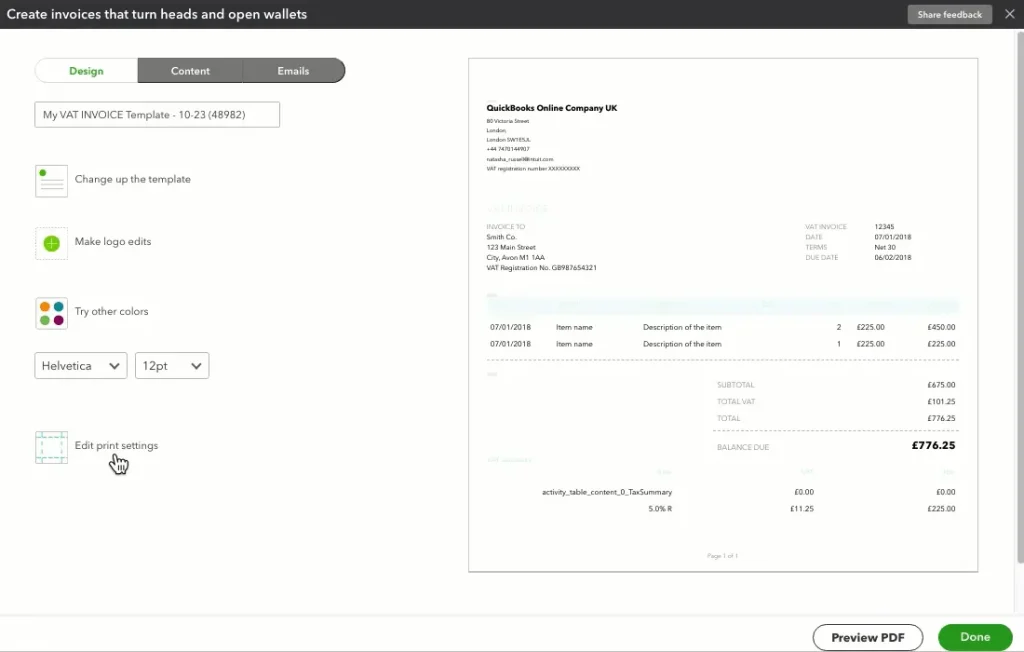
  • After doing that, hit Select a different font option.
  • At last, change the font size.

Fourth Step: Change Print Settings
First, tap on the edit print settings option
  • First, tap onthe edit print settings option.
  • If you send printed forms to your customers, adjust the margins.
    • Important Tip: You can click Reset to move back to the default margin settings if you need to.

Fifth Step: Update Invoice Details
Update Invoice Details
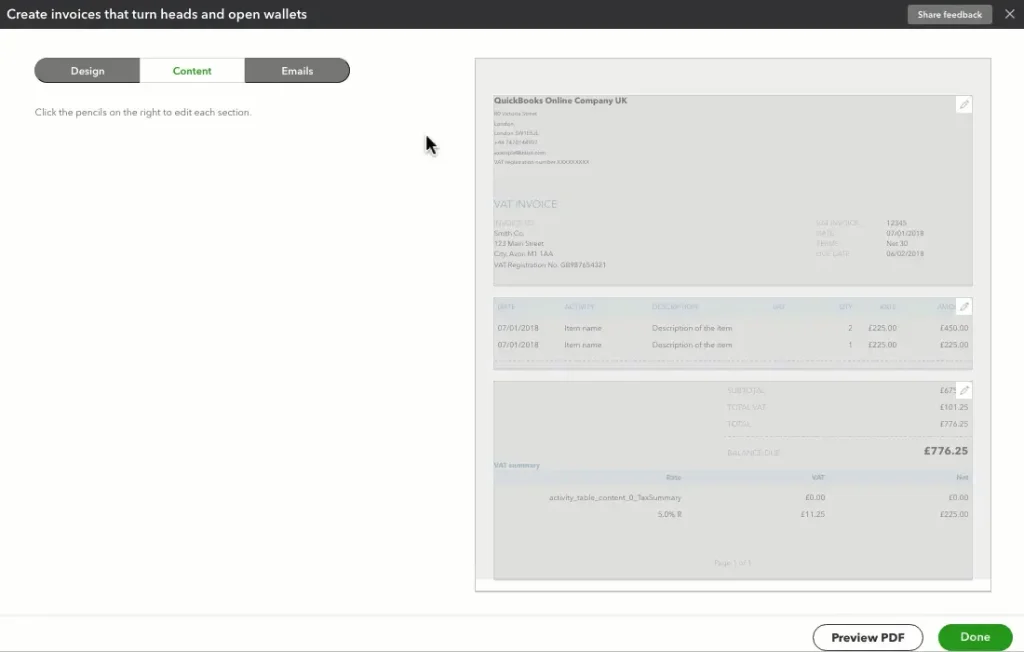
  • Initially, click the Content tab.
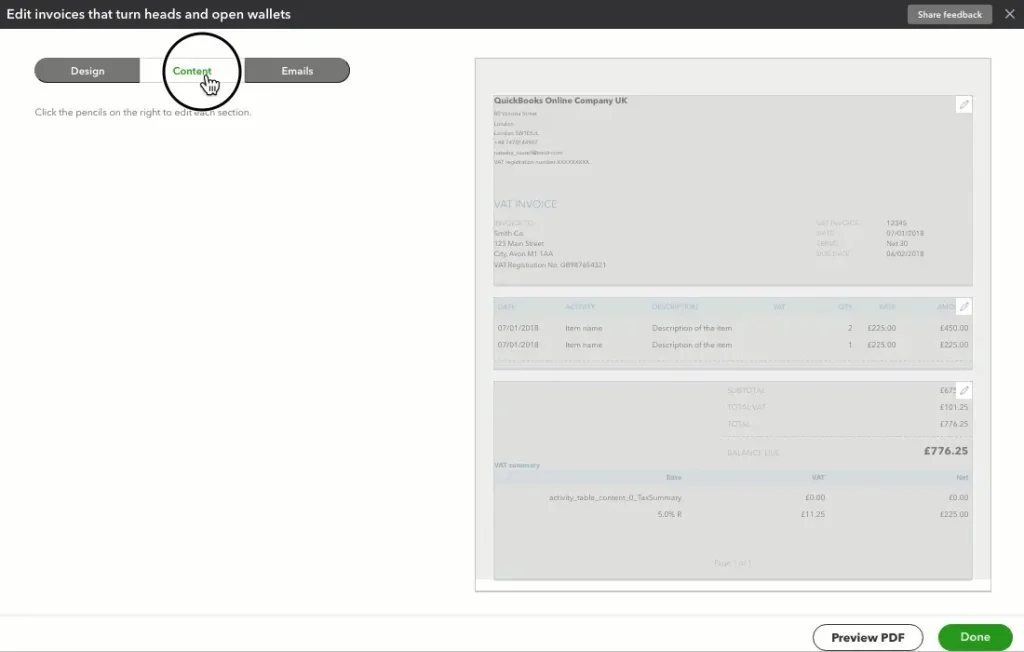
  • After this, you will see three sections, i.e., Header, table, and Footer. You need to edit each section separately by clicking the Edit icon.

Now, pick the heading to show more customization options for each section.

Header (company info, custom fields, and tax)

  • Click the Pencil icon to change the Header section.
  • Choose the ticks next to the fields you want to display on the invoice. The invoice preview will automatically update as you make changes.
  • Also, you can customize what you want your customers to see by adding or removing information. Besides this, you can also update the text fields to edit what displays.
  • Select the Form numbers checkbox to have QuickBooks add invoice numbers to your form.
  • If your business is tax-registered, you cannot remove the registration number field.

Table (product/service info and sales tax)

  • Choose the Pencil icon to make changes to the Table section.
  • For having separate columns for item descriptions, quantities, and rates, verify the Description, Quantity, and Rate checkbox.
    • If you wish to add the item description in the Activity column, mark the Product/Service checkbox. Then, circle the “Include description here” checkbox.
    • Alternatively, you can circle the Description checkbox and then include Quantity and Rate.
  • To arrange the columns again, pick and drag the grid icon to a new position on the list.
  • If you wish to change the column name or size, opt for Edit labels and width.
    • Make changes to the text fields to edit the column names.
    • Also, adjust the column width by shifting the sliders.
  • After doing this, tap on Show more activity options to edit the following;
    • Group Activity By: It lets you group activities according to Day, Week, Month, or Type.
    • Collapse activity rows- This function will allow you to combine rows with the same rate and description, excluding dates.
    • Show progress on line items (email only).
    • Show markup on billable expenses.
    • Show billable time: It provides two additional options when selected:
      • Include the employee’s name
      • Include hours and rate.
    • Show tax-inclusive amounts: It shows the VAT-inclusive amount on print previews and invoices sent to customers.
  • Show tax type indicators: This will display T, ST, and VAT indicators in the tax column if possible.

Footer (discounts)

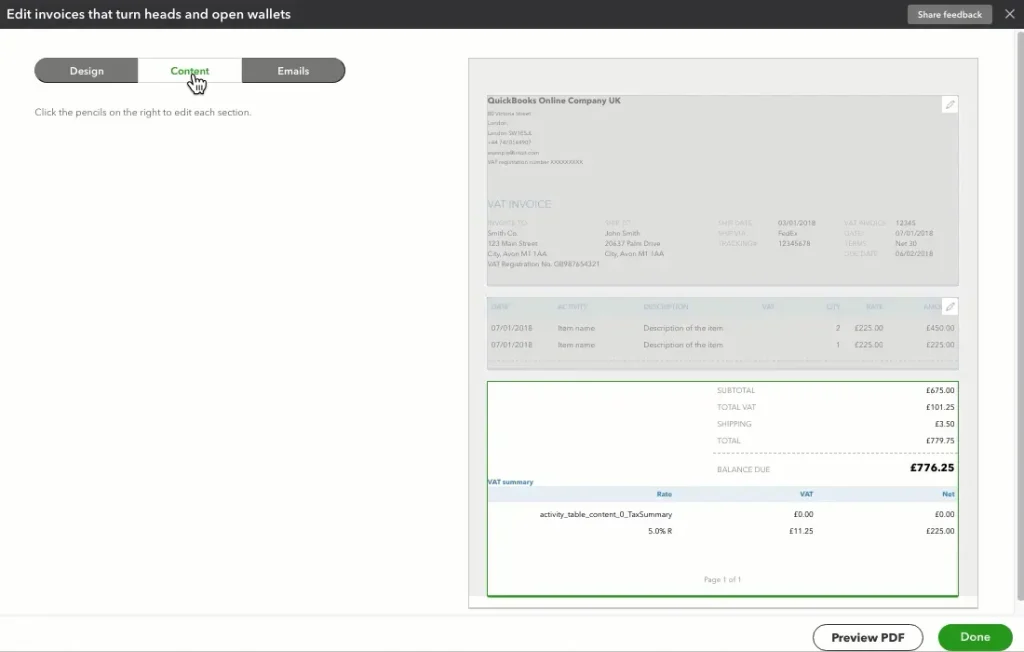
  • First, tap on the Pencil icon to make changes in the Footer section.
  • Circle the Discount checkbox if you wish to offer a discount and show it on the form.
  • Also, you can personalize a message to your customer and then include a text in the footer of a form. Besides this, pick the desired font size and/or placement by clicking the drop-down fields.

Sixth Step: Add custom fields

Important Tip: You can see this feature only in QuickBooks Online Plus, Essentials, and Advanced.
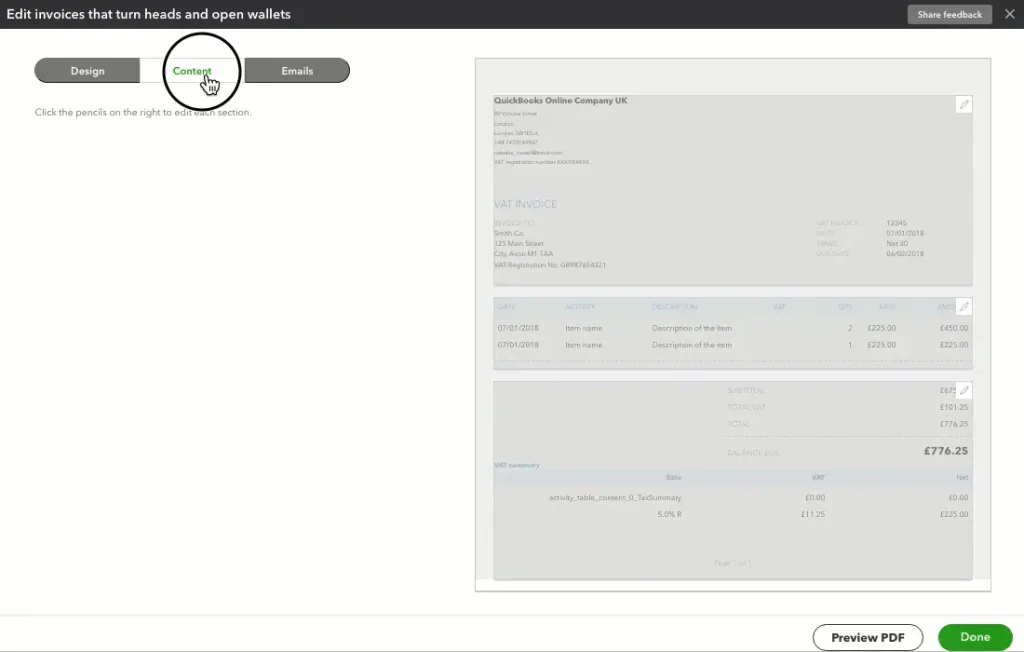
Add custom fields
  • Click on the Content tab and then the Pencil icon to edit the header section.
  • After doing this, choose the Manage custom fields. This will redirect you to the custom fields page.
  • Move to the Add field option and assign a name to the custom field. Also, pick the data type.
  • Now, hit the Transaction option as the category and click Invoice.
  • Enable Print on form so that it shows in your form’s header.
  • At last, hit the Save option. This will display the custom field on the template.

Seventh Step: Add a Discount

QuickBooks automatically monitors the discounts you give by creating a Discounts given account in your charts of accounts. But first, you must verify whether this setting is enabled.

  • Save and then shut down your template.
Add a Discount
  • Move to the Settings icon and click the Account and Settings option.
  • Choose the Sales option.
  • From the Sales form content section, hit the Edit icon.
  • After this, enable the Discount setting.
  • Once the changes are done, click the Save and then Done options.

Return to your invoice template and then start adding the discount field.
Account and Settings option.
  • Move to the Settings icon and click the Custom Form Styles option.
  • Choose the Invoices tab. For making changes to an existing invoice, select the invoice from the list and click View/Edit.
  • After that, tap on the Content tab and hit the Pencil icon to edit the footer section.
  • Finally, mark the Discount checkbox.

Your invoice subtotal will include a discount field, which will only be displayed to your customer while adding a discount to it.

Eight Step: Personalise the email

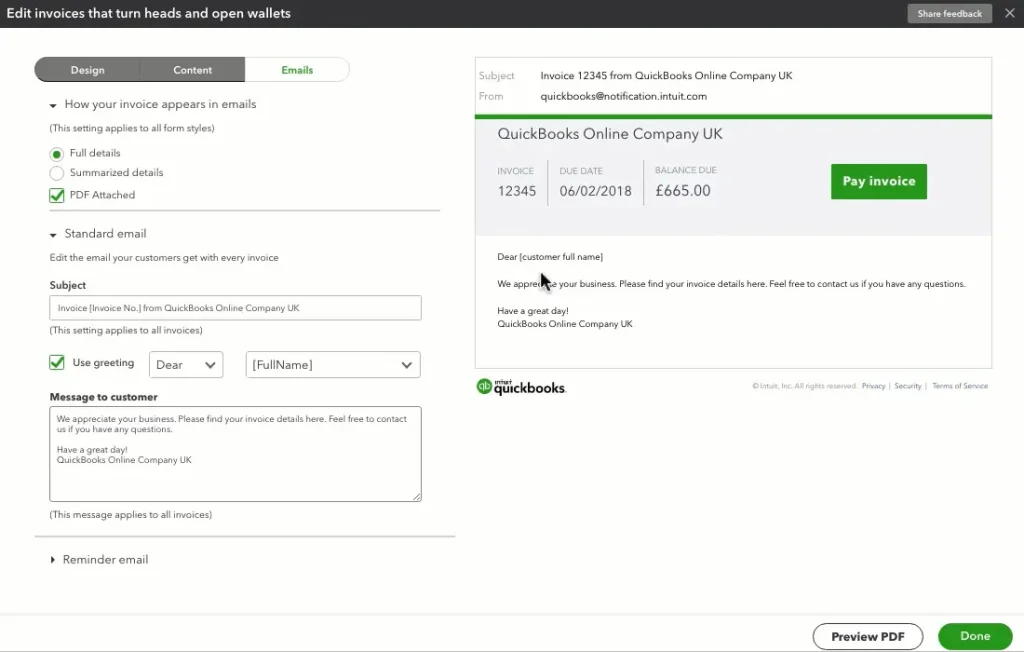
Enhance the customer experience by designing the email message they receive with their invoice. Also, ensure that you have included all the additional details, instructions, or a thankyou message to give a personalised touch.
Personalise the email
  • Choose the Emails tab.
  • After this, click either Full Details or Summarised Details, depending on how much information you wish to display on the invoice.
  • If you want to add the complete pricing breakdown, tap on the PDF Attached option.
  • You also have the option to edit the email your customer will get with each invoice and reminder emails.

Ninth Step: Preview the Invoice

Before you save and close, it’s best to check everything to ensure that the invoice is all good and contains all the information you want.
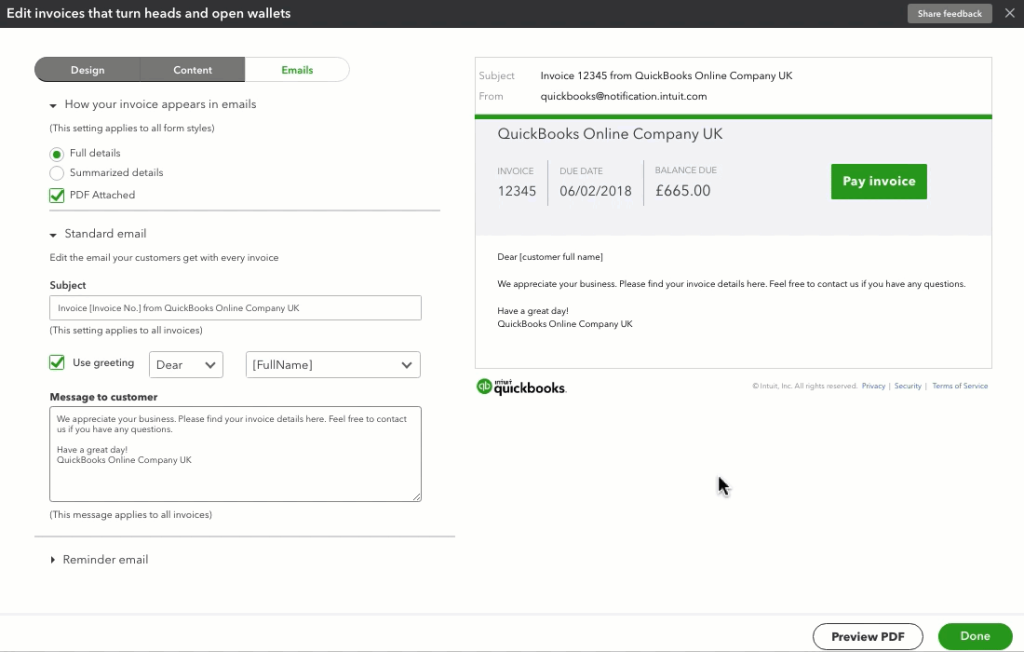
Preview the Invoice
  • Initially, tap on the Email tab.
  • Choose the Preview PDF option. This will take you to a new window displaying a PDF version of the invoice your customer will see.
  • To make any changes, exit from the window to return and do the required changes.
  • Once everything is set, clickthe Done option.

Tenth Step: View all templates
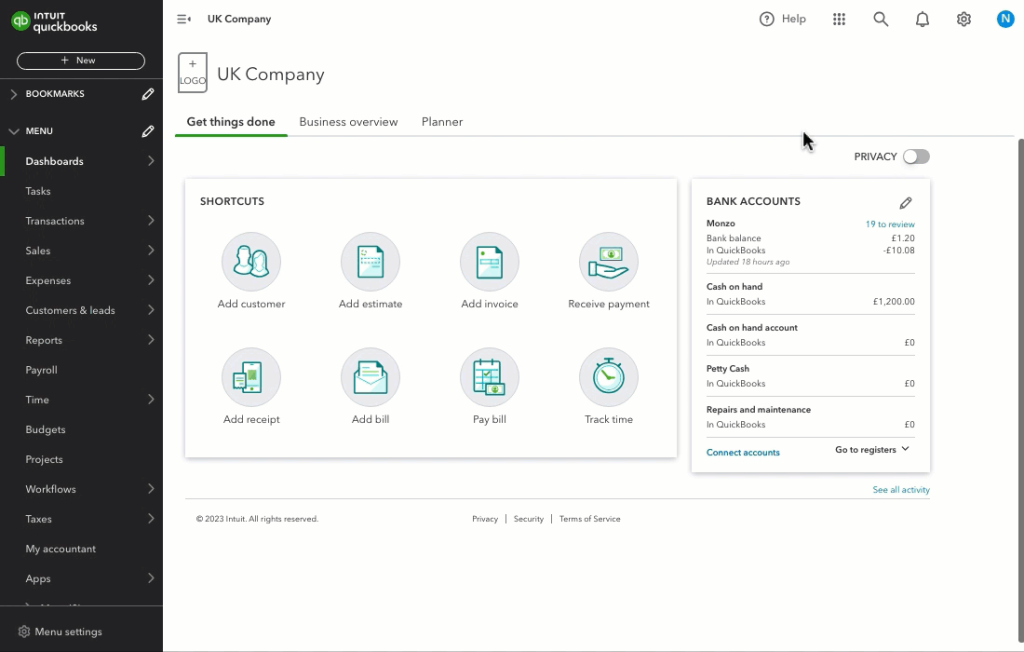
Custom Form Styles to get a list of all your saved templates.
  • Move to the Settings icon and click Custom Form Styles to get a list of all your saved templates.
  • To generate a customized new form, click New Style and pick the correct form. Otherwise, tap on Edit to customize an existing template.

How to Change QuickBooks Invoice Template?

You can change the QuickBooks Invoice template according to your business requirements whenever you want. Whether you are an Online or Desktop user, you can switch between existing templates or create a new customized layout for your invoices.

Change Default Template in QuickBooks Online

Here’s how to change the default template in QuickBooks Online.

  • Initially, log in to QuickBooks Online and hit the Settings option.
  • Choose the Custom Form Styles option and look for the invoice template you want to use.
  • Now, hit the drop-down arrow next to the template.
  • Afterwards, go to the Make Default option.
  • With this, the selected template will automatically apply to all new invoices.  

Change Invoice Template in QuickBooks Desktop

Use the following steps to change the invoice template in QuickBooks Desktop.

  • Open the QuickBooks Desktop and generate a new invoice.
  • Search for the Template drop-down menu and select the drop-down list.
  • Now, pick the invoice template that you want to apply.
  • With this, the invoice layout will be updated automatically.

How to Edit the Invoice Template in QuickBooks Online?

QuickBooks Online provides you with an option to generate attractive, professional-looking invoices. Perform the following steps to edit the invoice template.

  • Move to the Gear icon and click Custom form styles.
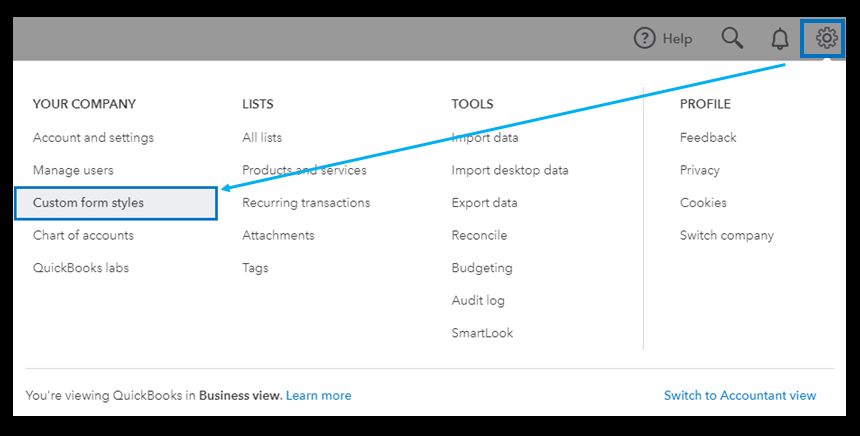
Edit the Invoice Template in QuickBooks Online?
  • After doing that, pick the template that you want to customize and hit the Edit menu.
  • Alternatively, you can also select the New Style option and then click Invoice.

New Style option
  • From the Edit invoices that turn heads and open wallets, select between the Design or Content tabs.
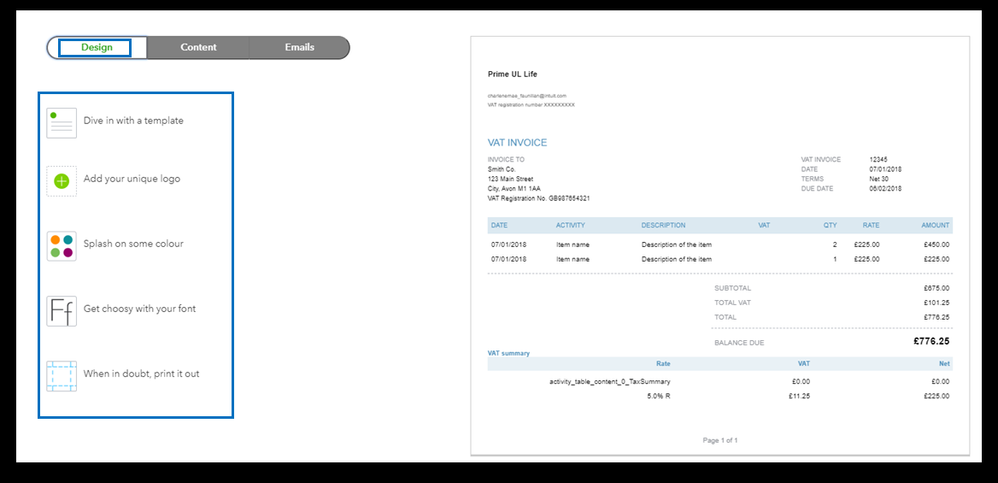
Design or Content tabs
  • Now, you can start customizing and hit the Done option.
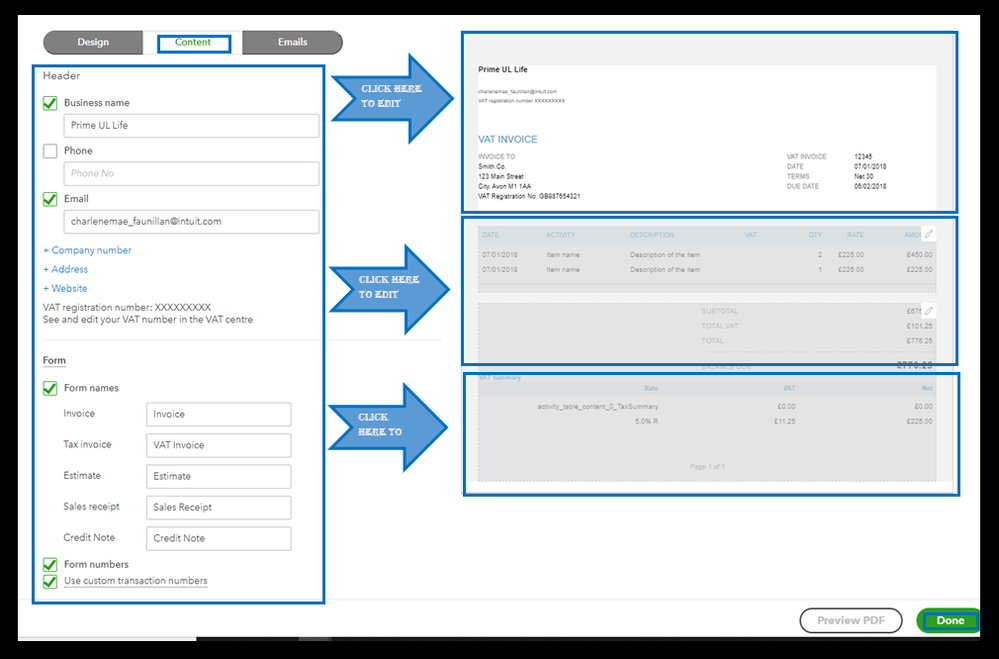
you can start customizing and hit the Done option.

QuickBooks Invoice Template Download Options

You can get your QuickBooks Invoice template download using the QuickBooks Free Invoice generator to download in PDF, Word, or Excel versions. Otherwise, you can download customized templates in QuickBooks Desktop.

Method 1: Download Free Templates (PDF, Excel, Word)

  • Initially, visit the QuickBooks Free Invoice Templates Page.
  • From that page, select a template design that is suitable for your business.
  • After this, pick the desired format (such as PDF, Excel, or Word) to download the file directly to your device.

Method 2: Download Customized Templates in QuickBooks Desktop

  • First, move to the Lists menu and click Templates.
  • Choose the template that you want to customize.
  • After that, select the Download Template option.
  • Complete the process by saving the template to your desktop.

How to Import & Export QuickBooks Invoice Templates In Easy Steps?

The following are the steps to import and export the QuickBooks Invoice template.

Key Considerations:

  • You can’t import customized templates created in the new version of QuickBooks into the older version.
  • Also, you can’t import the templates created in one regional version of QB to another.

Steps to import the template

  • Initially, open the data file you want to import the template into.
  • Go to the Lists menu and choose Templates.
  • From the Templates drop-down menu, click Import.
  • Now, pick the template you wish to import and choose Open.
  • Give a new name to the imported template. Herein, you can either keep its original name or change it.
  • Click OK, and you will notice the imported template on the template list.

Steps to export template

  • First, move to the Lists menu and click Templates.
  • Now, pick the template that you wish to export.
  • Hit the Templates drop-down menu and select Export.
  • Check your file name and select the file location on your computer.
  • When the changes are done, click Save.

What if the QuickBooks Invoice Template is not printing correctly?

The QuickBooks invoice template not printing issue correctly may arise if the template is corrupted or your printer settings are incorrect. So, to fix the issue, perform these steps.

Case 1: Invoice or statements print without lines or borders around fields

You must change the settings in QuickBooks so that you can easily print with or without borders. Here’s what to do to change the line or borders around fields.

  • Initially, go to the File menu and tap on Printer Setup.
  • From the Form drop-down menu, choose the correct form.
  • Now, pick the Blank Paper option.
  • Make sure that the Do not print lines around each field remains unmarked and click OK.

Case 2: Changes don’t save when you save your customized invoice template from an invoice

If you access the template on an invoice and you generate another invoice, make sure to show the regular template again. Also, verify that these settings must remain until you change the template.

  • Click the Customers > Create Invoices option.
  • After this, generate a new test invoice with a standard template.
  • Choose the Template drop-down menu and pick any one of the listed Intuit templates.
  • Provide the Customer and Item details on the invoice.
  • After that, hit the Save and Close option.
  • Select the Customers > Create Invoices to check if the Intuit template option is now visible on the default section.

Best Practices for Invoice Templates in QuickBooks

The following are the key factors that you must consider to set up and customize the QuickBooks Invoice Templates properly.

  • Upload your company logo and make use of consistent colors.
  • Make sure that you have included specific due dates.
  • Enable the QuickBooks Payments so that clients can easily pay via credit card or bank transfer.
  • Make proper use of the detailed descriptions for services or products.

Conclusion

We hope that with the help of this blog, you can easily set up and customize the QuickBooks invoice template. Thus, it helps businesses in creating professional invoices while improving branding and payment management. Moreover, this guide will also help manage invoice layouts, customize fields, troubleshoot invoice template issues, and minimize the billing process.

If you still need any help, then feel free to connect with our Qbookassist professionals for better guidance.

Frequently Asked Questions

1. How to make an invoice template the Default in QuickBooks Online?

For setting a custom default template;

  • First, generate a new sales form and click the Manage icon.
  • Go to the Design drop-down menu and choose Remove Default.
  • Now, hit the Add/Edit to edit the standard template.
  • Click Done to complete the process.

2. Does QuickBooks Online support custom invoice templates?

Yes, QuickBooks Online supports custom invoice templates that allow users to personalize logos, fonts, fields, discounts, and email messages.

3. What file formats are supported for the QuickBooks Invoice template download?

The QuickBooks invoice template is usually downloaded in PDF, Excel, or Word formats, depending on the platform.

4. What is the QuickBooks invoice generator?

QuickBooks invoice generator is a built-in tool that lets businesses create, send, customize, and manage professional invoices.

5. How many invoice templates can I create in QuickBooks?

You can generate multiple invoice templates in QuickBooks for different business uses, customers, or invoice styles.

QuickBooks Error 3008 — The Complete Fix Guide forPayroll, Certificate & Update Failures (2026)

It usually happens at the worst possible time.
Payroll is due tomorrow. You open QuickBooks Desktop, click update, and expect the process to finish in a few minutes. Instead, the download suddenly stops. A warning window appears on the screen:

QuickBooks Error 3008

No clear explanation. No obvious solution.

Now payroll updates fail. QuickBooks online services stop responding. Sync operations freeze halfway through. And suddenly you are searching the internet trying to figure out what exactly went wrong.

For many users, Error 3008 feels random because everything may have worked perfectly fine just a day earlier. In reality, the error is usually triggered by a security verification issue
happening behind the scenes.

QuickBooks relies heavily on:

  • digital certificates
  • encrypted SSL/TLS connections
  • secure Intuit verification services
  • Windows internet settings
  • firewall permissions

If any of these systems fail, QuickBooks blocks the update or synchronization process for security reasons.

The good news is this:

QuickBooks Error 3008 is completely fixable in most cases.
At our support desk, we commonly see this error after:

  • Windows updates
  • antivirus software updates
  • expired certificates
  • incorrect system time settings
  • firewall configuration changes
  • damaged QuickBooks installations

This guide explains:

  • what QuickBooks Error 3008 actually means
  • why it happens
  • the exact symptoms to look for
  • how to identify the root cause quickly
  • 11 detailed troubleshooting methods
  • Windows 11-specific fixes
  • prevention steps to stop the error from returning

Most users solve the problem within 15–30 minutes once the correct cause is identified.

What Is QuickBooks Error 3008?

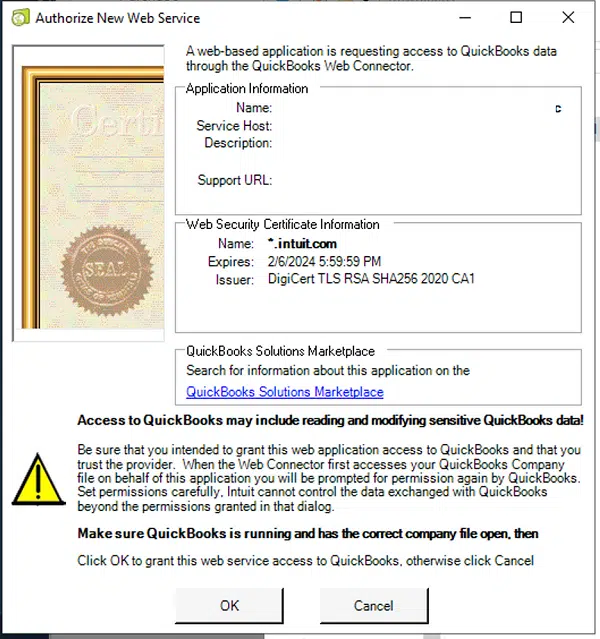
QuickBooks Error 3008 is a certificate verification and connection authentication error that appears when QuickBooks cannot securely communicate with Intuit services during payroll updates, synchronization, or software updates.

The error commonly appears during:

  • payroll update downloads
  • QuickBooks Desktop updates
  • QuickBooks Sync Manager operations
  • online banking synchronization
  • Intuit service authentication
  • tax table downloads

In many situations, QuickBooks attempts to validate a digital certificate before allowing a secure connection or installing an update.

If the verification fails, QuickBooks stops the operation immediately and triggers Error 3008.

The issue is usually connected to:

  • expired or invalid certificates
  • SSL/TLS problems
  • firewall interference
  • blocked QuickBooks services
  • corrupted Windows internet settings
  • antivirus restrictions
  • damaged QuickBooks installation files One important thing to understand:

QuickBooks Error 3008 does NOT damage your company file or financial records.

Your accounting data remains safe. The problem only affects:

  • secure connections
  • update verification
  • synchronization services
  • payroll downloads

Common Symptoms of QuickBooks Error 3008

Before the error fully appears, users often notice smaller warning signs. Recognizing these symptoms early can help identify the root cause faster.

Most Common Symptoms

  • Payroll updates freeze midway
  • QuickBooks crashes during updates
  • QuickBooks Sync Manager stops responding
  • Error 3008 popup appears repeatedly
  • Online services disconnect unexpectedly
  • Tax table downloads fail
  • QuickBooks becomes unusually slow
  • Banking synchronization fails
  • Certificate or security warnings appear
  • QuickBooks update verification fails
  • “Unable to establish secure connection” messages appear
  • Update progress bar gets stuck indefinitely

If multiple symptoms appear together, the issue is usually related to Windows security settings or blocked secure communication. Some users also report QuickBooks Desktop keeps crashing before Error 3008 appears consistently during updates.

What Actually Causes QuickBooks Error 3008?

Several technical problems can trigger Error 3008, but seven causes account for the majority of cases.

Understanding the exact cause saves significant troubleshooting time.

Cause 1. Expired or Invalid Digital Certificate

This is the most common reason behind QuickBooks Error 3008. QuickBooks uses digital certificates to verify:

QuickBooks Error 15225 digital signature verification
  • payroll updates
  • tax table downloads
  • QuickBooks Desktop updates
  • Intuit service authentication

Similar certificate validation problems may also lead to QuickBooks Error 15225 when QuickBooks cannot verify payroll update files securely.

If the certificate becomes:

  • expired
  • corrupted
  • missing
  • untrusted

QuickBooks immediately blocks the process for security reasons. This often happens after:

  • Windows updates
  • certificate store corruption
  • interrupted QuickBooks updates
  • system migration

Cause 2. Firewall or Antivirus Blocking QuickBooks

Windows Defender and third-party antivirus software frequently interfere with QuickBooks services.

Security software may block:

  • QBW32.exe
  • QBUpdate.exe
  • Intuit Sync Manager
  • payroll authentication requests
  • encrypted SSL traffic

When QuickBooks cannot complete secure communication with Intuit servers, Error 3008 appears.

Common antivirus programs associated with the issue include:

  • Norton
  • McAfee
  • Avast
  • Bitdefender
  • Kaspersky

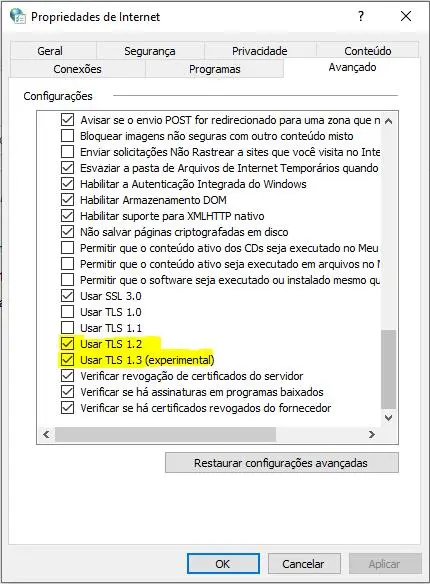
Cause 3. Incorrect SSL or TLS Settings

QuickBooks relies on Windows internet security protocols.

Enable TLS and SSL settings

If SSL or TLS settings are disabled, outdated, or corrupted, QuickBooks cannot establish secure encrypted connections.

TLS 1.2 is especially important for modern QuickBooks services. Improper protocol settings often occur after:

  • browser modifications
  • Windows upgrades
  • network policy changes
  • internet security customization

Cause 4. Internet Explorer Configuration Problems

Even though Internet Explorer is officially retired, QuickBooks Desktop still depends on its internet settings internally.

Incorrect:

  • trusted site settings
  • security zones
  • browser certificates
  • LAN configurations

can all prevent secure communication with Intuit servers.

This issue is extremely common on Windows 11 systems. In multi-user environments, unstable office networks may also create connection problems similar to QuickBooks Error H202.

Cause 5. Corrupted QuickBooks Installation

A damaged QuickBooks installation can break update verification mechanisms. This may happen because of:

  • interrupted installations
  • incomplete updates
  • damaged registry entries
  • missing QuickBooks components
  • system crashes

When certificate verification modules become corrupted, Error 3008 may appear repeatedly. Severe installation corruption may eventually lead to situations where QuickBooks won’t open properly after startup.

Cause 6. Incorrect Windows Date and Time

Digital certificates rely heavily on accurate system time.

If the Windows clock or timezone is incorrect, the operating system may incorrectly treat a valid certificate as expired.

This is one of the fastest and easiest fixes for Error 3008.

Cause 7. Malware or Security Infection

Malware sometimes modifies:

  • internet settings
  • proxy settings
  • Windows certificates
  • QuickBooks services
  • network configurations

This can interrupt secure QuickBooks communication and trigger Error 3008.

Quick Diagnosis Table

Your SituationBest Starting Solution
Payroll update failedInstall digital certificate
Error started after antivirus updateFirewall C antivirus
settings Sync Manager stopped workingSSL/TLS settings
Incorrect Windows time Fix system clock
Multiple QuickBooks errors togetherTool Hub repair
Windows 11 issueWindows 11 compatibility
QuickBooks crashes during updatesfixes Diagnostic Tool
Error persists after updateClean reinstall

How to Identify QuickBooks Error 3008 in Logs

Most troubleshooting guides never mention QuickBooks logs, but they can reveal exactly where the failure occurs.

QuickBooks stores update and verification errors inside:

QBWin.log

Steps to Access the Log

  1. Press:

Windows + R

  1. Type:

%appdata%\Intuit\QuickBooks

  1. Press Enter
  2. Open:

QBWin.log

  1. Search for:

3008

or:

LVL_ERROR

The surrounding log entries often reveal:

  1. certificate failures
  2. SSL issues
  3. blocked services
  4. firewall interruptions
  5. synchronization errors

This is especially useful if standard troubleshooting steps fail.

How to Fix QuickBooks Error 3008

Before beginning any troubleshooting:

Create a Company File Backup

Go to:

File > Back Up Company > Create Local Backup

Although Error 3008 does not affect company data, creating a backup before troubleshooting is always recommended.

Solution 1. Install the QuickBooks Digital Certificate

This directly addresses certificate verification failures.

Step-by-Step Instructions

  1. Close QuickBooks completely
  2. Open File Explorer
  3. Navigate to:

C:\Program Files\Intuit\QuickBooks

  1. Locate:

QBW32.exe

  1. Right-click → Properties
  2. Open the:

Digital Signatures

tab

  1. Select:

Intuit Inc

  1. Click:
    • Details
    • View Certificate
    • Install Certificate
  2. Follow the Certificate Import Wizard
  3. Click Finish
  4. Restart the computer

After restarting, reopen QuickBooks and retry the payroll or update process.

Why This Works

Installing the certificate manually helps Windows recognize Intuit as a trusted publisher, allowing QuickBooks to verify update files successfully.

Solution 2. Add Intuit as a Trusted Website

QuickBooks uses Windows internet security settings internally. If Intuit servers are not trusted, secure communication may fail.

Steps

  1. Press:

Windows + R

  1. Type:

inetcpl.cpl

  1. Press Enter
  2. Open the:

Security

tab

  1. Select:

Trusted Sites

  1. Click:

Sites

  1. Add these URLs:

https://www.intuit.com https://payroll.intuit.com https://qbo.intuit.com

  1. Click Close → Apply → OK

Restart QuickBooks afterward.

Solution 3. Correct Windows Date and Time

This fix resolves certificate validation failures surprisingly often.

Steps

  1. Right-click the Windows clock
  2. Select:

Adjust Date/Time

  1. Enable:
    • Set time automatically
    • Set timezone automatically
  2. Verify:
    • correct date
    • correct time
    • correct timezone

Restart QuickBooks and test the update.

Why This Matters

Certificates contain expiration timestamps.

If Windows time is incorrect, the system may incorrectly reject valid certificates.

Solution 4. Enable TLS and SSL Security Protocols

QuickBooks requires secure SSL/TLS communication.

Steps

  1. Open:

inetcpl.cpl

  1. Go to:
    • Advanced tab
    • Security section
  2. Enable:
    • TLS 1.0
    • TLS 1.1
    • TLS 1.2
    • SSL 3.0
  3. Disable:

Do not save encrypted pages to disk

  1. Click Apply → OK
  2. Restart the computer

Solution 5. Run QuickBooks as Administrator

Windows permissions can block update verification.

Steps

  1. Close QuickBooks
  2. Right-click the QuickBooks icon
  3. Select:

Run as Administrator

  1. Open:

Help > Update QuickBooks Desktop > Get Updates

Administrator permissions often resolve update-related access restrictions.

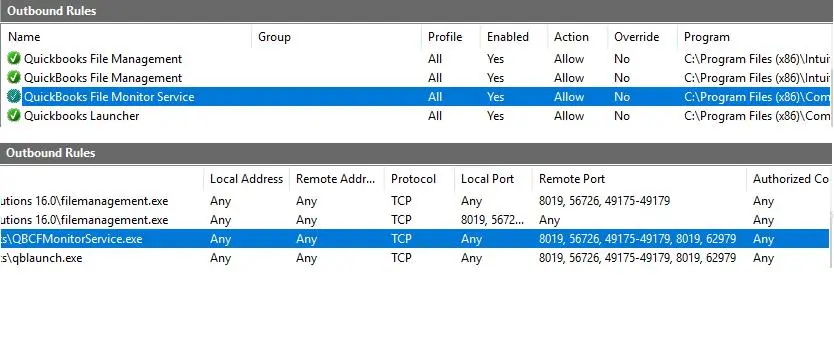
Solution 6. Configure Firewall and Antivirus Exceptions

Security software is one of the biggest causes of Error 3008.

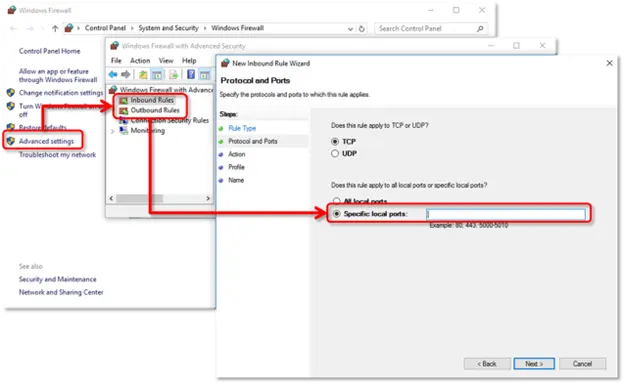
Set up firewall and security settings for QuickBooks Desktop

Temporarily Disable Firewall for Testing

  1. Open:

Windows Security

  1. Go to:

Firewall & Network Protection

  1. Temporarily disable the firewall
  2. Retry the QuickBooks update

If the update succeeds, the firewall is causing interference.

Add QuickBooks Exceptions

Create exceptions for:

ExecutablePurpose
QBW32.exeMain QuickBooks process
QBUpdate.exeUpdate service
QBDBMgrN.exeDatabase manager
QBCFMonitorService.exeCompany file
monitoring IntuitSyncManager.exeSync services

Solution 7. Clear SSL State

Corrupted SSL cache can repeatedly interrupt secure connections.

Steps

  1. Open:

inetcpl.cpl

  1. Go to:

Content

tab

  1. Click:

Clear SSL State

  1. Restart Windows Retry the update afterward.

Solution 8. Update Windows Security Certificates

Microsoft distributes root certificate updates through Windows Update. Outdated systems frequently experience certificate verification failures.

Steps

  1. Open Windows Settings
  2. Go to:

Windows Update

  1. Install:
    • all available updates
    • optional security updates
    • certificate updates
  2. Restart the computer

This fix is especially important on Windows 11.

Solution 9. Run QuickBooks Tool Hub

The QuickBooks Tool Hub repairs damaged installation components automatically.

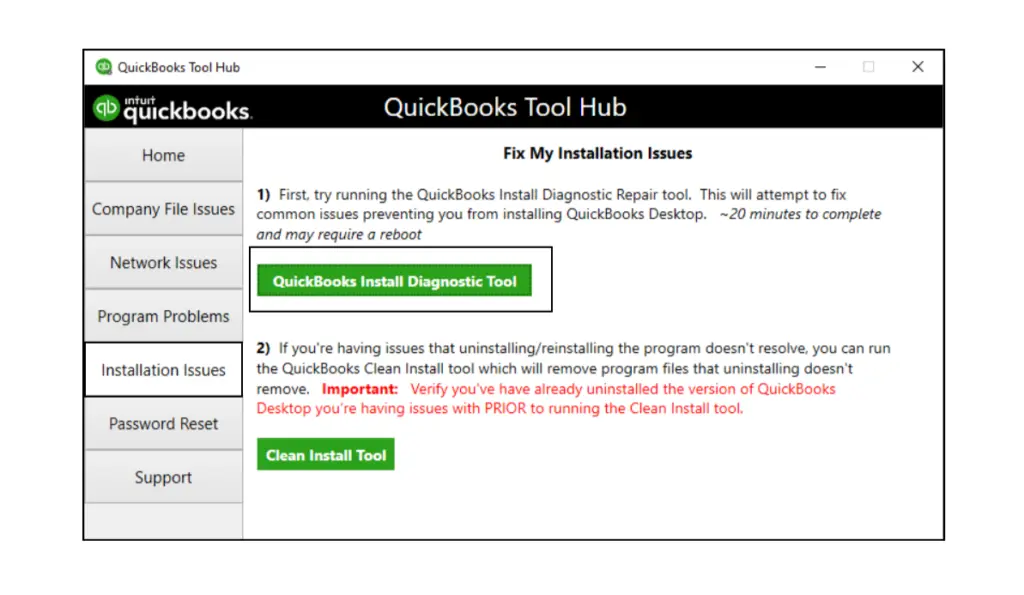
QuickBooks Tool Hub installation issues repair utility

Steps

  1. Download QuickBooks Tool Hub from Intuit
  2. Install the program
  3. Open: Installation Issues
  4. Run: QuickBooks Install Diagnostic Tool
  1. Allow the scan to finish
  2. Restart Windows The tool repairs:
    • .NET Framework
    • Visual C++ components
    • MSXML files
    • QuickBooks installation corruption

You can download the latest version of QuickBooks Tool Hub directly from Intuit’s official QuickBooksTool Hub page.

Solution 10 . Update QuickBooks in Safe Mode

Safe Mode disables unnecessary background programs. This helps identify third-party interference.

Steps

  1. Restart Windows
  2. Enter:

Safe Mode with Networking

  1. Open QuickBooks
  2. Retry the update

If the update works successfully in Safe Mode, another background application is interfering with QuickBooks.

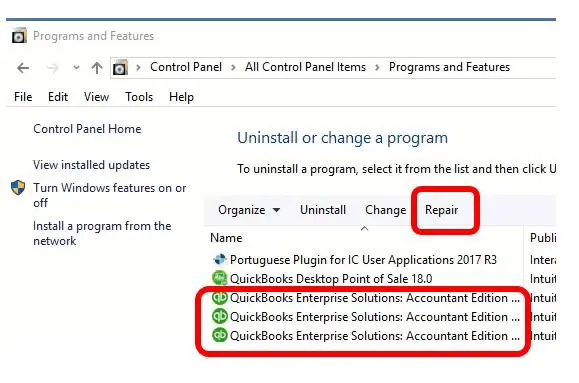
Solution 11. Perform a Clean Reinstall of QuickBooks Desktop

If every other solution fails, perform a complete clean reinstall.

Step 1 — Uninstall QuickBooks

Go to:

Control Panel > Programs and Features

Select QuickBooks → Uninstall.

Step 2 — Rename Old QuickBooks Folders

Rename these folders by adding:

OLD

to the end.

Common locations:

C:\Program Files\Intuit C:\ProgramData\Intuit C:\Users\[username]\AppData\Local\Intuit

Step 3 — Run Clean Install Tool

Inside QuickBooks Tool Hub:

Installation Issues > Clean Install Tool

Step 4 — Reinstall QuickBooks

Download a fresh installer directly from Intuit. Run the installer as Administrator.

After installation:

  • immediately update QuickBooks
  • verify payroll downloads
  • test synchronization services

If system corruption becomes more serious over time, users may eventually encounter

QuickBooks Unrecoverable Error messages during startup or company file access.

QuickBooks Error 3008 on Windows 11

Windows 11 introduces additional compatibility issues.

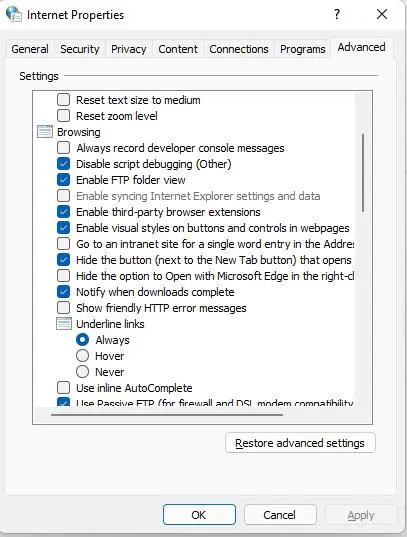
Essential Network Settings and Tasks in Windows

The retirement of Internet Explorer created problems because QuickBooks still relies on IE internet settings internally.

Many Windows 11 users cannot even open Internet Explorer directly.

Access Internet Settings Without IE

  1. Press:

Windows + R

  1. Type:

inetcpl.cpl

  1. Press Enter

This opens Internet Properties directly.

Important Windows 11 Fixes

Prioritize these solutions first:

  1. Windows Update
  2. TLS settings
  3. certificate updates
  4. administrator permissions
  5. firewall configuration
  6. SSL state clearing

These solve most Windows 11 Error 3008 cases.

How to Prevent QuickBooks Error 3008

Keep QuickBooks Updated

Regular updates reduce certificate compatibility problems.

Enable Automatic Windows Updates

Security certificate updates arrive through Windows Update.

Add QuickBooks to Antivirus Whitelist

Prevent future interference before it happens.

Keep Windows Time Accurate

Enable automatic time synchronization.

Avoid Unstable Internet Connections

Interrupted secure connections frequently trigger update verification failures.

Run Payroll Updates Regularly

Long gaps between updates sometimes cause certificate mismatches.

Final Thoughts

QuickBooks Error 3008 looks complicated because the actual problem happens behind the scenes during secure verification.

But the root cause is usually one of a few issues:

  • invalid certificates
  • blocked SSL/TLS connections
  • firewall interference
  • outdated Windows security settings
  • damaged QuickBooks components Start with the simplest fixes first:
  • correct Windows time
  • install the QuickBooks certificate
  • enable TLS settings
  • update Windows
  • check firewall permissions

Most users solve the issue quickly once the exact cause is identified.

If the error continues even after all troubleshooting methods, deeper Windows security corruption or QuickBooks installation damage may require advanced diagnostics.

Frequently Asked Questions

What is QuickBooks Error 3008?

QuickBooks Error 3008 is a certificate and secure connection verification failure that interrupts updates, payroll downloads, or synchronization services.

Does Error 3008 damage my company file?

No. The error only affects secure connections and update verification. Your financial records remain safe.

What is the fastest fix for Error 3008?

The fastest solutions are:

  • correcting system date and time
  • installing the QuickBooks certificate
  • enabling TLS 1.2

These resolve many cases immediately.

Why does Error 3008 appear during payroll updates?

Payroll updates require secure certificate authentication with Intuit servers. If QuickBooks cannot validate the connection, the update fails.

Can antivirus software cause QuickBooks Error 3008?

Yes. Antivirus and firewall software commonly block QuickBooks update services and secure SSL traffic.

Is Error 3008 common on Windows 11?

Yes. Windows 11 internet security and certificate changes frequently contribute to the error.

When should I contact QuickBooks support?

Seek professional support if:

  • all troubleshooting steps fail
  • payroll deadlines are approaching
  • multiple workstations show the same error
  • QuickBooks crashes continuously
  • certificate problems keep returning

How to Get QuickBooks Training For Both Online & Desktop Versions?

QuickBooks has become the foremost choice of small-to-medium-scale businesses. With the right QuickBooks training, you can manage finances efficiently, reduce errors, and improve overall business performance.

Whether you want to learn QuickBooks Online, QuickBooks Desktop, or bookkeeping, there are training programs available for every skill level. From beginners to advanced users.

In this guide, you’ll learn how to choose the best QuickBooks training- whether online or in-person, explore certification options, and understand how to become a certified QuickBooks ProAdvisor based on your goals, and budget.

What are the benefits of QuickBooks Training?

QuickBooks training helps both beginners and professionals understand bookkeeping, invoicing, payroll, and financial reporting.

1. Enhance Financial Accuracy & Organization-

With proper QuickBooks training, you can minimize the errors that occur during data entry. Also, it ensures consistent monitoring of expenses and revenues.

2. Improvised Reporting & Insight-

You can generate financial reports such as profit & loss and cash flow statements to make better business decisions.

3. Time-Saving Automation-

Users can also learn how to automate manual tasks such as invoicing, bank reconciliations, and report generation. Also, it makes some free time to concentrate on strategic business growth.

4. Maximize Productivity & Tax Readiness-

It gets easier for the users to handle payroll, inventory, and tax compliance more efficiently with proper training. This will make the tax season less stressful and more accurate.

5. Get Access to Support & Resources-

With the QuickBooks Certification, you can get access to exclusive training materials, webinars, and a “Find a ProAdvisor: directory to get more clients.

6. Professional Certification & Credibility-

Earning the QuickBooks Certification will give you a clear signal to your employers and clients about your proficiency. As a result, it will eventually maximize the chances of job prospects.

7. Improves Personal Financial Literacy-

Getting a proper understanding of QuickBooks for non-accountants helps improve personal financial management. Thus, it helps in better decision-making skills.

QuickBooks Training For Different Levels

The QuickBooks training is available for various skill levels that vary from beginner to advanced. Herein, we have discussed the different training levels.

1. Beginner/Fundamental Level-

  • QuickBooks training for beginners mainly focuses on initial setup, navigating the dashboard, generating the company file, managing vendors, and basic invoicing.
  • Moreover, it’s best for the new business owners or users who have limited accounting software experience.

2. Intermediate Level-

  • Its main focus is on handling sales tax, payroll basics, bank reconciliation, and customized reporting.
  • For this, you will get Intuit Advisory Academy Certification prep courses.

3. Advanced Level-

  • This training level concentrates on advanced inventory management, multi-currency, advanced reporting, and preparing for accountant-level tasks.
  • You need an Advanced Certification Training.

Who Should take QuickBooks Training?

QuickBooks training is not only for accountants and finance professionals. But it can be used by anyone who is engaged in the financial management of a business, who can benefit from QuickBooks Training.

1. Small Business Owners-

Managing finances alone can be challenging. QuickBooks helps track income, expenses, and business growth. However, learning the QuickBooks training for small business owners will help them in the long run to handle business finances easily.

2. Accountants-

Having an in-depth knowledge of the QuickBooks software is important for accountants to handle the company’s accounts easily. However, there are many businesses that want their accountants to learn QuickBooks training for better financial management.

3. Finance Professionals-

QuickBooks provides powerful tools for handling financial data and generating reports, which makes it an important tool for finance professionals. By learning about QuickBooks, finance professionals can get useful insights regarding the company’s performance.

4. Students-

Students can also get the benefit of learning QuickBooks to gain a better insight into finance or accounting. Moreover, it also provides hands-on experience with the popular financial software that can enhance your job prospects.

Explaining the Different Types of QuickBooks Training

There are numerous ways through which you can get QuickBooks training.

1. Online Instructor-Led Training-

You can get access to the interactive, live classes led by QuickBooks experts that can help you learn in real-time. Also, you can get the benefits such as instant guidance, a chance to ask questions, and hands-on practice during the training.

2. Self-paced On-Demand Courses-

This training is suitable for busy professionals, with self-paced courses that let you learn QuickBooks according to your own schedule. Using the detailed video tutorials and practice modules, these courses are the best fit for learners who require flexibility.

3. In-Person Workshops-

In-person workshops provide an in-depth experience where learners can practice in a focused environment. You must consider that these workshops need travel, and scheduling gets more convenient. Anyone who is seeking QuickBooks, ONLC provides training in all formats.

How to get QuickBooks training near me?

Here we have described how to get the upcoming live QuickBooks classes near you.

1. 2-day QuickBooks Classes-

Date & TimeClass Title
May 4-5 (9:30 AM- 5:30 PM)How to Use QuickBooks Online?
May 6-7 (9:30 AM- 5:30 PM)How to Use QuickBooks Online?
May 11-12 (9:30 AM- 5:30 PM)How to Use QuickBooks Online?
May 13-14 (9:30 AM- 5:30 PM)How to Use QuickBooks Online?
How to Use QuickBooks Desktop?
May 18-19 (9:30 AM- 5:30 PM)How to Use QuickBooks Online?
May 20-21 (9:30 AM- 5:30 PM)How to Use QuickBooks Online?
May 26-27 (9:30 AM- 5:30 PM)How to Use QuickBooks Online?
May 27-28 (9:30 AM- 5:30 PM)How to Use QuickBooks Desktop?
Jun 1- 2 (9:30 AM- 5:30 PM)How to Use QuickBooks Online?
June 3- 4 (9:30 AM- 5:30 PM)How to Use QuickBooks Online?
Jun 8 – 9 (9:30 AM- 5:30 PM)How to Use QuickBooks Online?
Jun 10 – Jun 11 (9:30 AM- 5:30 PM)How to Use QuickBooks Desktop?
How to Use QuickBooks Online?
Jun 15- Jun 16 (9:30 AM- 5:30 PM)How to Use QuickBooks Online?
Jun 17 – Jun 18 (9:30 AM- 5:30 PM)How to Use QuickBooks Online?
Jun 22 – Jun 23 (9:30 AM- 5:30 PM)How to Use QuickBooks Online?
Jun 24 – Jun 25 (9:30 AM- 5:30 PM)How to Use QuickBooks Desktop?
How to Use QuickBooks Online?
Jul 8 – 9 (9:30 AM- 5:30 PM)How to Use QuickBooks Desktop

2. Live Mini Classes

Date & TimeClass Title
Fri 5 / 1 (10:30Am – 11:30AM)Inventory Management for Online
Fri 5 / 1 (12:30 PM-3:30 PM)Payroll for Online
Mon 5 / 4 (1:30PM – 4:30 PM)Construction for Online
Mon 5 / 4 (10:30AM – 12:30 PM)QuickBooks Online Advanced
Tue 5 / 5 (10:30 AM- 2:30 AM)QuickBooks For Business Owners
Wed 5 / 6 (10:30 AM – 1:00 PM)Financial Reporting & Analysis for Online
Wed 5 / 6 (2:30 PM- 4:30 PM)Improve Your Bookkeeping with AI Agents
Thu 5 / 7 (10:30 AM – 12:30 PM)Job Costing For Online
Fri 5 / 8 (9:30 AM- 1:30 PM)Bookkeeping Professional Part 1
Mon 5 / 11 (10:30 AM – 1:30 PM)How to Clean Up your Books for Online?
Tue 5 / 12 (10:30 AM – 11:30 PM)Accounts Receivable for Online
Fri 5 / 15 (10:30 AM – 11:30 AM)Inventory Management For Online

Explore QuickBooks Training Plans As a Beginner

Look at the pricing chart of the different QuickBooks training plans and pick the right one according to your suitability.

Learner Plan
Just Training (1 User)
Certification Plan
Training + Certification (1 User)
Team Plan
Training + Certification (2-5 Users)
$59995$69995$99995
Get 30 days of free Live one on one help + 50% monthly for one on one helpGet 30 days of free Live one on one help + 50% monthly for one on one helpGet 30 days of free Live one on one help + 50% monthly for one on one help
Live 2 day QuickBooks classesLive 2 day QuickBooks certification classesLive 2 day QuickBooks certification classes
100+ Self-paced and live classes100+ Self-paced and live classes100+ Self-paced and live classes
Live 1-on-1 HelpLive 1-on-1 HelpLive 1-on-1 Help

Training for all 3 QuickBooks certifications — includes 3 free exams ($390 value)Training for all 3 QuickBooks certifications — includes 3 free exams per user ($1950 value)

Different Ways to Learn QuickBooks

Let’s learn the different ways to learn QuickBooks.

Learn Live-Learn Anytime-Learn 1 on 1 Help-
Structured, Scheduled classesFlexible learning from anywhere and anytimeLive and personalized support.
Real-Time InstructorSet your own scheduleReal time problem solving with an expert
Best for guided learningBest for independent learnersPerfect for direct and expert guidance.

Get Expertise with Different QuickBooks Certifications

By getting the right QuickBooks certification, you can give your clients and employers the assurance that you have the required skills.

1. QuickBooks Online Certification

  • Upgrade your resume and become QuickBooks certified in QuickBooks Online.
  • You can learn QuickBooks by taking a live class or according to your own preference.
  • Get your official Intuit QuickBooks certification.

2. QuickBooks Desktop Certification

  • You can take your career to the next level by getting the certification in QuickBooks Desktop.
  • Get a better understanding in a live class or on your own schedule.
  • By clearing a 47-question multiple-choice exam, you can earn your Desktop Certification.

3. Bookkeeping Professional Certification

  • You must know the basics of accounting, such as debits and credits, and what different account types are for.
  • Get a better understanding of the live class.
  • Clear the 60-question exam to clear for the Bookkeeping Professional Certificate.

How to Choose the Right QuickBooks Training?

You must consider the following factors while choosing the right QuickBooks training.

1. Your Goals-

Firstly, your main goal for which you want to learn QuickBooks must be clear. If you are new to QuickBooks software, then start the Intuit QuickBooks training with a basic course such as QuickStart or Desktop On-Demand Comprehensive. For more advanced users, consider choosing a course such as Online Advanced for in-depth training on certain features.

2. Availability-

You must look out for the schedule and availability while selecting a training option. Instructor-led courses will provide a more structured learning experience, while self-study options give more flexibility.

3. Budget-

Making a good investment in training will not only improve efficiency but also productivity in the long run. You must identify how much you are willing to spend and then pick a course that best fits your budget and goals.

4. Your Current Level-

It’s best that beginners begin with introductory courses. At the same time, the experienced users must go with the advanced learning.

5. Preferred Learning Style-

Make sure to pick the instructor-led classes if you want to engage in interactive training or self-study if flexibility is important.

Conclusion

In today’s time, it’s important to learn QuickBooks for managing your business finances, bookkeeping, and other bank-related tasks easily. However, by reading this post, you will know the different types of QuickBooks training, QuickBooks certifications, and how to make the right QuickBooks training.

For any further guidance, you can consult with the professionals available at Qbookassist instantly and get all your answers.

Frequently Asked Questions :-

Question 1: What is the best way to learn QuickBooks?

Ans. The best way to learn QuickBooks entirely depends on your preference. You can select live classes, self-paced courses, or personalized live help.

Question 2: How long does it take to learn QuickBooks?

Ans. You can learn the basics of QuickBooks within one week. However, how quickly you learn QuickBooks depends on your pace and the learning style you choose.

Question 3: Who is QuickBooks Certification for?

Ans. QuickBooks certification is used by business owners, accountants, bookkeepers, accounting staff, consultants, and job seekers.

Question 4: Is QuickBooks Certification worth it for beginners?

Ans. Yes, QuickBooks Certification is a perfect fit for beginners to help enhance their confidence and support.

Question 5: What is the best QuickBooks certification to get?

Ans. The best QuickBooks certification for beginners is QuickBooks Online Certification.

Question 6: What if I have questions during or after my QuickBooks Accounting training?

Ans. ONLC provides support for all its students. You can connect with any of the instructors who are available to provide answers to your questions during live sessions. Moreover, you can also take help from additional resources such as practice exercises and webinars provided for continued learning.

How to Setup QuickBooks For Multiple Businesses? An Easy Guide

Managing multiple businesses can be challenging, especially when it comes to tracking finances efficiently. QuickBooks enables you to handle QuickBooks For Multiple Businesses using one login by generating separate company files, each requiring its own paid subscription. Moreover, this setup also allows switching between entities, streamlined reporting, and data segregation for each business.

In this guide, we have covered everything from setting up new companies to choosing the best QuickBooks solution for multiple businesses.

How to Add another company to QuickBooks Online?

You can add multiple companies within a single QuickBooks Online account to handle different businesses using the same login credentials.

Add a New Company

Perform the following steps to create a new company file within your existing account.

  1. Visit the QuickBooks Online pricing page.
  2. After this, choose the subscription plan you want for your new company.
  3. If prompted for “Adding a company to an existing account?”, tap on Sign In.
  4. Now, insert the user ID and password you use to access the current QuickBooks account.
  5. When you are in the Choose your company section, hit the Create a New Company option.

With this, you now have a new company file linked with your existing account.

Switch between companies

After having multiple companies, you can easily switch between them to handle them separately.

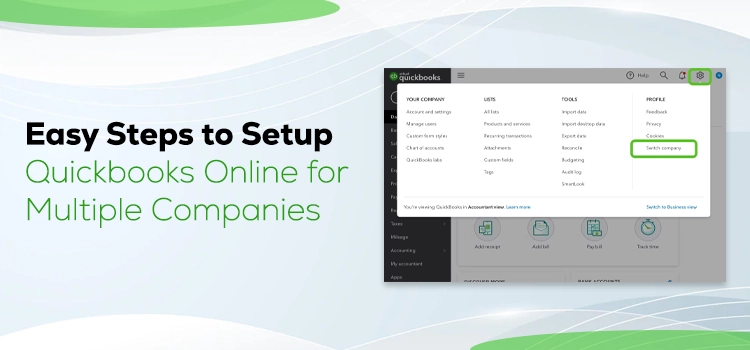
  1. Initially, choose the Settings icon.
  2. Click the Switch Company option.
  3. Now, pick the company file on which you wish to work.

Manage Multiple Companies

No matter whether your company shares a sign-in, your data remains completely separate.

1. Users- The users you have set up in one company won’t automatically have access to others. For that, you have to invite them to each company separately.

2.Online Banking- The bank or credit card accounts that are linked with one company aren’t reflected in another. For that, you have to connect accounts separately for each file.

3. Lists- You can also move vendors, customers, inventory, and charts of accounts to your new company to save precious time. If any future changes are made to a list in a company, it will not be updated in the other.

Can you use QuickBooks Online for multiple businesses?

QuickBooks Online enables you to create multiple companies under one account. But you may require a separate paid subscription for each of the companies you add. Also, you can access them all with the same sign-in credentials. Perform the following steps to use one user ID to access multiple companies in QuickBooks Online.

Send an Invite

You first need to send an invite to the email address of the person with whom you wish to access all your companies. This will be known as “Email A,” and the email you don’t want to access any longer is “Email B”.

Important Tip:

  • Only the company admin has the right to send an invite.
  • Also, verify that you have a valid Intuit account with email A. If you don’t have it, first set it up.
  • Firstly, log in to one of your QuickBooks Online companies, which you can use with Email B.
  • After this, send an Invite email A to the company.
    • Note: If you get a user limit message, it’s because QBO has a maximum number of users depending on your subscription.
  • Now, choose a user type. If you want Email A to handle other users and company details, tap on Company Admin.
  • Next, access your inbox for email A and choose the link you received to accept the invite.

With this, you can now log in to your company using email A.

How to Manage Multiple Companies in QuickBooks Enterprise?

QuickBooks Enterprise lets you create and manage multiple company files, each with its own users and access permissions. You can allot certain roles and permissions to users by restricting their access to certain areas and activities within each data file. This ensures that the clients only have the authority to the necessary features and information.

Perform these steps to add a user and assign it a role.

  1. Initially, head to the Company menu and hit the Users tab.
  2. Choose the Set Up Users and Roles option.
  3. Now, provide the admin password and hit OK.
  4. Browse to the User List tab and select New.
  5. After this, insert a username and an optional password.
  6. When you are in the Available Roles section, select the roles for the user and hit the Add option.
  7. At last, select the OK option to conclude.

How to Setup QuickBooks For Multiple Businesses?

You can easily set up QuickBooks for multiple businesses by performing the steps instructed below.

QuickBooks Desktop Setup

  1. Initially, launch your QuickBooks Desktop software.
  2. Move to the File menu and click the New Company option.
  3. After this, set up “Express Start” to create a new company file with its unique name, vendor, and customer lists.
  4. Keep your books of accounts separate by saving each business with a unique file name on your computer.

How to Use QuickBooks for multiple businesses?

To access QuickBooks for multiple businesses, you can access QuickBooks Desktop or QuickBooks Online according to your requirements.

QuickBooks Online for multiple businesses

1. Sign Up for Separate Accounts.

  • Initially, log in to your QuickBooks Online account.
  • After this, sign out of the current company and hit Add a New Company to create another business.
  • Now, resume the same process for each business.

2. Switch between businesses

  • You have the option to switch between different QBO companies by logging in and out of each one, using different login details.

3. Manage each business independently

You can maintain separate financial data, such as income, expenses, payroll, and taxes, for each business.

Using QuickBooks Desktop for Multiple Businesses

By accessing the QuickBooks Desktop, you can manage multiple businesses within one installation by generating separate company files for each business.

1. Create a new Company File for each business

  • Initially, access the QuickBooks Desktop and click Create a New Company from your main screen.
  • Now, set up your business details, consisting of name, industry, tax details, and charts of accounts.
  • You need to repeat the same steps for each business you manage.

2. Switch between company files

  • Firstly, open QuickBooks Desktop and switch between your business files without exiting from the software.
  • Move to the File menu, click Open Previous Company. Alternatively, use the Company menu to pick a different business file.

3. Track finances separately

You need to maintain the independent financial records, tax reports, and transactions for each business.

4. Save backup

It is necessary to take a backup of each company file to safeguard your business data.

Conclusion

We hope that now you have understood how QuickBooks for multiple businesses helps in handling multiple companies easily. By applying the steps explained above, you can easily set up QuickBooks for multiple businesses and manage the finances. If you still need any help, then you can reach out to our Qbookassist professionals and fix the issue.

Frequently Asked Questions:-

Question 1: Can I run two businesses on one QuickBooks account?

Ans. Yes, you can manage two businesses on one QuickBooks Online login, but it needs a separate subscription for each company.

Question 2: Which is the best QuickBooks for multiple businesses?

Ans. QuickBooks Desktop Enterprise is a one-stop solution that lets you work more efficiently across all your companies.

Question 3: What are the QuickBooks alternatives for multiple businesses?

Ans. The following are the QuickBooks alternatives for multiple businesses.

  • Xero
  • Sage Intacct
  • Gravity Software

Question 4: Which is the best accounting software for multiple businesses?

Ans. Sage Intacct and NetSuite are for large-scale businesses, whereas Xero and QuickBooks are for medium-scale businesses.

Question 5: Can you use QuickBooks for multiple businesses?

Ans. Yes, QuickBooks can be used for multiple businesses.

Question 6: Can you have multiple companies in QuickBooks Desktop?

Ans. Yes, you can manage multiple companies in QuickBooks Desktop by separating company files (.qbw) for each business. But you can’t merge them into one file, but you can switch between them easily.

QuickBooks Error 15225 — The Complete Fix Guide for Payroll and Desktop Update Failures

Payroll runs on Friday. It is Wednesday afternoon. You open QuickBooks, click Get Updates, and watch the progress bar move — and then stop. Dead. Replaced by a message that makes absolutely no sense at the worst possible moment:

“QuickBooks cannot verify the digital signature of the update file.”

Error 15225.

Your payroll update failed. Your software is now sitting on an outdated version. And you have no idea what a digital signature is or why QuickBooks suddenly cannot verify one.

This is the reality of QuickBooks Error 15225 — and the reason it feels so disproportionately stressful is that it ambushes you during what should be the most routine task in the world. You clicked update. That is all you did. And now you are stuck.

At QBookAssist, we handle this error regularly for small business owners, accountants, and bookkeepers across the US. We have seen it on brand-new Windows 11 machines. We have seen it on systems that were updating perfectly fine last week. We have seen it block payroll the day before payday — which, as anyone running a business knows, is about the worst timing an error can have.

The good news is this — QuickBooks Error 15225 has a clear set of causes and a clear set of fixes. Eleven of them. And the vast majority of users are back running their updates within thirty minutes.

This guide covers every fix, every cause, and a few solutions that no other guide on the internet currently covers — including a specific section for Windows 11 users where the standard guidance no longer applies.

What QuickBooks Error 15225 Actually Is

Let us clear this up before anything else, because understanding it changes how you approach fixing it.

Every time QuickBooks downloads an update — whether that is a payroll tax table update or a QuickBooks Desktop software update — it does not just install the file immediately. It first checks whether that file is genuine. It does this by reading the file’s digital signature — essentially a cryptographic stamp that Intuit places on every legitimate update file to prove it has not been tampered with.

QuickBooks Error 15225 means that verification failed.

QuickBooks downloaded the file. Then it tried to read the digital signature. And something prevented it from confirming that the signature was valid — an expired security certificate, a blocked internet connection, incorrect SSL settings, a firewall that intercepted the download, or a corrupted QuickBooks installation that cannot read signatures correctly.

The result is that QuickBooks refuses to install the file. Not because the file is bad — in almost every case, it is perfectly fine. But because QuickBooks cannot confirm it is genuine, it stops as a security measure.

Your financial data is completely safe. This error has nothing to do with your company file. It is entirely about the update process — and that is a solvable problem.

The Full QuickBooks 15XXX Error Family

This is something most guides skip — and it matters because you may be seeing a variation of this error rather than exactly 15225.

QuickBooks Error 15225 belongs to the 15XXX error family — a group of errors that all share the same root cause: QuickBooks failed to verify the digital signature of a downloaded file.

Error CodeWhen It Appears
Error 15214During QuickBooks Desktop update
Error 15215During payroll update download
Error 15217When verifying update file signature
Error 15218SSL connection to Intuit server fails
Error 15221Security certificate validation error
Error 15222Payroll update signature mismatch
Error 15223Download interrupted during verification
Error 15224Windows security certificate expired
Error 15225Digital signature verification failed
Error 15226Update file cannot be authenticated

If you are seeing any of these errors — not just 15225 — every solution in this guide applies to your situation. They are the same problem expressed slightly differently depending on exactly where in the verification process the failure occurs.

From our team: When a client calls with any 15XXX error, we follow the same diagnostic process regardless of the exact number. The underlying cause — digital signature verification failure — is always the same. The specific number just tells us roughly where in the update process things broke down.

Which Solution Is Right for Your Specific Situation?

Do not start at Solution 1 and blindly work through everything. Use this table to find the right starting point for your exact situation — it will save you significant time.

Your Exact SituationBest Starting Point
Error appeared during payroll updateSolution 1 — Digital Signature
Error appeared during QB software updateSolution 2 — Trusted Website
Your system clock shows wrong date or timeSolution 3 — Date and Time
QuickBooks was not opened as AdministratorSolution 4 — Run as Admin
Windows has not been updated recentlySolution 5 — Windows Update
You use Internet Explorer or Edge for QBSolution 6 — SSL Settings
Antivirus was recently installed or updatedSolution 7 — Firewall
Standard solutions have not workedSolution 8 — Safe Mode
Multiple QB errors appearing togetherSolution 9 — Diagnostic Tool
Payroll subscription recently expired or changedSolution 10 — Subscription
Everything else tried with no resultSolution 11 — Clean Reinstall
You are on Windows 11 specificallyWindows 11 Section

What Actually Causes QuickBooks Error 15225?

Seven causes account for essentially every case of this error. Knowing which one applies to you makes the fix significantly faster.

1. Expired or Unregistered Digital Signature Certificate

This is the most common cause. The QBW32.exe file — the main QuickBooks executable — contains a digital signature issued by Intuit. When this certificate expires, is not properly registered in Windows, or gets corrupted during a system update, QuickBooks loses its ability to verify downloaded files.

How do I add a signature in QuickBooks desktop?

The error message says it all: QuickBooks is trying to check the signature, finding something wrong with the certificate, and stopping the installation as a precaution.

2. Internet Explorer or Browser Misconfiguration

QuickBooks Desktop historically uses Internet Explorer’s settings to manage internet connections — even if you never open Internet Explorer yourself. If IE’s security zones, trusted site settings, or SSL configurations are incorrect, QuickBooks cannot establish a secure connection to Intuit’s update servers to verify the digital signature.

This is also why the fix involves adding Intuit to Internet Explorer’s trusted sites — even on computers that use Chrome or Edge as their main browser.

3. Expired Windows Security Certificate

Windows maintains its own library of trusted root certificates — essentially a list of organizations it considers trustworthy. When Microsoft’s own security certificates expire or fall out of date on your system, Windows loses the ability to validate Intuit’s digital signature even if the QuickBooks certificate itself is perfectly fine.

Running Windows Update typically resolves this — because Microsoft ships updated root certificates through Windows Update.

4. Firewall or Antivirus Blocking the Update

Windows Defender Firewall, third-party antivirus programs, and corporate security software sometimes intercept QuickBooks’ connection to Intuit’s update servers. The download appears to proceed — but the security software inspects the traffic and either blocks the file or strips the digital signature in the process.

The result is a file that arrives at QuickBooks without a verifiable signature — and Error 15225 immediately follows

5. Damaged QuickBooks Installation

A QuickBooks installation that was partially uninstalled, interrupted during a previous update, or corrupted by a system crash sometimes loses the components it needs to read and verify digital signatures. The update process starts normally, reaches the verification step, and fails because the verification mechanism itself is broken.

6. Incorrect System Date and Time

This one catches people completely off guard — and it is almost never mentioned in other guides.

Digital signature certificates contain expiry dates. When Windows checks a certificate, it compares the certificate’s expiry date against the current system time. If your system clock is wrong — even by a few hours in the wrong timezone — Windows may conclude that a perfectly valid certificate has expired. And QuickBooks fails verification immediately.

We have seen this exact situation cause QuickBooks payroll update error 15225 on otherwise healthy systems. Two minutes to fix the clock — error disappears completely.

7. Inactive or Expired Payroll Subscription

When your QuickBooks payroll subscription has lapsed — or when Intuit’s servers cannot verify that your subscription is active — the payroll update process sometimes throws Error 15225 instead of a more descriptive subscription error.

Before spending an hour on technical fixes, it is always worth checking whether your subscription is current and properly linked to your QuickBooks account

How to Identify QuickBooks Error 15225 in Your System Logs

Most guides tell you what the error message says. Nobody tells you how to find more specific information about what actually failed.

QBWin.log is QuickBooks’ own diagnostic log — and it contains detailed information about exactly where the verification failed.

Press Windows + R and type %appdata%\Intuit\QuickBooks. Press Enter. Look for a file called QBWin.log. Open it with Notepad and press Ctrl+F. Search for 15225 or LVL_ERROR. The log entries near that point will show the exact component or certificate that failed verification.

This is particularly useful when you have tried Solutions 1 through 6 with no result — the log tells you specifically what is still broken.

How to Fix QuickBooks Error 15225

One thing before you start. Back up your company file if you have not done so recently. Go to File > Back Up Company > Create Local Backup. The error does not affect your data — but a backup before any troubleshooting session is always the right call.

1. Install the QuickBooks Digital Signature Certificate

This is the most direct fix for QuickBooks error code 15225 — because it addresses the root cause head-on rather than working around it.

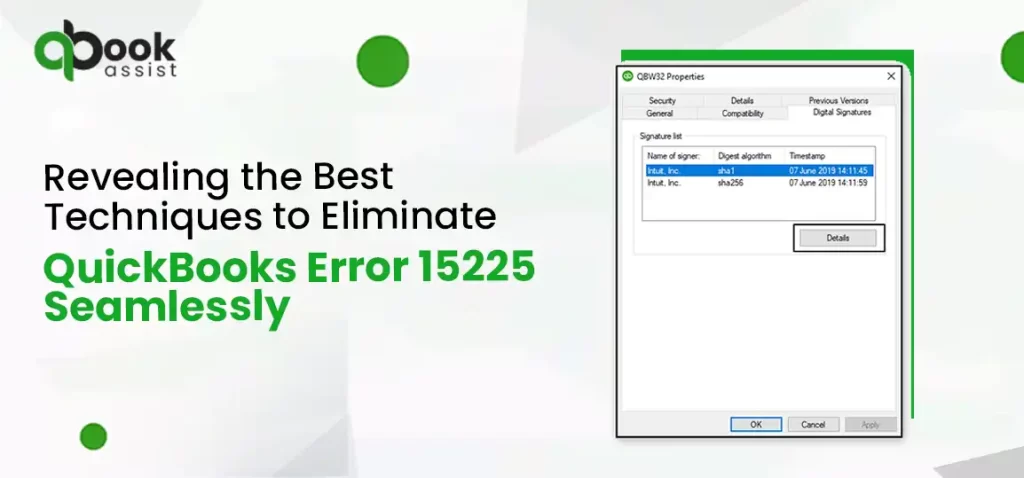
QuickBooks Error 15225 digital signature verification

Close all open company files and close QuickBooks completely. Open File Explorer and navigate to C:\Program Files (x86)\Intuit\QuickBooks — or C:\Program Files\Intuit\QuickBooks if you are on a 32-bit system. Find the file called QBW32.exe.

Right-click QBW32.exe and select Properties. Go to the Digital Signature tab. You should see Intuit Inc. listed in the signature list. Select it and click Details. In the Digital Signature Details window, click View Certificate. In the Certificate window, click Install Certificate.

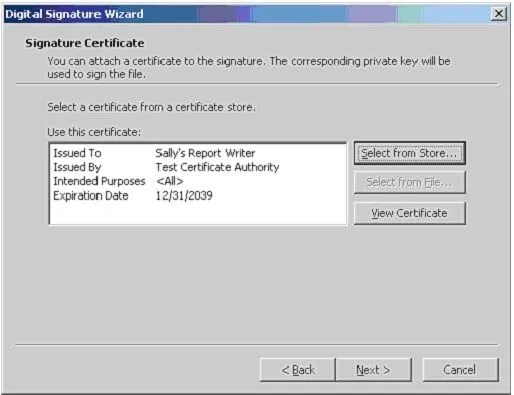
The Certificate Import Wizard opens. Click Next through the prompts until you reach Finish. Click Finish. The certificate is now installed and registered in Windows.

Restart your computer. Open QuickBooks and try running the update again- if you are unsure how to run the update correctly, follow our complete guide on how to update QuickBooks Desktop step by step.

From our team: This single solution resolves the majority of Error 15225 cases we handle. When the digital signature certificate is properly installed and registered, Windows can verify it immediately — and the update runs without issue. Try this first before anything else.

2. Add Intuit as a Trusted Website

QuickBooks uses Internet Explorer’s security zone settings to determine which websites it can connect to securely. When Intuit’s servers are not in the trusted zone, Internet Explorer’s security settings can block the digital signature verification connection — triggering QuickBooks update error 15225.

Open Internet Explorer — press Windows, type Internet Explorer, and open it. If you cannot find Internet Explorer on Windows 11, use the Run box (Windows + R) and type iexplore. Click the Gear icon in the top right and select Internet Options.

Go to the Security tab and click Trusted Sites, then click the Sites button.

In the box, type https://www.intuit.com and click Add. Then typehttps://www.intuit.ca and click Add (this matters for Canadian QuickBooks users). Also add https://payroll.intuit.com and https://qbo.intuit.com.

Make sure the checkbox for Require server verification (https:) for all sites in this zone is checked. Click Close, then Apply, then OK.

Restart Internet Explorer completely. Then reopen QuickBooks and attempt the update.

Important: Even if you use Chrome or Edge as your daily browser — you still need to do this in Internet Explorer. QuickBooks Desktop uses Internet Explorer’s settings internally for its update connections regardless of what browser you use.

3. Fix Your System Date and Time

This is the fastest fix in the entire guide — and the most overlooked one.

Right-click the clock in your Windows taskbar and select Adjust Date/Time. Make sure the date, time, and timezone are all completely accurate. If Set Time Automatically is enabled but the time is still wrong, toggle it off and on again to force a sync with Microsoft’s time servers.

After correcting the time, restart QuickBooks and try the update immediately.

Why this matters: digital signature certificates have expiry dates. When Windows compares a certificate’s expiry against your system clock — and your clock is wrong — it concludes the certificate has expired even when it has not. QuickBooks error 15225 appears instantly as a result. Fixing a two-minute clock problem has resolved this error for more of our clients than we can count.

4. Run QuickBooks Update as Administrator

Close QuickBooks completely. Find the QuickBooks icon on your Desktop or in your Start menu. Right-click it and select Run as Administrator. Click Yes when Windows asks for permission.

With QuickBooks open as Administrator, go to Help > Update QuickBooks Desktop. Click the Update Now tab and then Get Updates.

Running as Administrator gives QuickBooks the elevated permissions it needs to install certificates, modify system settings, and complete the update verification process without being blocked by Windows User Account Control.

This is particularly effective on shared workstations where QuickBooks was installed by one user but is being updated by another — a situation that creates permission conflicts almost every time.

5. Update Windows and Security Certificates

Microsoft ships updated root certificates and security patches through Windows Update. When your system is behind on updates, it may be missing the specific certificate update that allows Windows to validate Intuit’s digital signature — causing QuickBooks payroll update error 15225 even when everything else is configured correctly.

Click the Windows Start button and type Settings. Go to Update and Security > Windows Update on Windows 10, or Windows Update directly on Windows 11. Click Check for Updates. Install every available update — including optional ones. Restart when prompted.

After the restart, open QuickBooks and try the update again before moving to the next solution.

On Windows 11 specifically, also check Optional Updates under Windows Update. Microsoft sometimes ships root certificate updates as optional rather than automatic — and those are precisely the updates that fix digital signature verification failures.

6. Fix SSL and TLS Settings and Clear SSL State

SSL and TLS are the security protocols that QuickBooks uses to establish encrypted connections with Intuit’s servers during the update process. If these settings are misconfigured — or if the SSL state cache contains corrupted session data — the digital signature verification cannot complete.

Step 1 — Clear the SSL State:

Open Internet Explorer. Click the Gear icon and select Internet Options. Go to the Content tab and click Clear SSL State. Click OK. Close and reopen Internet Explorer.

Step 2 — Configure SSL and TLS Settings:

In Internet Explorer, go to Gear icon > Internet Options > Advanced tab. Scroll down to the Security section. Make sure these are checked:

  • Use SSL 3.0
  • Use TLS 1.0
  • Use TLS 1.1
  • Use TLS 1.2

Make sure these are unchecked:

  • Do not save encrypted pages to disk

Click Apply and OK. Restart your computer and try the QuickBooks update again.

From our team: The SSL state cache is something almost nobody thinks to clear — but it stores session information from previous connection attempts. When a previous failed update attempt left corrupted session data in the cache, every subsequent update attempt fails at the same point. Clearing it gives QuickBooks a completely fresh connection to Intuit’s servers.

7. Configure Windows Firewall for QuickBooks

When your Windows Firewall or antivirus software is blocking QuickBooks from connecting to Intuit’s update servers, the digital signature verification fails mid-process and QuickBooks error code 15225 appears.

 How to Set up firewall and security settings for QuickBooks Desktop

Step 1 — Test by temporarily disabling the firewall:

Go to Settings > Update and Security > Windows Security > Firewall and Network Protection. Turn off Microsoft Defender Firewall for Domain, Private, and Public Networks. Try the QuickBooks update immediately.

If the update succeeds — your firewall was the culprit. Turn the firewall back on and move to Step 2 to create proper exceptions instead of leaving it disabled.

If the update still fails — your firewall is not the cause. Skip to Solution 8.

Step 2 — Create QuickBooks Firewall Exceptions:

Press the Windows Start button and type Windows Firewall. Select Windows Defender Firewall with Advanced Security. Click Inbound Rules on the left, then New Rule on the right.

Select Program and click Next. Select This Program Path and browse to find each of these QuickBooks executable files — create a separate exception for each:

Executable FileLocation
QBW32.exeC:\Program Files\Intuit\QuickBooks YEAR
QBDBMgrN.exeC:\Program Files\Intuit\QuickBooks YEAR
QBUpdate.exeC:\Program Files\Common Files\Intuit\QuickBooks\QBUpdate
QBCFMonitorService.exeC:\Program Files\Common Files\Intuit\QuickBooks
QBLaunch.exeC:\Program Files\Common Files\Intuit\QuickBooks
IntuitSyncManager.exeC:\Program Files\Common Files\Intuit\Sync

For each file: click Next, select Allow the Connection, click Next, check all three profile boxes (Domain, Private, Public), click Next, give the rule a name like QBFirewallException-QBW32, and click Finish.

Repeat the same process for Outbound Rules.

Restart your computer and try the QuickBooks update again.

QBookAssist tip: If you use a third-party antivirus — Norton, McAfee, Avast, Bitdefender, or others — also add QuickBooks as a trusted application inside the antivirus software itself. Windows Firewall exceptions alone are not enough when a third-party security program has its own blocking rules.

8. Update QuickBooks in Windows Safe Mode

Safe Mode with Networking starts Windows with only essential services running — no third-party antivirus, no startup programs, no background applications that could interfere with the update process.

Restart your computer. As it starts up, press F8 repeatedly until you see the Advanced Boot Options menu. Select Safe Mode with Networking. On Windows 10 and 11, hold the Shift key while clicking Restart, then go to Troubleshoot > Advanced Options > Startup Settings > Restart, and select option 5 for Safe Mode with Networking.

Once in Safe Mode, open QuickBooks and go to Help > Update QuickBooks Desktop. Click the Update Now tab, then Get Updates. Let the update complete fully.

Restart your computer normally after the update finishes. Open QuickBooks and confirm the update installed correctly.

This solution works specifically because Safe Mode removes every program that could be intercepting, blocking, or corrupting the update download before QuickBooks can verify its digital signature.

9. Run the QuickBooks Install Diagnostic Tool

When the QuickBooks installation itself is damaged — corrupted components, missing registry entries, broken certificate handling — no amount of internet settings fixes will resolve the error. The Install Diagnostic Tool addresses this directly.

QuickBooks Install Diagnostic Tool - Fix Installation Errors

Close QuickBooks. Download the latest version of the QuickBooks Tool Hub from Intuit’s official website. Open the downloaded file and install it following the on-screen steps. Once installed, open the QuickBooks Tool Hub and go to the Installation Issues tab. Click QuickBooks Install Diagnostic Tool and let it run completely — this takes up to twenty minutes.

When it finishes, restart your computer. Open QuickBooks and try the update again.

The Install Diagnostic Tool automatically repairs damaged .NET Framework components, MSXML, and Visual C++ libraries — all of which can affect QuickBooks’ ability to verify digital signatures during the update process.

10. Verify Your Active Payroll Subscription

This solution is almost never mentioned elsewhere — but it resolves QuickBooks payroll update error 15225 in cases where the actual underlying problem is a subscription issue rather than a technical one.

Open QuickBooks and go to Employees > My Payroll Service > Account/Billing Information. Sign in with your Intuit account credentials. Verify that:

  • Your payroll subscription shows as Active
  • The subscription is linked to the correct QuickBooks account
  • Your payment method is current and not expired
  • The Employer Identification Number (EIN) on the account matches your company file

If your subscription has lapsed — even by one day — Intuit’s servers may reject the payroll update request and throw Error 15225 rather than a clear subscription expiry message.

Renew the subscription if needed. Then return to QuickBooks, go to Help > Update QuickBooks Desktop, and run the update again.

11. Clean Reinstall of QuickBooks Desktop

If all ten solutions above have not resolved QuickBooks Desktop error 15225, a clean reinstall is the definitive fix. The most important thing about this process is doing it completely — a half-done reinstall simply recreates the same problem.

Step 1 — Note your license details: Before uninstalling anything, find your QuickBooks license number and product number. These are on your original packaging, your purchase confirmation email, or inside QuickBooks at Help > About QuickBooks.

Step 2 — Uninstall QuickBooks: Go to Control Panel > Programs and Features. Find QuickBooks in the list, select it, and click Uninstall/Change > Remove > Next. Let the uninstall complete and restart your computer.

Step 3 — Rename old QuickBooks folders: Open File Explorer and show hidden files (View > Hidden Items). Navigate to each of these locations and rename the QuickBooks folder by adding OLD at the end:

  • C:\Program Files\Intuit\QuickBooks (year)
  • C:\Program Files (x86)\Intuit\QuickBooks (year)
  • C:\ProgramData\Intuit\QuickBooks (year)
  • C:\Users[username]\AppData\Local\Intuit\QuickBooks (year)

Step 4 — Run the QuickBooks Clean Install Tool: Open the QuickBooks Tool Hub and go to Installation Issues. Click Clean Install Tool. This removes every residual QuickBooks file and registry entry the standard uninstall left behind. Do not skip this step — it is the difference between a clean reinstall and another broken one.

Step 5 — Download and reinstall: Download a fresh QuickBooks Desktop installer directly from Intuit’s official website. Right-click the installer and select Run as Administrator. Follow the installation steps, enter your license and product numbers, and let the installation complete.

Step 6 — Update immediately after installing: After reinstalling, go to Help > Update QuickBooks Desktop and run updates before doing anything else. This confirms the installation is clean and the update process is working correctly.

QuickBooks Error 15225 on Windows 11

This section exists because the standard guidance for this error has a significant problem on Windows 11 — and nobody else is talking about it.

Internet Explorer is deprecated on Windows 11. Microsoft officially retired IE in June 2022. On many Windows 11 machines, Internet Explorer either does not exist or does not function properly. But QuickBooks Desktop still depends on IE’s settings for its update connections.

This creates a confusing situation: the standard fix says “open Internet Explorer and add Intuit to trusted sites” — but on Windows 11, Internet Explorer may not open at all.

Here is how to handle it on Windows 11:

Option 1 — Access Internet Options without opening Internet Explorer: Press Windows + R and type inetcpl.cpl. Press Enter. The Internet Properties window opens directly — without needing to open Internet Explorer itself. Add Intuit to trusted sites exactly as described in Solution 2.

Option 2 — Configure Microsoft Edge for compatibility: Open Microsoft Edge. Click the three-dot menu in the top right and go to Settings > Default Browser. Under Internet Explorer compatibility, turn on Allow sites to be reloaded in Internet Explorer mode. Then add www.intuit.com and payroll.intuit.com to the IE Mode site list.

Option 3 — Update root certificates through Windows Update: On Windows 11, go to Settings > Windows Update > Advanced Options > Optional Updates. Check for any certificate or security updates that are not automatically applied. Install them. This often resolves digital signature verification failures on Windows 11 without requiring any IE configuration at all.

Windows 11 users — run Solutions 3, 4, and 5 first before touching any IE settings. The date/time fix, Run as Administrator, and Windows Update resolve Error 15225 on Windows 11 in the majority of cases — without the Internet Explorer complexity.

How to Prevent QuickBooks Error 15225 From Coming Back

Ten minutes now versus another payroll disruption six months from now.

Keep QuickBooks updated regularly. The longer you wait between updates, the more likely it is that the digital signature certificate has changed and your system needs to re-verify it from scratch. Monthly updates are smoother than quarterly ones.

Add Intuit to trusted sites permanently. Do not just add it as a troubleshooting step — keep it in your trusted sites list permanently. This prevents the trusted site issue from ever causing this error again.

Set Windows Update to automatic. Root certificate updates come through Windows Update. A system behind on updates is a system waiting for a certificate error to happen.

Add QuickBooks to your antivirus whitelist now. Do not wait until the next error appears. Open your antivirus or security software today and add QuickBooks Desktop as a trusted application. This prevents every category of update interference.

Verify your payroll subscription renewal date. Put it in your calendar three weeks before expiry. Renewing before it lapses means the subscription is always active when you run payroll updates — which eliminates an entire category of Error 15225 triggers.

Keep your system clock accurate. Enable automatic time synchronization in Windows settings. This takes thirty seconds and permanently eliminates the system clock as a possible cause of digital signature errors.

If you are still running an older version of QuickBooks Desktop, consider upgrading to [QuickBooks Desktop 2025] — the latest version has improved update handling that reduces Error 15225 frequency significantly.

Conclusion

QuickBooks Error 15225 stops you at the worst possible moment — right when you are trying to keep your software current and your payroll running. It is frustrating precisely because you were doing the right thing.

But the cause is always the same: something prevented QuickBooks from verifying the digital signature of its update file. Fix that something — whether it is the certificate registration, the trusted site settings, the system clock, the SSL configuration, the firewall, or the installation itself — and the error disappears.

Start with Solution 1 — install the digital signature certificate. If that does not resolve it, work through Solutions 2, 3, and 4 in order. Most users are done within fifteen minutes. The later solutions exist for cases where something deeper needs attention.

And if you get through all eleven solutions with the error still there — that is when you stop fighting it alone.

Call QBookAssist at +1-866-408-0544 . Our team will find exactly what is preventing your QuickBooks update from completing and fix it fast — so your payroll runs on time and your software stays current.

Frequently Asked Questions (FAQ’s)

Q1: What is QuickBooks Error 15225 and why does it happen?

Ans. QuickBooks Error 15225 is a digital signature verification failure that occurs when QuickBooks cannot confirm that a downloaded update file is genuine. It happens when the digital signature certificate is expired or unregistered, when Internet Explorer security settings block Intuit’s servers, when the system clock is incorrect, or when a firewall or antivirus intercepts the download before verification completes.

Q2: Does QuickBooks Error 15225 affect my company file or financial data?

Ans. No — not at all. Error 15225 is entirely about the update process. Your company file, transactions, payroll records, and financial data are completely unaffected. The error prevents QuickBooks from installing an update, but it does not touch anything in your company file.

Q3: What is the fastest fix for QuickBooks Error 15225?

Ans. Check your system date and time first — it takes two minutes and resolves the error in a surprising number of cases. If the clock is correct, install the digital signature certificate from QBW32.exe as described in Solution 1. These two steps together resolve the majority of Error 15225 cases our team handles.

Q4: Why does QuickBooks Error 15225 appear during payroll updates specifically?

Ans. Payroll updates require a verified connection to Intuit’s servers to authenticate your subscription and download tax table updates. This verification process relies on digital signatures and SSL connections — the same mechanisms that Error 15225 disrupts. The payroll update process is more sensitive to certificate and connection issues than a standard software update, which is why payroll is often where this error first appears.

Q5: What is the difference between QuickBooks Error 15225 and other 15XXX errors like 15222 or 15226?

Ans. All 15XXX errors share the same root cause — digital signature verification failure during a QuickBooks update. The specific error number indicates roughly where in the verification process the failure occurred. Error 15222 typically appears during payroll specifically, while 15225 and 15226 are more general update failures. Every solution in this guide applies to all 15XXX errors — not just 15225.

Q6: I am on Windows 11 and cannot find Internet Explorer. What do I do?

Ans. On Windows 11, use the Run box (Windows + R) and type inetcpl.cpl to access Internet Options directly without opening Internet Explorer. Alternatively, run Solutions 3, 4, and 5 first — the date/time fix, Run as Administrator, and Windows Update resolve Error 15225 on Windows 11 in most cases without requiring any Internet Explorer configuration.

Q7: Can QuickBooks Error 15225 come back after I fix it?

Ans. Yes — if the underlying cause was not permanently addressed. The most common reasons for recurrence are a trusted site setting that gets reset after a browser update, a Windows Update that changes certificate settings, or an antivirus update that adds new blocking rules for QuickBooks processes. Following the prevention steps in this guide — particularly permanent trusted site configuration, automatic Windows Updates, and antivirus whitelisting — significantly reduces the chance of seeing this error again.

Q8: When should I call a professional instead of continuing to troubleshoot?

Ans. Call a specialist if the error persists after all eleven solutions, if your payroll is blocked with payday approaching, if the error returned immediately after a clean reinstall, or if the error is appearing on multiple workstations simultaneously. A network-wide or persistent Error 15225 almost always involves a system or network-level configuration that needs professional assessment rather than continued self-troubleshooting.

QuickBooks Error 1402 — The Complete 12-Step Fix Guide for Windows 10 and Windows 11

You were not doing anything risky.

You clicked the update button — the same one you have clicked a dozen times before — and walked away for ten minutes. When you came back, QuickBooks was gone. Not slow. Not glitchy. Gone. Replaced by a message that makes absolutely no sense to someone who runs a business and not an IT department:

“Error 1402: Could not open key. Verify that you have sufficient access to that key, or contact your support personnel.”

Registry key. Access denied. Contact support personnel.

Meanwhile, your team cannot log in. Your accountant is waiting on last quarter’s numbers. Payroll runs tomorrow. And you have no idea what any of that error message actually means.

This is the reality of QuickBooks Error 1402 — and it happens because a routine software update collided with a Windows permission setting in a way that nobody warned you about. It is not your fault. And it is not permanent.

At QBookAssist, we fix this error for business owners and accountants across the US every single week. We have seen it on clean new Windows 11 machines and decade-old Windows 10 workhorses. We have seen it appear after Windows updates, after antivirus installations, after QuickBooks updates, and after absolutely nothing at all changed that anyone could identify.

This guide contains every fix we know — twelve of them, in the exact order we recommend — along with two tables that will save you from trying solutions that do not apply to your situation. Start here. Work through it. You will get your QuickBooks back.

Which Solution Is Right for Your Specific Situation?

Do not start at Solution 1 and blindly work through every step. Use this table first — it will get you to the right fix faster.

Your Exact SituationStart Here
Error appeared during a QuickBooks updateSolution 1 — Tool Hub
Windows has not been updated in monthsSolution 2 — Windows Update
Error appeared immediately after a Windows upgradeSolution 4 — %temp% Folder
You are on Windows 11 specificallySolution 9 — UAC Fix
Antivirus was recently installed or updatedSolution 7 — Selective Startup
QuickBooks was recently uninstalled and reinstalledSolution 12 — Clean Reinstall
Error shows a specific registry key path in messageSolution 11 — Error Log
All solutions tried and error is still thereCall QBookAssist

How Long Will This Actually Take?

Before you start — here is an honest time estimate for every solution. No surprises.

SolutionTime RequiredDifficulty Level
Solution 1 — Tool Hub Diagnostic20 minutes⭐ Easy
Solution 2 — Windows Update15–30 minutes⭐ Easy
Solution 3 — reboot.bat File2 minutes⭐ Easy
Solution 4 — %temp% Folder Fix3 minutes⭐ Easy
Solution 5 — Compatibility Troubleshooter5 minutes⭐ Easy
Solution 6 — Registry Permissions10 minutes⭐⭐ Medium
Solution 7 — Selective Startup20 minutes⭐⭐ Medium
Solution 8 — Repair .NET and MSXML30 minutes⭐⭐ Medium
Solution 9 — Windows 11 UAC Fix10 minutes⭐ Easy
Solution 10 — System File Checker15 minutes⭐ Easy
Solution 11 — Error Log Review10 minutes⭐⭐ Medium
Solution 12 — Clean Reinstall60–90 minutes⭐⭐⭐ Hard

Most people are back in QuickBooks within 30 minutes using Solutions 1 through 5. The later solutions exist for cases where something deeper is broken. Work through them in order and stop the moment the error is gone.

What QuickBooks Error 1402 Actually Means

Plain English version — no IT degree required.

When QuickBooks installs or updates, it needs to write information into a part of Windows called the registry. Think of the registry as a giant organized filing cabinet that Windows uses to keep track of every program on your computer. QuickBooks needs to open a specific drawer, make some notes, and close it.

Error 1402 means the drawer is locked.

Maybe the lock is broken, another program changed the combination, or Windows quietly reset the permission settings after an update without telling anyone. Whatever the reason — QuickBooks cannot get into that drawer and it cannot complete what it started.

Here is what matters most: your company file data is almost certainly fine. Error 1402 is an installation conflict. Your financial records, your invoices, your payroll history — they are sitting safe on your hard drive right now. You just cannot reach them until QuickBooks is working again. That is a solvable problem.

What Actually Causes QuickBooks Error 1402?

Five causes account for essentially every case we have ever handled.

Cause 1 — Windows Registry Permissions Were Damaged or Reset

This is the cause behind the majority of Error 1402 cases we see at QBookAssist. Windows registry permissions can get damaged after a Windows update that quietly resets certain access settings, after a previous QuickBooks uninstall that did not clean up properly, or after security software decided to tighten registry access as a protective measure — without notifying you.

When the permissions are wrong, QuickBooks hits a locked door during installation and cannot proceed past it.

Cause 2 — Microsoft’s Supporting Components Are Broken

QuickBooks is not self-contained. It depends on three Microsoft components to function — .NET Framework, MSXML, and Visual C++ libraries. When any of these are damaged, outdated, or partially installed, the QuickBooks installer cannot complete its work even if everything else is perfectly configured.

We see this most often after major Windows upgrades. A Windows 10 to Windows 11 upgrade in particular sometimes leaves these components in a half-working state that breaks QuickBooks installation with no obvious warning sign.

Cause 3 — Windows Is Behind on Updates

This one surprises people. An outdated Windows system — even just a few months behind — creates compatibility gaps that QuickBooks installation trips over. Microsoft ships registry and permission fixes as part of regular updates. If those patches are not on your system, QuickBooks hits the unfixed problem and cannot proceed.

Cause 4 — Antivirus or Security Software Blocked the Installation

Antivirus programs — Norton, McAfee, Avast, Windows Defender, and others — sometimes flag QuickBooks installer activity as suspicious and block it quietly in the background. The installation appears to run. It gets partway through. Then it silently stops because the security software cut off registry access.

The result is a partially installed QuickBooks that is broken enough to show Error 1402 but intact enough that it still appears in your Programs list — which is why a simple reinstall attempt often fails.

Cause 5 — The Installation File Itself Is Corrupted

A download that got interrupted, an update that stopped mid-process, or an installation that was forced closed — all of these leave broken fragments in the registry. The next installation attempt finds those broken pieces and cannot work around them.

Other Errors That Appear Alongside QuickBooks Error 1402

This section alone separates this guide from everything else you will find online. Error 1402 rarely travels alone in serious cases — and the combination of errors you are seeing tells a specific story about what needs to be fixed.

QuickBooks Error 6150

After a failed QuickBooks installation triggered by Error 1402, some users try to open their company file directly and immediately get QuickBooks Error 6150. This is not a separate problem — it is the same problem expressing itself differently. The installation that was supposed to support your company file never completed. Fix the 1402 and Error 6150 disappears with it in most cases.

C=44 QuickBooks Error

The C=44 QuickBooks error is an internal code that appears when a data file operation fails during a damaged installation state. Seeing C=44 alongside Error 1402 tells us immediately that the installation disruption went deeper than a simple permission conflict. Standard solutions may not be enough — that combination is a call-us situation, not a keep-trying-alone situation.

QuickBooks Hosting Mode Is Off

After you fix Error 1402 and reinstall QuickBooks, your hosting settings often reset completely. Your server is no longer sharing the company file with other workstations. Everyone on your team gets an access error and assumes something new broke — when really it is just a setting that got wiped during the reinstall.

If QuickBooks hosting mode is off after resolving Error 1402, go to File > Utilities > Host Multi-User Access on your server computer and re-enable it. Then restart the QuickBooks Database Server Manager. Network access restores immediately.

QuickBooks Driver Lacks Full Font Support

This message looks alarming and means very little. QuickBooks driver lacks full font support appears when certain QuickBooks display components were not installed correctly during a partial installation. It is a cosmetic side effect of the same incomplete installation that caused Error 1402. Fix the installation — it disappears.

QuickBooks File Doctor Check Your Network Greyed Out

A lot of people try to run File Doctor when QuickBooks stops working — which makes complete sense. But if QuickBooks File Doctor check your network is greyed out, it is because File Doctor’s network diagnostic tools require a functioning QuickBooks installation to operate. Error 1402 leaves the installation in a broken state that disables that button entirely.

Fix the installation first. Run File Doctor afterward. The button will be fully active again. If it is still greyed out after a complete clean reinstall — that is a separate network configuration issue that needs direct support.

12 Solutions — How to Fix QuickBooks Error 1402

One thing before you start. If you can open QuickBooks at all — even briefly — back up your company file right now. Go to File > Back Up Company > Create Local Backup. Thirty seconds of backup work now protects everything.

If QuickBooks will not open at all, your data is still safe on the hard drive. Just work through the solutions below.

Solution 1 — Run the QuickBooks Install Diagnostic Tool

Close QuickBooks completely. Go to Intuit’s official website and download the latest version of the QuickBooks Tool Hub. Open the downloaded file and follow the on-screen steps to install it. Agree to the terms and conditions when prompted.

Once installed, open the QuickBooks Tool Hub — if you cannot find the icon, press the Windows key, type QuickBooks Tool Hub, and select it from the results. Go to the Installation Issues tab. Click QuickBooks Install Diagnostic Tool and let it run.

Do not interrupt it. It can take up to twenty minutes and it is supposed to take that long. When it finishes, restart your computer completely. Then try opening QuickBooks or running the update again.

This single tool fixes the majority of Error 1402 cases we encounter. It automatically detects and repairs damaged .NET Framework, MSXML, and C++ components — the root cause behind most installation failures. If it works, you are done. If it does not fully resolve the error, move to Solution 2.

From our team: We run the Tool Hub on every single Error 1402 case before doing anything else — even when the client describes a situation that sounds like it definitely needs a registry fix. About 55% of the time, the Tool Hub handles it completely and we never need to go further.

Solution 2 — Update Windows Completely

Do not skip this. It feels unrelated. It is not.

Click the Windows Start button and type Settings. Go to Update and Security > Windows Update on Windows 10, or Windows Update directly on Windows 11. Click Check for Updates. Install every update available — including the optional ones that do not install automatically. Restart when prompted.

This resolves QuickBooks Error 1402 on Windows 11 in a significant number of cases. Windows 11 security updates frequently include registry permission patches that directly impact how third-party installers operate. A system that is even a few months behind on updates may be missing the specific fix that allows QuickBooks to complete its installation.

After the restart, attempt the QuickBooks installation or update again before moving forward.

Solution 3 — Run the reboot.bat File

This is one of the fastest fixes available and most people have never heard of it.

Open File Explorer and navigate to C:\ProgramData\Common Files\Intuit\QuickBooks. Look for a file called reboot.bat. Right-click it and select Run as Administrator. A command window opens briefly and runs. Wait for it to finish completely — it usually takes under sixty seconds.

What this does is re-register all of QuickBooks’ registry entries in Windows from scratch. It is essentially telling Windows — here is QuickBooks, here are all its registry entries, please recognize them as valid. After it finishes, try updating QuickBooks Desktop and test whether the error is gone.

If you cannot find the reboot.bat file at that path, the installation is damaged enough that this file was not created properly.

Solution 4 — Fix the %temp% Folder Permissions

This fix is almost never mentioned anywhere else — and it resolves Error 1402 in cases where nothing obvious seems wrong with the registry or Windows components.

Press Windows + R and type %temp% in the Run box. Press Enter. A folder opens — this is the temporary folder that Windows and QuickBooks use during installation.

Right-click anywhere inside that folder and select Properties. Go to the Security tab and click Edit. Find your Windows username in the list. Under the Allow column, check the Full Control checkbox. Click OK to apply.

When the %temp% folder has restricted permissions — which happens silently after certain Windows updates without any warning — the QuickBooks installer cannot write the temporary files it needs during installation. Granting Full Control to your user account removes that restriction.

After making this change, try the QuickBooks installation or update again immediately.

Solution 5 — Run the Windows Compatibility Troubleshooter

Almost no other guide covers this fix — which is precisely why it helps users who have already tried everything else.

Navigate to the folder where your QuickBooks installer file is saved — usually your Downloads folder or Desktop. Right-click the QuickBooks installer file — not the shortcut, the actual installer — and select Properties. Go to the Compatibility tab. Click Run Compatibility Troubleshooter.

Windows will analyze the installer and automatically recommend the correct compatibility settings for your system version. Click Try Recommended Settings and attempt the installation again with those settings applied.

This works particularly well on Windows 11 systems where the QuickBooks installer was built for an earlier Windows version and Windows 11’s compatibility layer is quietly blocking certain installation operations as a protective measure. The troubleshooter identifies and resolves that conflict automatically.

From our team: We started recommending this fix about eighteen months ago after noticing a pattern — clients on fresh Windows 11 machines who had tried the Tool Hub and Windows Update with no result often got through the installation immediately after running the compatibility troubleshooter. It is now standard in our Windows 11 Error 1402 process.

Solution 6 — Fix Windows Registry Permissions Manually

Follow this exactly. Do not deviate. And do the backup first — it takes thirty seconds and gives you a complete safety net.

Press Windows + R, type regedit, and press Enter. The Registry Editor opens. Before touching anything, click File > Export, name the backup file something memorable, and save it to your Desktop. Done — you now have a full registry backup you can restore from if anything goes wrong.

Navigate to HKEY_LOCAL_MACHINE\SOFTWARE\Classes in the left panel. Click Edit > Permissions. In the window that appears, click Advanced, then Add. Type Everyone in the object name field and click OK. Check the Full Control box. Click Apply and OK to save.

Now exit the Registry Editor and restart your computer. Try the QuickBooks installation again.

If the error message you received showed a specific registry key path — it usually looks something like HKEY_LOCAL_MACHINE\SOFTWARE\Microsoft\Windows\CurrentVersion\Installer — navigate to that exact path in the Registry Editor and repeat the same permissions process for that specific key as well.

Honestly: We know the registry sounds scary. But if you follow these steps exactly — backup first, navigate carefully, apply Full Control, restart — there is very little that can go wrong. The backup means you can always undo everything. Take it one step at a time.

Solution 7 — Install QuickBooks in Selective Startup Mode

When background software is blocking the installation without telling you, Selective Startup removes all interference.

Press Windows + R, type MSConfig, and click OK. Under the General tab, select Selective Startup and confirm Load System Services is checked. Go to the Services tab. Check Hide all Microsoft Services, then click Disable All. Now uncheck Hide all Microsoft Services and scroll through the list to find Windows Installer — make sure it is checked. Click Apply and restart.

With everything except core Windows services turned off, try your QuickBooks installation or update. Nothing in the background can interfere with it now — no antivirus scanning, no update services, no third-party applications running quietly.

After the installation completes, go back to MSConfig, select Normal Startup, and restart again to restore your regular settings. Never leave the system in Selective Startup permanently.

Solution 8 — Repair Microsoft .NET Framework and MSXML

If the Install Diagnostic Tool from Solution 1 did not automatically repair these components, do it manually.

For .NET Framework: Go to Control Panel > Programs and Features > Turn Windows Features On or Off. Find .NET Framework in the list. If it is unchecked, enable it. If it is checked but damaged — uncheck it, click OK, restart your computer, then re-enable it and let Windows repair it automatically on the next startup.

For MSXML: Press the Windows Start button and in the search bar type:

exe /fvaum “%userprofile%\desktop\msxml.msi”

Press Enter. If MSXML is damaged, this command initiates the repair. Alternatively, download the MSXML package directly from Microsoft’s official website, save it to your Desktop, and run the installer manually.

After repairing both components, run the QuickBooks Install Diagnostic Tool from Solution 1 one more time to confirm everything registered correctly before attempting the installation again.

Solution 9 — Windows 11 Specific UAC Fix

This solution is specifically for QuickBooks Error 1402 on Windows 11 — and it addresses something unique to how Windows 11 handles installer permissions that does not apply to Windows 10.

Windows 11 has stricter default User Account Control policies than any previous Windows version. Even when you are logged in as an Administrator, Windows 11 does not automatically grant elevated permissions to third-party installers unless they explicitly request them. QuickBooks does not always do this correctly — and Error 1402 appears as a result.

Fix step 1: Find your QuickBooks installer file. Right-click it and select Run as Administrator — do not just double-click. This explicitly tells Windows 11 to grant the installer the elevated permissions it needs.

Fix step 2: Go to Control Panel > User Accounts > Change User Account Control Settings. You will see a slider with four levels. Temporarily slide it down one level from its current position. Click OK and restart. Run the QuickBooks installation. After it completes successfully, return UAC to your original setting.

These two adjustments specifically address the permission model that Windows 11 applies to third-party installers — and they resolve QuickBooks Error 1402 on Windows 11 in the majority of cases where Solutions 1 through 8 were not enough.

Solution 10 — Run Windows System File Checker

This tool is built into Windows and almost nobody uses it until something breaks. It should be used proactively — but it also fixes Error 1402 in cases where damaged Windows system files are quietly corrupting registry access permissions.

Press the Windows key, type cmd, right-click Command Prompt in the results, and select Run as Administrator. In the command window, type:

sfc /scannow

Press Enter. Windows will scan every protected system file on your computer and automatically repair any that are damaged or replaced by incorrect versions. This takes ten to fifteen minutes. Do not close the window while it runs — let it complete entirely.

When it finishes, restart your computer and attempt the QuickBooks installation again.

Why this works for Error 1402: damaged Windows system files silently corrupt registry access permissions over time — without any obvious warning. System File Checker finds and repairs these before they block another installation.

Solution 11 — Read the QuickBooks Installation Error Log

This is the most precise fix on the entire list — and it is in every other guide’s blind spot.

Instead of applying broad permission changes across the registry and hoping one of them covers the problem, this solution finds the exact registry key that QuickBooks could not access and fixes only that.

Press Windows + R and type %appdata%\Intuit\QuickBooks in the Run box. Press Enter. A folder opens. Look for a file called QBInstall.log or similar — it will have a recent date matching when the error occurred. Open it with Notepad.

Press Ctrl+F and search for 1402 or Error. The log will show the exact registry key path that QuickBooks could not open — something like:

HKEY_LOCAL_MACHINE\SOFTWARE\Microsoft\Windows\CurrentVersion\Installer\UserData

Copy that exact path. Open the Registry Editor (Windows + R, type regedit). Navigate to that precise location using the left panel. Right-click the folder at that path and select Permissions. Grant Full Control to your Administrator account. Close the Registry Editor and restart.

This targeted fix resolves the exact problem without touching anything else — and it works in cases where the broader Solution 6 registry fix did not reach the specific key that was causing the issue.

From our team: When clients have been through Solutions 1 through 10 with no resolution, this is the first thing we check. The error log almost always contains the exact registry path that everything else missed. It is the most underused diagnostic tool for this error by far.

Solution 12 — Clean Reinstall of QuickBooks Desktop

If you have worked through Solutions 1 through 11 and the error is still there — this is the definitive fix. And the most important thing about it is doing it correctly. A reinstall done wrong simply recreates the same problem.

Step 1 — Uninstall QuickBooks completely. Go to Control Panel > Programs and Features. Find QuickBooks in the list. Click Uninstall. Let it complete fully and restart your computer when it is done.

Step 2 — Run the QuickBooks Clean Install Tool. This is the step that most failed reinstalls skip — and it is why they fail. Open the QuickBooks Tool Hub, go to Installation Issues, and run the Clean Install Tool. This removes every residual QuickBooks file, folder, and registry entry that the standard uninstall left behind.

Do not reinstall QuickBooks until this tool has finished. Reinstalling over broken remnants just recreates the same error.

Step 3 — Download a fresh installer. Go to Intuit’s official website and download the latest QuickBooks Desktop installer directly. Do not use a saved installer from months ago — download a fresh copy.

Step 4 — Install as Administrator. Right-click the installer and select Run as Administrator. Follow the on-screen steps. Activate QuickBooks using your original license key.

Step 5 — Verify your company file. Open QuickBooks and your company file. Confirm everything looks correct before returning to normal work.

This resolves Error 1402 in every case where the earlier solutions could not — because it removes everything broken and replaces it with a completely fresh installation.

Run the QuickBooks Connection Diagnostic After Fixing

Once QuickBooks is opening correctly, do not jump straight back into work. Take five minutes here first.

Open the QuickBooks Tool Hub and go to Network Issues. Run the QuickBooks Database Server Manager and scan your company file folder. This confirms that your network connections, firewall rules, and file permissions all survived the installation repair intact.

If you were previously seeing QuickBooks File Doctor check your network greyed out — try it again now. With a complete installation restored, that button will be fully active. Run the network check and confirm your connections are healthy before opening your company file for the day.

Also verify your hosting settings. Go to File > Utilities on your server computer. It should show Stop Hosting Multi-User Access — meaning it is actively hosting the file. If it shows Host Multi-User Access instead, click it to enable hosting and restart the Database Server Manager. Your team’s network access returns immediately.

How to Make Sure QuickBooks Error 1402 Never Comes Back

Fifteen minutes of prevention right now versus another Error 1402 in six months. Here is what actually makes a difference.

Always right-click QuickBooks and select Run as Administrator when applying updates. Make this a habit. This single action eliminates the permission conflict that starts the entire problem — because it explicitly grants the installer the elevated access it needs instead of relying on Windows to figure it out automatically.

Keep Windows updated automatically. The registry permission fixes that prevent Error 1402 come through Windows updates. A system behind on updates is a system waiting for this error to happen again. Turn on automatic updates and let them run.

Add QuickBooks to your antivirus whitelist. Open your antivirus or security software and mark QuickBooks Desktop as a trusted application. This prevents future installation interference without reducing your overall security in any meaningful way.

Run System File Checker every three months. Open Command Prompt as Administrator and run sfc /scannow quarterly. This catches damaged Windows system files before they become QuickBooks problems. It takes fifteen minutes and works quietly in the background.

Create a Windows System Restore point before every major QuickBooks update. Search for Create a Restore Point in the Windows Start menu. Click Create and name it something like Before QuickBooks Update May 2025. If anything goes wrong during a future update, you have a complete fallback that takes your entire system back to a working state.

When to Stop and Call a Specialist

We believe in giving business owners every tool to fix things themselves. But there are specific situations where continuing to troubleshoot alone is not the right call — and being honest about that matters more than making this guide seem like it solves everything.

Stop and call a certified QuickBooks specialist if you have worked through all twelve solutions and the error is still appearing. That combination tells us something environment-specific is happening — an enterprise group policy, a managed security configuration, or a deeper installation conflict that requires someone to look at your actual system.

Call immediately if you are seeing Error 1402 alongside C=44 or the QuickBooks Unrecoverable Error at the same time. That combination signals a data integrity issue that needs professional assessment before any further troubleshooting.

Call before touching anything if you completed the reinstall, QuickBooks opens, but your company file will not open — or your reports are showing wrong balances or missing transactions. Do not start manually correcting things. Let us verify the file is fully intact first. Corrections made to a damaged file before it is repaired often make things worse.

And call if your business has enterprise IT management, group policies, or domain-level security controls. Registry permission changes in those environments sometimes require domain administrator access that goes beyond what a local account can do — no matter how carefully you follow the steps above.

Call QBookAssist at [+1-866-408-0544] — we resolve QuickBooks Error 1402 on Windows 10 and Windows 11 systems every day and we will get you back into your company file the same day.

Conclusion

There is nothing fair about QuickBooks Error 1402. You did what you were supposed to do — you kept your software updated — and Windows permission settings turned that into a business disruption.

But here is where we land after handling hundreds of these cases: it is almost always fixable. The twelve solutions in this guide cover every situation we have encountered — from a simple Tool Hub scan that takes twenty minutes to a targeted error log fix that goes after the exact registry key causing the problem. Work through them in the order that matches your situation, using the table at the top to find your starting point.

Most people are back in QuickBooks within thirty minutes. A few need the full clean reinstall. And a small number — the ones with C=44 errors, enterprise security environments, or post-fix data concerns — need a specialist.

Frequently Asked Questions (FAQs)

Q1: What is QuickBooks Error 1402 and is my data safe?

QuickBooks Error 1402 is a Windows registry permission error that appears during installation or updates. It means QuickBooks could not access a specific registry key it needed to complete the process. Your company file data is almost always unaffected — this error disrupts the installation, not your financial records. Your data sits safe on your hard drive until the installation is repaired.

Q2: What is the fastest fix for QuickBooks Error 1402?

Start with the reboot.bat file in Solution 3 — it takes under two minutes and re-registers all of QuickBooks’ registry entries automatically. If that does not work, the %temp% folder fix in Solution 4 takes three minutes and resolves a surprising number of cases. If you want the most comprehensive automated fix, the Tool Hub Install Diagnostic Tool in Solution 1 handles the majority of cases but takes up to twenty minutes to run.

Q3: Why did my QuickBooks reinstall not fix Error 1402?

Almost certainly because you reinstalled over a broken installation without running the Clean Install Tool first. The standard uninstall leaves residual registry entries and files behind — reinstalling over them recreates the same problem. The solution is to uninstall QuickBooks, run the QuickBooks Clean Install Tool from the Tool Hub, restart, and then install a fresh downloaded copy. That sequence resolves virtually every failed reinstall situation.

Q4: Is QuickBooks Error 1402 different on Windows 11 than Windows 10?


The root cause is the same on both — registry permission conflicts and damaged Windows components. But Windows 11 has stricter User Account Control policies that cause this error to appear more frequently during routine updates, even on otherwise healthy systems. The specific Windows 11 fix involves running the installer explicitly as Administrator and temporarily lowering the UAC setting during installation — both covered in Solution 9.

Q5: Why is my QuickBooks File Doctor network button greyed out after Error 1402?

File Doctor’s network diagnostic requires a functioning QuickBooks installation to operate. Error 1402 leaves the installation in a broken state that disables the network check button. Fix the installation using any of the twelve solutions, then return to File Doctor — the button will be fully active. If it remains greyed out after a complete clean reinstall, that indicates a network configuration issue separate from Error 1402 that needs direct support.

Q6: What should I do if QuickBooks hosting mode turned off after I fixed Error 1402?

This is completely normal after a reinstall — hosting settings reset to factory defaults. On your server computer, open QuickBooks, go to File > Utilities, and click Host Multi-User Access to re-enable hosting. Then open the QuickBooks Database Server Manager from the Tool Hub and scan your company file folder. Your team’s network access restores within minutes. It is a two-minute fix, not a new problem.

Q7: Can QuickBooks Error 1402 come back after I fix it?

Yes — if the underlying cause was not fully addressed. The most common reasons for recurrence are antivirus software that re-blocks QuickBooks registry access after the next update, Windows updates that reset permission settings again, or a reinstall that was done without the Clean Install Tool and left broken remnants behind. Following the prevention steps — Run as Administrator habit, automatic Windows updates, QuickBooks antivirus whitelist — significantly reduces the chance of seeing this error again.

Q8: Is it safe to edit the Windows registry to fix Error 1402?

Yes — if you follow the specific steps exactly and create a registry backup before making any changes. The backup process takes thirty seconds and gives you a complete restore point if anything goes wrong. The registry edits required for Error 1402 are limited to changing permission settings on specific keys — they do not delete or modify any data. If you are not comfortable doing it yourself, our team at QBookAssist can handle the registry fix remotely and safely.

QuickBooks Error 3120 — How to Fix the Transaction Mapping Nightmare for Good

Everything was running fine. Your QuickBooks POS processed the sale. The customer paid. And then — right when the financial exchange tried to sync that transaction into QuickBooks Desktop — everything stopped.

“Object: 800000-1349276859 specified in the request cannot be found. QuickBooks error message: Invalid argument. The specified record does not exist in the list.”

Fix QuickBooks Error 3120

That is QuickBooks Error 3120. And if you have seen it, you know exactly how frustrating it is. Your POS and your Desktop are supposed to talk to each other seamlessly. Instead, they are pointing fingers at each other while your payment records sit in limbo.

The good news — this is fixable. In most cases, completely fixable without touching your company file or losing a single transaction.

At QBookAssist, we have resolved QuickBooks Error Code 3120 for retail business owners, accountants, and bookkeepers across the US. This guide covers every cause, every fix, and exactly when to stop troubleshooting on your own and call someone who does this for a living.

What Exactly Is QuickBooks Error 3120?

Let us clear something up right away — QuickBooks Error 3120 is not a file corruption error. Your company data is almost certainly intact.

What it actually is — it is a mapping and synchronization error. Specifically, it happens when QuickBooks Desktop Point of Sale tries to run a financial exchange with QuickBooks Desktop, and something in that handshake breaks down. Either the accounts on both sides do not match up, or one side is trying to record a transaction that already exists — or that the other side cannot find at all.

The technical name for this is a QuickBooks transaction update error 3120. It belongs to the QuickBooks 3XXX series of errors — a family that includes Error 3000, Error 3140, Error 3170, and Error 3180 — all of which are related to data exchange and account reference issues between QuickBooks products.

The error mainly occurs when the transaction you are trying to enter already exists in QuickBooks records — or when the system cannot find the record it is looking for on either side of the sync.

The status code message that appears says it all: “The specified account is invalid or of the wrong type.” That single line tells you exactly where to look — your account mapping.

What Causes QuickBooks Error 3120?

Before you start clicking through solutions randomly, take two minutes to identify which cause actually applies to your situation. It will save you an hour of unnecessary troubleshooting.

Cause 1 — Incorrect Account Mapping in QuickBooks POS

This is the number one cause — and it is responsible for the majority of Error 3120 cases we handle.

If your Accounts Receivable and Accounts Payable are not mapped correctly, you will face error code 3120, responsible for invalid references to these accounts.

When you set up QuickBooks Desktop Point of Sale, every transaction type — sales, payments, refunds, inventory — needs to be mapped to the correct corresponding account in QuickBooks Desktop. If even one of these mappings is off — pointing to a wrong account type or an account that no longer exists — the financial exchange breaks and Error 3120 appears.

You can spot incorrectly mapped accounts easily. In QuickBooks POS preferences, account names that are mapped incorrectly appear with brackets around them — like [Accounts Receivable] instead of just Accounts Receivable. If you see brackets — that is your culprit.

Cause 2 — QuickBooks POS Synchronization Failure

Sometimes the error is not about accounts at all. It is about timing.

If the initial exchange was removed or manually modified in the QuickBooks application, users may receive error 3120.

When a financial exchange between QuickBooks POS and QuickBooks Desktop is interrupted midway — power outage, manual close, software crash — the data on both sides ends up in a mismatched state. One side thinks the transaction was recorded. The other side has no record of it. The next sync attempt triggers status code 3120 because the system is trying to record something that partially exists — or find something that was never fully saved.

Cause 3 — Duplicate Transaction Already in the File

The error mainly occurs when the transaction you try to enter already exists in QuickBooks records.

This happens when a payment gets processed in POS, the sync partially runs, and then someone tries to manually enter the same payment in QuickBooks Desktop. Now both sides have a version of the transaction — and when the next financial exchange runs, the system flags the conflict as QuickBooks banking error 3120.

Cause 4 — Mismatched Payment Invoices

The payment amount in POS and the invoice amount in QuickBooks Desktop do not match. Maybe the invoice was edited after the payment was taken. Maybe a discount was applied on one side but not the other. Either way — the mismatch triggers the error.

This error normally indicates that a specific item is missing from QuickBooks or that there is an issue with the vendor, supplier, customer, or employee information while processing the bank transactions.

Cause 5 — Corrupted Data or Damaged Installation

A corrupted or damaged company file can also trigger QuickBooks Error 3120. In such cases, QuickBooks is unable to read the transaction data correctly, causing a sync failure.

This is the less common but more serious cause. A damaged QuickBooks installation file or a company file with corrupted records prevents the financial exchange from completing. The error shows up because the system literally cannot read what it needs to read.

Cause 6 — Incorrect or Outdated QuickBooks Web Connector

If you are using a third-party application integrated with QuickBooks through the Web Connector — and that connector is outdated or misconfigured — it can trigger QuickBooks runtime error 3120 during every sync attempt. This is especially common with ecommerce integrations and inventory management systems that connect to QuickBooks.

Signs You Are Dealing With QuickBooks Error 3120

Just so there is no confusion — here is what the error actually looks like when it hits:

The error message on your screen reads something like:

“Status code 3120: Object ‘80000026-1349276859’ specified in the request cannot be found. QuickBooks error message: Invalid argument. The specified record does not exist in the list.”

Alongside this message, you will typically notice:


Your QuickBooks application becomes unresponsive for a period after the error appears. The financial exchange stops mid-process — leaving transactions in a pending state on the POS side. QuickBooks performance degrades noticeably — slower load times, freezing when navigating between screens. Some receipts display as ####### instead of showing account names — this is QuickBooks telling you the referenced account is invalid or typed incorrectly. Payment downloads fail when you try to bring transactions in through invoices.

If you are seeing three or more of these at once — you are dealing with a classic QuickBooks error message 3120 scenario. Let us fix it.

Step-by-Step: How to Fix QuickBooks Error 3120

Work through these solutions in order. The first two fix the vast majority of cases.

Before you start: Create a backup of both your QuickBooks Desktop company file and your QuickBooks POS data file. Do not skip this. Go to File > Back Up Company > Create Local Backup in QuickBooks Desktop. Then open QuickBooks POS and go to File > Backup Data. Two minutes now protects everything you have built.

Solution 1 — Fix Account Mapping in QuickBooks POS

This is the first thing to check and fixes roughly 60% of Error 3120 cases.

Open QuickBooks Desktop Point of Sale and go to File > Preferences > Company. Under the Financial section, click Accounts. You will see two tabs — Basic and Advanced. Go through both carefully.

Look for any account name displayed in brackets — for example [Accounts Receivable] or [Checking Account]. Brackets mean that account is incorrectly mapped or no longer exists in QuickBooks Desktop. Click on each bracketed account and reassign it to the correct corresponding account from the dropdown list.

Once you have corrected every mapping, click Save. Then run the financial exchange again from QuickBooks POS by going to File > Financial Exchange.

Real talk from our team: Nine out of ten times when a client calls us about QuickBooks error code 3120, the brackets are right there in the account preferences — sitting in plain sight. Check this first before anything else. It is the fastest fix there is.

Solution 2 — Re-Sync Data Between QuickBooks POS and Desktop

If the account mapping looks correct but the error persists, a manual re-sync often clears the conflict.

Open QuickBooks POS and go to File > Re-sync Data in QuickBooks. Follow the on-screen prompts. This process manually matches the data between both systems — identifying what was successfully synced and what still needs to be recorded.

If you are using a third-party integration through the QuickBooks Web Connector — open the Web Connector, check for any pending updates, and update it to the latest version before running the sync again. An outdated Web Connector is a hidden trigger for QuickBooks POS sync issues that many people miss completely.

Pro tip: After the re-sync completes, do not immediately try to add new transactions. Give QuickBooks about five minutes to settle the data before your next financial exchange. Rushing a second sync right after the first often triggers the error again.

Solution 3 — Run QuickBooks Verify and Rebuild Data

If the first two solutions did not fully resolve the QuickBooks transaction update error 3120, it is time to check whether your company file has data integrity issues.

Open QuickBooks Desktop and go to File > Utilities > Verify Data. Let the tool run completely — do not interrupt it. It will scan your company file for any internal inconsistencies or damaged records.

If Verify Data finds problems, go back to File > Utilities > Rebuild Data. Confirm that you want to proceed. The rebuild process repairs the damaged data structures inside your company file. This takes a few minutes depending on your file size.

Once the rebuild is complete, go back to QuickBooks POS and try running the financial exchange again.

Solution 4 — Fix the Customer or Vendor Payment Method

This is a less obvious fix but it works in cases where the error is specifically tied to how a customer or vendor payment is being processed.

Open QuickBooks POS and go to the main menu. Click on Customer and Vendor Profile. Locate the Payment Method list. Find the Cash heading, right-click it, and select Edit. Change the payment method name by adding an X in front — making it (XCash) — and click OK. Then create a new Cash payment method from scratch and set it as the active default.

This resets the payment method reference that QuickBooks was struggling to locate — which is what was triggering the QuickBooks payment entry conflict in the first place.

After making this change, try processing a test payment to confirm the error is resolved.

Solution 5 — Merge Duplicate Customer or Vendor Names

Duplicate entries in your customer or vendor list create conflicting references during the financial exchange — and those conflicts show up as status code 3120.

In QuickBooks Online Accountant, sign in as an admin, click the Gear icon, and select Merge Duplicate Contacts. Review the list of potential duplicates that appears. For any entries that are clearly the same customer or vendor — same name, same contact details — select them and merge them into a single record.

In QuickBooks Desktop, go to Lists > Customer List or Vendor List. Look for any entries that appear twice with slightly different spelling — like “John Smith” and “John Smith LLC.” Edit one of them to match the other exactly, and QuickBooks will prompt you to merge them.

Once duplicates are resolved, run the financial exchange again.

QBookAssist tip: Duplicate names are one of the sneakiest causes of QuickBooks error 3120 because they are so easy to create accidentally — one import, one manual entry, one sync from a third-party app — and suddenly you have two records pointing to the same real-world customer. Always run a duplicate check after any data import.

Solution 6 — Repair or Reinstall QuickBooks Desktop

If none of the above solutions have worked, the issue may be with the QuickBooks installation itself rather than your data.

Download the QuickBooks Tool Hub from Intuit’s official website – it contains the Verify and Rebuild tool you need for this step. Open it and go to the Installation Issues tab. Click QuickBooks Install Diagnostic Tool and let it run. This tool automatically detects and repairs common installation problems that can cause financial exchange errors including QB error 3120.

If the diagnostic tool does not resolve it, consider a clean reinstall of QuickBooks Desktop. Before uninstalling — make sure your company file is backed up and your license key is saved somewhere accessible.

Before You Troubleshoot — Three Things to Check First

These three checks take two minutes but can save you from an hour of troubleshooting the wrong thing:

Check 1: Confirm that the payment amount your customer made and the amount on the invoice are identical — down to the cent. Even a one-cent discrepancy can trigger this error.

Check 2: Run an invoice query to verify that the invoice with the specific transaction ID actually exists in your QuickBooks database. If it was deleted or modified after the payment was taken — that is your cause.

Check 3: Make sure both QuickBooks Desktop and QuickBooks POS are running the same version and update level. A version mismatch between the two products is a known trigger for QuickBooks POS financial exchange errors across the entire 3XXX series.

When QuickBooks Error 3120 Keeps Coming Back

Here is something we hear regularly — “I fixed it, but it came back three days later.”

If QuickBooks error code 3120 keeps recurring after you have applied these solutions, it almost always means one of three things:

The root cause was never fully addressed — most commonly an account mapping that was fixed but reverted because the underlying account in QuickBooks Desktop was edited or made inactive again.

There is a deeper data integrity issue in the company file that the Verify and Rebuild process did not fully resolve. This requires a more thorough file repair using specialized tools.

A third-party integration or app is pushing bad transaction data into QuickBooks repeatedly — triggering the same sync error every time it runs.

In any of these recurring cases, the honest truth is that continuing to apply the same fixes is not going to get you a permanent resolution. You need someone to look at the actual file and the actual sync log to find what keeps breaking.

When to Call a QuickBooks Specialist

Most people can get through Solutions 1 and 2 on their own. But call a certified QuickBooks specialist if:

The error appears on every single financial exchange with no improvement from any troubleshooting step. Your QuickBooks POS synchronization stopped working entirely — not just one transaction but all of them. You are seeing QuickBooks error 3120 alongside other errors like Error 3000, 3140, or the QuickBooks unrecoverable error — which suggests a broader data or installation problem. Your company file is showing signs of damage beyond just the sync error — missing transactions, wrong balances, or reports that do not reconcile – Our QuickBooks data recovery services team can repair the file without risking your existing data. . You are a retailer with high transaction volume and cannot afford to have your POS-to-Desktop sync down for hours while you troubleshoot.

At QBookAssist, we handle QuickBooks Desktop Point of Sale errors — including recurring QB error 3120 cases — every day. We can get into your sync logs, identify exactly what is breaking, and fix it without putting your company file data at risk.

Call us at [+1-866-408-0544] for same-day QuickBooks Error 3120 support.

How to Prevent QuickBooks Error 3120 From Returning

Once you are error-free, spend fifteen minutes doing these things to keep it that way:

Never make an account inactive in QuickBooks Desktop without first updating the POS mapping. Deactivating a mapped account without reassigning it in POS preferences is the fastest way to trigger this error again.

Run the financial exchange daily — not in batches. The longer you wait between syncs, the more opportunity there is for mismatches to build up. Daily exchanges keep both systems in close alignment.

Keep QuickBooks Desktop and QuickBooks POS on matching update levels. Every time you update one, update the other. Do not let them drift apart in version numbers.

Do a quarterly duplicate check on your customer and vendor lists. Any integration with ecommerce, inventory, or CRM systems can create duplicates over time without obvious warning.

Back up both systems before every update. A backup takes two minutes. A company file recovery after a failed update takes hours.

Conclusion

QuickBooks Error 3120 is one of those errors that sounds more intimidating than it actually is — at least in most cases. Nine times out of ten it comes down to account mapping that went wrong somewhere between QuickBooks POS and QuickBooks Desktop. Fix the mapping, re-sync the data, and you are done.

But when it keeps coming back — or when it arrives alongside other errors — it is telling you something deeper needs attention. Do not ignore that signal.

Work through the six solutions above in order. And if you get to Solution 6 and the error is still there — or if it comes back within a few days — that is when you call someone who handles this daily.

Frequently Asked Questions (FAQs)

Q1: What is QuickBooks Error 3120 and what causes it?

Ans. QuickBooks Error 3120 is a transaction mapping and synchronization error that occurs during the financial exchange between QuickBooks Desktop and QuickBooks POS. The most common causes are incorrect account mapping in POS preferences, mismatched payment invoices, duplicate customer or vendor entries, and incomplete synchronization between the two systems.

Q2: Does QuickBooks Error 3120 delete or damage my company file data?

Ans. No — in most cases QuickBooks Error Code 3120 does not damage your company file. It is a runtime sync error, not a data corruption error. Your existing transactions and records remain intact. The error prevents new transactions from being recorded correctly until the underlying mapping or sync issue is resolved.

Q3: How do I identify incorrect account mapping in QuickBooks POS?

Ans. Open QuickBooks POS and go to File > Preferences > Company > Accounts. Look through the Basic and Advanced tabs for any account names displayed inside brackets — for example [Accounts Receivable]. Brackets indicate that account is incorrectly mapped or no longer exists in QuickBooks Desktop. Reassign each bracketed account to the correct one and save.

Q4: Why does QuickBooks Error 3120 keep coming back after I fix it?

Ans. Recurring Error 3120 usually means the root cause was not fully addressed. The most common reasons it returns are a mapped account that was made inactive again in QuickBooks Desktop, a deeper data integrity issue in the company file, or a third-party integration pushing bad transaction data into QuickBooks repeatedly. A QuickBooks specialist can identify the recurring trigger by reviewing the sync logs directly.

Q5: Is QuickBooks Error 3120 related to other QuickBooks errors like 3000 or 3140?

Ans. Yes — Error 3120 belongs to the QuickBooks 3XXX series of errors, which includes Error 3000, Error 3140, Error 3170, and Error 3180. All of these are related to data exchange and account reference issues between QuickBooks products. If you are seeing multiple 3XXX errors at once, it typically indicates a broader account mapping or installation problem that needs a more

Q6: Can I fix QuickBooks Error 3120 without losing any transaction data?

Ans. Yes — in most cases all six solutions covered in this guide can be applied without touching or losing your existing transaction data. The only solution that carries any risk is the reinstall in Solution 6, which is why creating a backup before troubleshooting is essential. With a backup in place, you can resolve the error safely regardless of which solution applies to your situation.

Q7: How long does it take to fix QuickBooks Error 3120?

Ans. If the cause is incorrect account mapping — Solutions 1 and 2 — most users resolve it within 20 to 30 minutes. If the error requires a Verify and Rebuild process, add another 15 to 45 minutes depending on company file size. Complex cases involving recurring errors or third-party integration issues may take longer and benefit from professional support.

How to Create, Add, or Delete an Expense Category in QuickBooks?

Managing the expense category in QuickBooks accurately is important for businesses for proper bookkeeping and detailed financial reports. Moreover, categorising the business expenses by type promotes better budget management. No matter whether you have to handle the uncategorized expense in QuickBooks Online, categorise credit card payments, or need to know how to add an expense category in QuickBooks, proper categorisation will help keep the accounts organised.

In this write-up, we have explained how to create, edit, view and delete the categories by improving the QuickBooks categorizing expenses for efficient financial tracking.

How to Create a New Expense Category in QuickBooks Online?

Perform the following step-by-step instructions to create a new expense category in QuickBooks Online.

  1. Initially, choose the Accounting option from the left panel.
  2. After this, click the Charts of Accounts.
  3. Look at the right side next to Run Report, hit the green colored box labelled as New.
  4. You will get a new prompt with a pop-up for a New account and click the Expense icon.
  5. Complete the required details for the expense account, and then scroll down to see more boxes and details to be filled.
  6. Once it’s done, tap on the Save option.
Create a New Expense Category in QuickBooks Online
  • Now, you can check if the new expense category is successfully created in QuickBooks Online.

How to Add An Expense Category in QuickBooks Online?

The Expense Categories page in the Payroll Settings is used to describe the various employee expense categories accessed by your business.

Add An Expense Category

Here’s what to do to add an expense category.

  1. Initially, move to the Payroll Settings and click Expense Categories.
  2. Choose the Add option and provide the name of the expense category.
  3. Also, provide an External ID for the expense category, if required.
  4. After adding all the details, click the Save option.

Edit expense category in QuickBooks Online

Perform the following steps to edit an expense category in QBO;

  1. Choose the name of the category you want to edit.
  2. It will expand the details of the category for editing.
  3. After this, you can make the required changes.
  4. At last, click Save after completing.

You can also delete expense categories from this screen by taking the cursor to the category you want to delete. Then, click the red circle cross that appears.

How to View Expense by Category in QuickBooks Online?

You need to run the Transaction detail by Account report, filter by transaction type (Expense) and group by account to get a summarised breakdown. Here’s what to do to view expenses by category.

  1. Initially, move to the Reports menu and type Transaction Detail by Account in the search bar.
  2. Tap on the Customise button and set the Report Period.
  3. Now, circle the checkbox of Transaction Type and click the Expense option.
  4. For the Distribution Account, head to the All Expense Account.
  5. Finally, tap on the Run Report option.

How to Delete an Expense Category in QuickBooks Online?

If you want to delete an expense category, move to the Chart of Accounts in QuickBooks Online to complete the task.

Here are the step-by-step instructions to delete an expense category.

  1. Initially, move to the Accounting menu.
  2. From the Charts of Accounts tab, look for the account you wish to make inactive. Alternatively, you can also use the search box to locate the accounts easily.
  3. Once you get the account, hit the drop-down arrow below the Action column.
  4. Now, tap on the Make Inactive option to complete the process.

How to Categorise Credit Card Payments in QuickBooks Online?

You can categorise credit card payments in QuickBooks Online with the help of the Pay Down Credit Card function. Follow the steps written below to categorise credit card payments.

  1. Firstly, hit the + New button and click Pay Down Credit Card.
  2. Choose the credit card you made the payment to and provide the payment amount.
  3. Also, mention the payment date and pick the bank account through which you make your credit card payment.
  4. If the payment is done via cheque, click “I made a payment with a check” and then mention the check number.
  5. If you have made the payment electronically, mention the EFT number.
  6. After this, include a memo or attachment as required.
  7. At last, hit the Save and Close option to finish.

How to Automatically Categorize Expenses in QuickBooks Online?

You can also enable the auto-categorise feature for QuickBooks, which categorizes expenses and automatically categorizes familiar expenses.

What Expenses Can or Cannot Be Auto-Categorized?

QuickBooks Online doesn’t auto-categorized less familiar expenses like;

  1. Expenses that are categorized by rules you have generated.
  2. Tricky expenses such as loans, owner’s draw, transfers, and check payments.
  3. We don’t have enough data on to categorise.
  4. Any money-in transactions.

How does Auto-Categorise work with other automation features?

When the auto-categorise feature is enabled, while other automation features are enabled, functions will perform in the following order.

  1. Any tricky or money-in transactions are excluded.
  2. Any rules that match or categorise transactions trigger.
  3. The Auto-Categorise feature is applied to the rest of the expenses. Then, it is categorised and added to the books.
  4. Any remaining transactions are left for you to categorise manually.

Setup Auto-Categorization

  1. Initially, move to All Apps > Accounting > Bank Transactions.
  2. Now, click the See how it works option when you see the “Save more time with auto-categorise” message.
  3. You will get an introduction to how QuickBooks will categorise your expenses. Then, tap on the See a preview option.
  4. QuickBooks shows some expenses that are identical to the ones you have categorised before, and shows how we can categorise them. After checking, hit the Next option.
  5. If you see everything is fine, select “Yes, categorise familiar expenses for me.” If you plan not to allow QuickBooks to auto-categorise your expenses, opt for the “No, I’ll Categorise everything.”
  6. Choose the Confirm option.
  7. If you click Yes, then you can also choose Review our work, or Go to Bank Transactions.

Review & Edit Auto-Categorized Expenses

QuickBooks application categorises the expenses accurately, but you still need to edit or change how certain transactions are categorised. For that, perform the steps instructed below.

  1. Initially, head to All Apps > Accounting > Bank Transactions.
  2. Choose the Categorised tab.
  3. Apply a filter for the transaction list for Auto-categorised.
  4. You must check out the categorized expenses for accuracy. If you think that any transactions need to be re-categorized, pick the category to select a different one. Otherwise, click Undo to remove the currently assigned category. It will simply transfer the expense back to the For Review tab.

Manage Auto-Categorization

You have the option to disable or enable the auto-categorization at anytime. For that, use the following steps.

  1. Move to All Apps > Accounting > Bank Transactions.
  2. Choose the Settings icon from the top of the transaction list.
  3. Enable the Familiar Expenses switch On or Off. Editing these settings doesn’t affect any expenses that are previously auto-categorised.

How To Use QuickBooks personal credit card for business expenses?

You need to perform the following steps to use the QuickBooks personal credit card for business expenses.

First Step: Record the Business Expense

Firstly, you need to record the business expense that was paid with personal funds with a journal entry. For that, perform the following steps.

  1. Initially, open the + New option from the left menu.
  2. Choose the Journal Entry tab.
  3. From the first line, select the Expense Account for the purchase and enter the Purchase Amount in the Debits column.
  4. Within the second line, tap on Partner’s equity or Owner’s equity.
  5. You must mention the same purchase amount in the Credits column.
  6. At last, hit the Save and Close option.

Second Step: Reimburse the funds as a cheque or expense

Perform the following steps to reimburse the funds as a cheque or expense.

  1. Click on + New and then hit the Cheque option.
  2. After this, select a Bank account to reimburse the personal funds from.
  3. When in the Category Column, opt for the Partner’s equity or Owner’s equity.
  4. Mention the reimbursement amount.
  5. Once all is sorted, click the Save and Close or Save and New option.
Reimburse the funds as an expense
  1. Initially, click the + New and then hit the Expense option.
  2. After this, select a bank account for the reimbursement of the personal funds.
  3. When you are in the Category column, hit the Partner’s equity or Owner’s equity option.
  4. Mention the reimbursement amount and then click the Save and Close option.

Conclusion

We hope that this post has provided you with enough information to manage expense categories in QuickBooks for accurate reporting. From understanding how to create, add, view, or delete expense categories in QuickBooks, proper setup ensures good control over the business finances. As a result, it will help the businesses in organising expenses properly, which helps in making informed decisions.

If you still need any help, feel free to connect with our QBooksAssist professionals.

Frequently Asked Questions (FAQ’s):-

Question 1: What are categories used for in QuickBooks Online?

Ans. In QuickBooks Online, categories allow you to keep your products and services organised. Also, it provides you with a clear insight into sales and inventory while running reports.

Question 2: How to categorise uncategorized expenses in QuickBooks?

Ans. To categorise uncategorized expenses in QuickBooks, identify them through the Profit and Loss report. After this, you can update the category within the Banking/Transaction tab by choosing the correct expense account.

Question 3: How do I change the name of the expense category in QuickBooks?

Ans. To edit the expense category name in QuickBooks, head to the Gear icon and click Chart of Accounts. Search for the expense category you wish to edit and click on it. After this, hit the Drop-down arrow next to the Run Report link for the Edit option.

QuickBooks Online vs QuickBooks Desktop: Top Differences

QuickBooks Online and QuickBooks Desktop are both powerful accounting solutions, each designed to meet different business requirements, which can make choosing between them a bit tricky. One emphasizes flexibility and cloud-based access, while the other provides advanced features and in-depth reporting capabilities. Before making a decision, between QuickBooks Online Vs QuickBooks Desktop, it’s important to figure out how each option fits your workflow, budget, and long-term goals.

Whether you’re a freelancer, a small business owner, or managing a growing business, selecting the right accounting software can significantly influence your efficiency and financial management.

QuickBooks desktop pro plus vs QuickBooks online

Herein, in this guide, we have provided the difference between QuickBooks online and desktop based on pricing, usability, benefits, and features.

What is QuickBooks Online?

QuickBooks Online is a cloud-based accounting software that lets you work from anywhere and on any device. It offers automatic updates and is designed for mobility and real-time collaboration.

Features of QuickBooks Online

The following are the key features that comes within the QuickBooks Online application.

Intuit QuickBooks Software Features
  1. Cloud-based access from any device
  2. Real-time syncing of data
  3. Mobile app support for iOS and Android.
  4. Integration with 750 + third-party apps.
  5. Automated invoicing and payment reminders.
  6. Receipt capturing using the mobile app.
  7. Multi-user collaboration (up to 25 users according to the plan).
  8. Automatic data backups and updates.

What is QuickBooks Desktop?

QuickBooks Desktop is locally installed accounting software that is designed for both Windows and Mac. It provides robust financial management for small to large-scale businesses. It offers more advanced, industry-specific features and deeper reporting.

Features of QuickBooks Desktop

The following are the key features you can access with QuickBooks Desktop.

Features of QuickBooks Desktop
  1. Advanced inventory tracking and reporting.
  2. Industry-specific versions (Manufacturing, Retail, Contractors).
  3. Enhanced Payroll processing (with add-on services).
  4. More advanced job costing and reporting tools.
  5. Local installation on Windows or Mac.
  6. Batch invoicing for multiple customers.
  7. One-time purchase or annual subscription.
  8. Ability to manage large files and extensive data.

What’s the Difference between QuickBooks Online and Desktop?

Here, we have described the difference between QuickBooks Online and Desktop. This will help you in choosing the right fit for your business.

FeaturesQuickBooks OnlineQuickBooks Desktop
AccessibilityIt is a cloud-based software which gives access to work from anywhere and on any device.It is installed on a single system only.
CollaborationYou can collaborate across multiple users, devices, and locations.You can collaborate in-person on one device only.
Users IncludedWith one single subscription, up to 25 users can use it.You have to pay additional charges per user.
Updates & SecurityAutomatic updates and backup is stored on cloud.Manual updates have to be done and data is stored locally.
Internet RequirementA high-speed internet connection is required.You can also work offline without internet.
Automated Time TrackingThis software automatically syncs and is included with QBO Payroll.Additional fees is applied.
Mobile AppYou can work from smartphone or tablet using the QBO app.Users can limited functionality to use the QuickBooks app.
Third-Party App IntegrationYou can integrate the QBO software with 750 + apps.You can integrate the QuickBooks Desktop with 200 + apps.
QuickBooks LiveUsers need to pay additional fees to access QuickBooks Live feature.QuickBooks Live Support facility isn’t available in Desktop version.
HR & Other BenefitsUse the Built-In HR and benefit services. Fees is applicable for 401(k), health insurance.Offers 401(k) employee benefits and additional fees is applied.
GoPayment App & Card ReaderCards, eChecks, ACH, plus Apple Pay, PayPal, and Venmo.Cards, eChecks, and ACH Payments.
Pricing ModelMonthly SubscriptionOne-time purchase option for some versions.
InventoryFIFO method only.Average Costing & FIFO.

QuickBooks Online VS QuickBooks Desktop: Which is Right For Your Business?

Consider the following key points while selecting the right accounting solution for your business.

Suitability for QuickBooks Online

  • E-commerce Business-

QuickBooks Online works best with e-commerce businesses, especially for small and web-based businesses.

  • Businesses Having Multiple Users-

If you wish to grant more than one person access to your books of accounts, then QBO is the best choice. When using QuickBooks Desktop, you need to pay additional fees to grant access to multiple users.

  • Cloud-Based Accounting-

Businesses and the ongoing entrepreneurs who want to run their businesses using their smartphones can use QBO via computer or mobile device with a good internet connection.

Suitability for QuickBooks Desktop

  • Intensive inventory accounting-

QuickBooks Desktop is the perfect fit for businesses that require a robust accounting & inventory package.

  • Specialized Industries-

This software is a perfect fit for industry-specific businesses like retailers and non-profit organizations.

  • Bookkeeping across multiple businesses-

You can handle the books of accounts for an unlimited number of companies with the QuickBooks Desktop software.

QuickBooks Online vs. QuickBooks Desktop Cost

We have explained the pricing plan of QuickBooks Online and QuickBooks Desktop.

QuickBooks Online

Simple StartEssentialsPlusAdvanced
$19 monthly
Save 50% for 3 months.
$37.50 monthly

Save 50% for 3 months.
$57.50 monthly

Save 50% for 3 months.
$137.50 monthly

Save 50% for 3 months.
1 User


With access for 2 accountants
3 Users


With access for 2 accountants.
5 Users


With access for 2 accountants.

QuickBooks Desktop

GoldPlatinumDiamond
$2210 yearly$2717 yearly$5364 yearly
Annual SubscriptionAnnual SubscriptionMonthly Subscription
Up to 30 usersUp to 30 usersUp to 40 users

Conclusion

The right choice between QuickBooks Online Vs QuickBooks Desktop entirely depends on how your business runs and what features matter the most to you. If you prioritize accessibility, automation, and seamless collaboration, QuickBooks Online offers a modern and flexible solution. Whereas, if your business requires in-depth reporting, industry-specific tools, and greater control over data, QuickBooks Desktop may be the better fit. However, carefully evaluating your current needs and future growth plans will help users make the right business decision.

If you still require any further assistance, consult with our Qbookassist professionals.

Frequently Asked Questions (FAQ’s):-

Question 1: Can you switch from QuickBooks Desktop to Online?

Ans. Yes, no matter which QuickBooks Desktop version you are using, you can easily switch to the QBO version.

Question 2: What happens to my QuickBooks Desktop data after switching to the online version?

Ans. After moving to QuickBooks Online version, create a new account and then log in. You can transfer your business and payroll data to QBO and keep a copy of your original records.

Question 3: What are the benefits of QuickBooks Online Payroll?

Ans. QuickBooks Online Payroll offers remote online access to your data from anywhere and at any time. Also, you can provide employee benefits such as 401 (k) plans, healthcare, and workers’ compensation. By syncing automatic time tracking with Online Payroll and by setting up payroll, you can work more efficiently.

Question 4: What are the benefits of moving from QuickBooks Desktop to QuickBooks Online?

Ans. The QuickBooks Online application provides more flexibility to work from anywhere, which saves your time that is otherwise spent going to the office. It eliminates the need for manual data entry and allows you to use the mobile app to stay updated with your business.

Question 5: Is QuickBooks Desktop going away in 2026?

Ans. QuickBooks Desktop is going to discontinue on 31st May 2026. It means Intuit is going to stop the updates, support, or access to add-ons such as payroll.

How To Fix QuickBooks Multi-User Mode Problems: H202?

Getting stuck with Error Code H202: This company file is on another computer, and QuickBooks needs some help connecting.”?

This error mainly triggers when a workstation cannot reach the company file on the host server. Other factors causing this error include incorrect hosting configurations, blocked network ports, or incorrect network connectivity.

Read this guide and learn how to fix QuickBooks multi-user mode problems: H202.

Why Do I Get Stuck with QuickBooks Multi-User Error H202?

QuickBooks Multi-user error H202 mainly occurs due to incorrect firewall settings on the server. The following are some of the common reasons causing this error.

  • Issues with the network connectivity.
  • QuickBooks services such as QBCFMonitorService and QuickBooksDBXX aren’t running properly.
  • You don’t have enough Windows permissions to run the company file in multi-user mode.
  • A corrupt or damaged company file may also trigger the H202 Error in QuickBooks Desktop.
  • Sometimes, it may be caused by inaccurate hosting settings.

Learn How To Fix QuickBooks Multi-User Mode Problems: H202

Wondering how to fix QuickBooks Multi-user mode problems: H202? Follow the troubleshooting solutions described below to regain access to multi-user mode.

First Solution: Review the Services Running On your Server

You must verify that the QuickBooks services are running accurately on your server computer. Perform these steps to test the QuickBooksDBXX services and then repeat the same steps for the QBCFMonitorService.

  • Go to your server computer and open the Run window.
  • Now, type “services.msc” and click the OK tab to view the Services list.
  • Locate and then double-tap on the QuickBooksDBXX from the list.
  • Choose the Automatic option for the Startup Type.
  • Moreover, ensure that the Service Status is either selected as Running or Started. If none of them is chosen, move to the Start option.
Review the Services Running On your Server
  • Now, browse to the Recovery tab and click Restart the Service from these options:
    • First Failure
    • Second Failure
    • Subsequent Failure
Recovery tab and click Restart the Service
  • After this, tap on Apply option and then OK to restore the required changes.
  • At last, you must perform these steps for QBCFMonitorService.

Once you’re done, launch QuickBooks on each workstation. Then, move to the File > Switch to Multi-user Mode and verify if everything opens accurately. If the issue still continues, then try another solution.

Second Solution: Check Your Internet Connectivity By Pinging Your Server

You must ping a server from your workstation to review the internet connection. Make sure that you ping the server from every workstation that is facing QuickBooks error h202 switching to multi-user mode.

Enable the Network Discovery on the Server PC and any workstations getting Error H202

  • Access the Start menu on both your server and workstations.
  • Now, enter Network and then access the Network and Sharing Center option.
  • Move to the Change Advanced sharing settings option.
  • Herein, verify that the Turn on network discovery is selected from the Network Discovery and File and Printer Sharing sections.

After that, obtain your server name from your server:

  • Launch the Start menu on your server PC and open the Run window.
  • Now, insert “CMD” in the search console and click OK.
  • When you are in the Command Prompt window, type “ipconfig/all” and hit the Enter key.
  • After this, look for the Host Name from the Windows IP Configuration section. You will get your server name on the right side of the screen.
Windows IP Configuration section
  • At last, note down the host name, or copy it to a Word Doc to easily access it.

Return to your workstation to review the server. You may find these steps a bit difficult, so you can ask the IT expert for assistance.

  • On your workstation, launch the Start menu and then open the Run window.
  • After this, insert CMD in the search box and click on OK.
  • When you are in the Command Prompt screen, type “ping [your server name]” and hit the Enter key. Make sure not to add brackets next to your
your server name
  • server name.
  • Finally, resume the same steps for each workstation facing the QuickBooks Desktop Error H202.

If you see a reply for each packet having no loss, it shows that your server is working absolutely fine. You can try another solution to fix the issue.

Otherwise, if you see there’s a packet loss or a very slow reply, you need to stop. Then, connect with your IT expert to get assistance regarding the network.

Third Solution: Set Windows Access Permissions to Share Company Files

Sometimes, the users might encounter QuickBooks Multi-User Mode error 102 due to inadequate Windows access permissions. Therefore, to fix the issue, it’s necessary that users have proper Windows access permissions to access the company file.

Examine that folder permissions are set properly

  • Open the File Explorer and right-click the folder containing the company file.
  • After this, choose the Properties option > Advanced > QBDataServiceUserXX > Edit menu.
  • Now, pick the following settings as Allowed:
    • Set the following settings to Allowed:
    • Traverse Folder/Execute File
    • List Folder/Read Data
    • Read Attributes
    • Read Extended Attributes
    • Create Files/Write Data
    • Create Folders/Append Data
    • Write Attributes
    • Write Extended Attributes
    • Read Permissions

If the permissions aren’t set properly, then do as follows;

  • Initially, right-click the folder containing the data file and click the Properties tab.
  • Choose the Security > Edit > QBDataServiceUserXX > Full Control > Allow.
  • Finally, tap on Apply and then the OK tab to complete.

Modify the Folder Permissions

Use these steps to adjust the folder permissions accurately.

  • Move to the Start menu and from there open the File Explorer.
  • Locate and right-click on the following folders given below.
    • C:\Program Data\Intuit\Entitlement Client\v8
    • C:\Program Data\Intuit\Entitlement Client\v6.0
    • C:\Program Data\Intuit\Entitlement Client\v5
    • C:\Program Data\Intuit\Entitlement Client\v3
    • C:\Program Data\Intuit\Entitlement Client
    • C:\Program Data\Intuit\QuickBooks Enterprise Solutions X.0 (X = version) or C:\Program Data\Intuit\QuickBooks 20XX (XX = year)
    • C:\Program Data\COMMON FILES\INTUIT
    • C:\Program Data\COMMON FILES\INTUIT\QUICKBOOKS
    • C:\Users\Public\Public Documents\Intuit\QuickBooks\FAMXX (XX = year)
    • C:\Users\Public\Public Documents\Intuit\QuickBooks\Company Files
    • C:\Users\Public\Public Documents\Intuit\QuickBooks\Sample Company Files\QuickBooks Enterprise Solutions X.0 (X = version) or
    • C:\Users\Public\Public Documents\Intuit\QuickBooks\Sample Company Files\QuickBooks 20XX (XX = year)

Use these steps for any folder given below. You don’t have all of these folders, as a few of them are restricted to certain versions of QuickBooks Desktop only.

  • Initially, right-click the QuickBooks folder and hit Properties.
  • When you are on the Security tab and click Everyone.
  • Now, browse to the Full Control > Apply > OK tab.

Set Windows Access Permissions to Share Company Files

Perform the steps below to provide Windows access permissions to share company files.

Windows 10
  • Access the Start menu and then launch the File Explorer on your PC.
  • After this, right-click on the company file folder and click Properties > Sharing > Share Add option.
  • Now, pick the corresponding QBDataServiceUserXX according to your version.
  • Finally, set the permission level for both users to Full Control and click the Share option.

Fourth Solution: Run the QuickBooks Database Server Manager On your Server

The server computer is the one that stores the QuickBooks company files. Other computers that are linked to your network are your workstations.

  • Download and install the latest version of QuickBooks Tool Hub.
  • After this, launch the QuickBooks Tool Hub and choose the Network Issues tab.
  • Now, browse to the QuickBooks Database Server Manager tab. If you see that QuickBooks isn’t available on the server, you will be asked to get it installed.
QuickBooks Database Server Manager
  • From the QuickBooks Database Server Manager, hit the Start Scan.
QBDBMgrN
  • If you can’t be able to find the file, Browse to the location of the company file and hit the Start Scan option.
  • Consequently, QBDBMgrN will begin repairing the firewall permissions. Once the scanning is done, click Close tab.
  • At last, access the QuickBooks on each workstations getting QuickBooks Error H202 multi user mode. Later on, browse to the File menu > Switch to Multi-User Mode. In case you are running the server computer, then don’t miss to check on it also.

Fifth Solution: Operate the QuickBooks File Doctor Tool

  • Open the QuickBooks Tool Hub and click the Company File Issues tab.
  • Choose the Run QuickBooks File Doctor Tool tab and wait for some time to run the tool.
  • Now, pick the company file by clicking the drop-down menu and select Check your Network.
  • Tap on Continue option and insert the QuickBooks admin password. Later on, hit the Next tab.
  • If you are able to run the multi-user mode in QuickBooks, it indicates that everything is absolutely working fine.

Sixth Solution: Configure Your Windows Firewall Manually

You must ensure that the server computer allows QuickBooks through the Windows Firewall.

  • Hit the Start menu and insert Windows Firewall in the search console.
  • Choose the Advanced Settings and right-click on the Outbound Rule. Then, select the New Rule tab.
  • Now, click the Port > Next and then the TCP option.
  • From the Specific Local Ports field, choose the specific ports for your QuickBooks version.
    • QuickBooks Desktop 2020 and later: 8019, XXXXX.
    • QuickBooks Desktop 2019: 8019, XXXXX.
    • QuickBooks Desktop 2018: 8019, 56728, 55378-55382.
    • QuickBooks Desktop 2017: 8019, 56727, 55373-55377
  • Add the port number and click Next > Allow the Connection > Next option.
  • When asked, ensure that all profiles are marked and click Next.
  • Now, establish a new rule and name it as “QBPorts(year)”.
  • Once you are all set, choose the Finish tab.

Resume the same steps and generate the outbound rules. Proceed with all the same steps, except choose the Outbound Rule in 4th step.

Furthermore, launch the QuickBooks Desktop and move to the multi-user mode. Alternatively, you may also launch the QuickBooks on your network from one of the host computers.

Final Words

So, here we conclude this blog and hope that now you have learn about how to fix QuickBooks multi-user mode problems H202 easily. Thus, it would helped you regain access to run your company file in multi-user mode.

Furthermore, if you still have any doubt, then connect with our Qbookassist experts for quick assistance. You can talk to our experts via live chat or by dialing the +1(866)408-0544.

Frequently Asked Questions (FAQ’s):-

Question 1: Why am I getting Error H202?

Ans. Users often encounter QuickBooks Error H202 when the QuickBooks Database Server Manager isn’t working properly. So, to resolve the issue, it’s essential to review that the Database Server Manager is running properly.

Question 2: What are QuickBooks Desktop Error H202 and H505?

Ans. The QuickBooks Error H202, H505, H101, and H303 belong to the H-series of errors, which may appear when something blocks the multi-user connection to your server computer. Usually, this error may trigger when the workstations fail to communicate with the file stored on the host server.

Question 3: How do I fix the QuickBooks multi-user mode error?

Ans. To rectify the QuickBooks multi-user mode, verify that the hosting is enabled on the server computer, relaunch the QBDBMgrN, and configure the firewall settings to allow QuickBooks processes.

Question 4: How to fix QuickBooks Error Code H202 when initializing multi-user mode?

Ans. You must run the QuickBooks File Doctor tool to verify both the company file and the network. Doing so will help fix the issues with the company file and network issues, which may cause QuickBooks Error Code H202 when initializing multi-user mode.

Run QuickBooks For Small Business & Simplify Your Finances

QuickBooks for small business is one of the most popular cloud-based accounting solutions designed for entrepreneurs and growing companies. With QuickBooks Online for small business, you can manage income, expenses, payroll, and inventory from any device, anytime.

This powerful QuickBooks accounting software for small business allows teams to collaborate in real-time, and connect with third-party apps. Also, it helps to generate financial reports that support smarter business decisions.

In this guide covers everything regarding the benefits and pricing of Intuit QuickBooks accounting software and QuickBooks payroll for small businesses.

Want to get stepwise instructions to use QuickBooks for small business and need immediate help? +1-866-408-0544 and talk to our QB professionals for better assistance.

Features You Can Access With QuickBooks Online For Small Business

You can use the following features by accessing QuickBooks for small businesses.

1. Auto-Track Business Income & Expenses

Intuit QuickBooks software for small business automatically categorizes transactions and syncs bank feeds. This reduces manual bookkeeping and improves accuracy.

2. Manage Inventory in real-time

QuickBooks software for small businesses automates inventory management tasks so that you can easily track your inventory. Also, it gives low stock alerts in real-time to ensure that you restock the goods in a timely manner. You can also integrate your QuickBooks account with eCommerce platforms like Shopify, eBay, BigCommerce, etc., to stay updated with small business orders.

3. Connect with your business apps

Every business has its own requirements. Considering this, QuickBooks Online lets you integrate with other eCommerce platforms, time tracking, inventory management, and payment processing. Connecting with these apps will help enhance your accounting experience with the QBO software.

4. Get Live Expert Assisted

The Live Expert Assisted in QuickBooks Online lets you connect with highly certified QuickBooks bookkeepers. Once you get in touch with them, they will offer you proper guidance and answer questions. Also, you will get proper step-by-step instructions to run QuickBooks and accomplish your daily business tasks.

5. Use the Payroll Services

QuickBooks for small businesses with payroll software streamlines the complex payroll tasks of the company. It also helps in tracking employees’ time, managing HR tasks, and providing team benefits. Moreover, it reduces the manual entry tasks, which enhances the accuracy and helps manage timesheets easily.

How Does QuickBooks Work For Small Businesses?

QuickBooks Small Business is a cloud-based software that uses high-grade security features to keep your financial data safe. You can get anytime access to the financial statements anywhere, anytime, to make the right business decisions. The great thing is that it’s a user-friendly software that automates complex financial tasks like invoicing, bookkeeping, and inventory tracking, and reduces manual data entry errors.

Above all, this accounting software can be accessed through different devices, including smartphones, tablets, laptops, etc. Moreover, it’s easy to set up Intuit QuickBooks Online accounting software by simply logging in and then continuing your ongoing business tasks.

How to use QuickBooks for small business?

To use QuickBooks for a small business, you are required to perform the following steps.

1. Set up your company profile

To set up your company file, move to Settings and click the Account and Settings tab. Then, you can add details regarding your business and enable the features beneficial for your business. Also, you can adjust company details, billing details, product language, and sales forms.

2. Link Your Bank or Credit Card Account

Next, connect your bank or credit card account to QBO, and you can easily download the latest bank transactions. Perform these steps to link the account.

3. Import your data

You can import the previous lists from another QuickBooks company or software into your QuickBooks Online file. Also, you can add new customers, suppliers, products, and services.

4. Set Up Sales Tax

The next step is to add sales tax to your invoices and receipts to track how much you owe. Here are the steps to set up sales tax.

  • Use this link to complete the steps in the product.
  • Go to Set up Sales tax and choose a province/territory.
  • Tap on Save > Start of tax period and select the Filing frequency.
  • Pick the suitable Reporting method and provide the registration number or GST/HST number.
  • Now, click Next and use the prompts to complete the setup.

5. Enable & Receive Payments

QuickBooks Payments is an optional subscription feature through which customers can pay online via trusted payment methods. Also, you can turn on payments from the QuickBooks Online dashboard, the Sales Overview page, or while generating an invoice.

6. Turn on payroll & Add Employee

To turn on payroll, move to the Settings > Subscriptions and Billings. Then, pick the subscription level that is suitable for you and complete the necessary details to run the first payroll.

You can also add employee data in QBO,

7. Customize and Send Invoices

To customize your invoice template,

  • For customizing the look of your invoice, click the ” Manage icon.
  • Now, hit the Design drop-down arrow and choose to edit an existing template or create one.

8. Add & Manage Users

In QuickBooks Online, you can add different user types, including primary admin, company admin, standard all access, track time only, and view company reports.

9. Run & Customize Reports

QuickBooks enables you to access the financial reports, which help you get clear insight into the company’s finances. By using the Reports tab, you can run financial reports or use filters to customize reports and concentrate on specific details.

QuickBooks payroll for small business: An Overview

The QuickBooks Payroll helps small businesses in automating payroll, tax filing, saving time, and minimizing manual errors. Moreover, the payroll feature is also beneficial for small businesses in numerous ways, including:

1. Automates Complex Tasks-

The QuickBooks Online Payroll automates paychecks, payroll tax calculations, and filings. Moreover, it also eliminates the effort of manually handling admin tasks.

2. Time Tracking Integration-

Moreover, it also lets you connect with QuickBooks Time to track employee hours, cut payroll costs, and enhance accuracy.

3. Tax Compliance & Protection-

QuickBooks for small businesses with payroll allows you to file federal and state taxes automatically. Moreover, it also protects you from paying heavy tax penalties for wrong or late filing of taxes.

4. Employee Self-Service-

This payroll software also offers employees online access to pay stubs and W-2s through the Workforce app.

5. Enhanced Features-

Above all, it also provides its users with the direct deposit feature, including same-day pay. Also, it comprises HR support for hiring and compliance.

How much does QuickBooks cost for a small business?

You must check out the table to learn more about the QuickBooks cost/pricing for small businesses.

PricingSimple StartEssentialsPlusAdvanced

$19/month and Save 50% for 3 months$37.50/month and Save 50% for 3 months$57.50/month and Save 50% for 3 months$137.50/month and Save 50% for 3 months
Users1 user + access for your accountant3 users + access for your accountant5 users + access for your accountant25 users + access for your accountant
Features IncludedIncludes following featuresEverything included in Simple Start, along with the following featuresEverything in Essentials along with the following featuresEverything in Plus along with the following features.
Intuit AssistAI-Powered Bank FeedsAI-Powered CollaborationAnomaly Detection, Customer AgentFinance Agent, Project Management Agent
Income & Expenses
Automated Bookkeeping
Automated bank feeds
Multiple Currencies—–
Revenue Recognition—–—–—–
Bill Management—–
Invoice & quotes
Recurring Invoices—-
Customer Management
Notes & Tasks Management
Reputation Management—–
Lead Management—-
Contract upload and e-signature—-—-
Enter Time—–
Project Profitability—–—–
Project Management—–—–
Inventory Tracking—–—-
Purchase Orders—–—-
Sales Orders—-—–
Custom Report Builder—–—–—–
Data Sync With Excel—–—–—–
Charts of Accounts250250250Unlimited

Note: The QuickBooks Support and App Integration feature is included in all the features of QuickBooks software for the small business.

Final Thoughts

QuickBooks for small business not only simplifies complex finances but also helps in inventory tracking, processing payroll, and in reducing tax burden. Moreover, it also give clear insight regarding company’s financial wealth to take informed business decision.

If you are still struggling while using this software, then connect with our QBookassist professionals for help.

Frequently Asked Questions (FAQ’s):-

Question 1: How do I manage multiple businesses with one login?

Ans. You can manage multiple businesses with one login using QuickBooks multi-files feature. Then, you can run multiple accounts using one login password and at an affordable rate.

Question 2: What types of businesses use QuickBooks Payroll?

Ans. The QuickBooks Online Payroll software is best fit for the small to mid-size businesses. Also, it is the best choice for accountants and financial experts to the hospitality companies, construction companies and truckers.

Question 3: Is QuickBooks worth it for a very small business?

Ans. The QuickBooks Online is the perfect choice for the small businesses, especially for the businesses who are growing and want to monitor expenses or require accountant ready financial reports. But, it isn’t great choice for the very low-volume soloprenuers.

Question 4: Is there a free version of QuickBooks?

Ans. Yes, QuickBooks provides 30 days of a free trial to all its new users. However, to generate a new trial, you must generate a QuickBooks account via pricing page.

Question 5: Is time tracking included with QuickBooks Payroll?

Ans. Yes, the time tracking feature is included with QuickBooks Online Payroll Premium and Elite versions.

Question 6: Do Accountants get QuickBooks for free?

Ans. Yes, the QuickBooks Online Accountant version is absolutely free for accounting experts to handle their practice and clients.