QuickBooks Invoice Template | Setup, Customise & More
A well-designed QuickBooks invoice template has made it more convenient for businesses to send professional invoices while improving brand consistency. QuickBooks allows users to create professional invoices by adding company logos, colors, payment terms, and custom fields both in Online and Desktop.
In this post, you’ll come to know how to set up and customize an invoice template, edit an invoice layout, download or export an invoice template, and fix issues like a QuickBooks invoice template not printing accurately.
What is a QuickBooks Invoice Template?
A QuickBooks Invoice template is a pre-formatted document used by businesses to bill their clients against goods or services within the QuickBooks software. Moreover, it also allows you to add logos, brand colors, and certain business details to these templates, which makes it more. Thus, it helps streamline the payment process. The following are the items that are included on each invoice;
- Your business contact details
- Your terms of payment
- A clear description of the goods and services for which you are billing
- Date when the invoice is being issued
- The invoice number allotted to the invoice you are creating
- If necessary, then add the sales tax component to the sale
How to Set up an Invoice Template in QuickBooks?
By setting up QuickBooks Invoice templates, you can generate professional invoices with your business branding, payment details, and customized fields. You can set up your invoice template in both QuickBooks Online and Desktop.
In QuickBooks Online
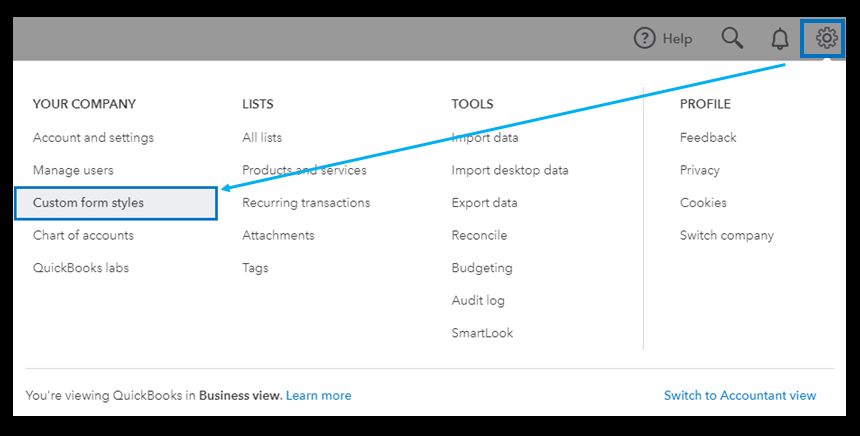
- First, log in to your QuickBooks Online application.
- After this, hit the Settings icon and choose Custom Form Styles.
- Tap on the New Style button > Invoice option.
- Provide a name for your invoice template.
- Afterwards, you can customize the template as discussed below.
- Next, preview the invoice to verify the layout.
- Hit the Save tab to successfully save the invoice template in QuickBooks.
In QuickBooks Desktop
- Launch the QuickBooks Desktop and move to the Lists menu.
- After this, choose the Templates and again click Templates from the drop-down list.
- Hit the New option and pick the template type as Invoice.
- Also, choose a pre-designed layout or generate a new template.
- Now, you can select Additional Customization to change.
- Company details
- Logo
- Columns and fields
- Payment Instructions
- Fonts & Colors
- When all the changes are done, save the template using a unique name.
- At last, hit OK to complete the setup process.
How to Customize QuickBooks Invoice Template?
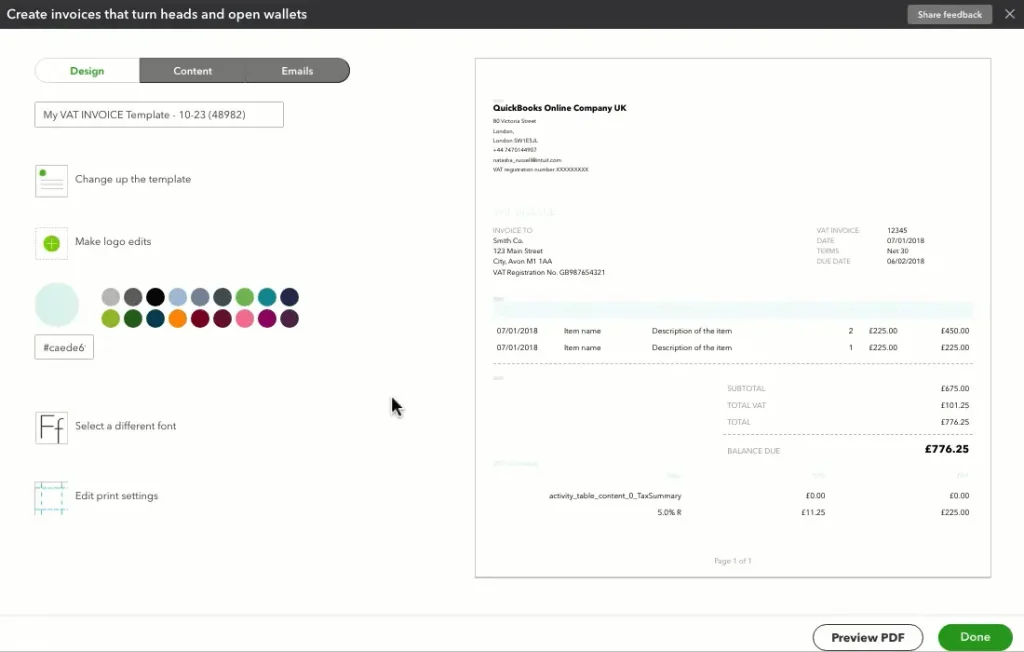
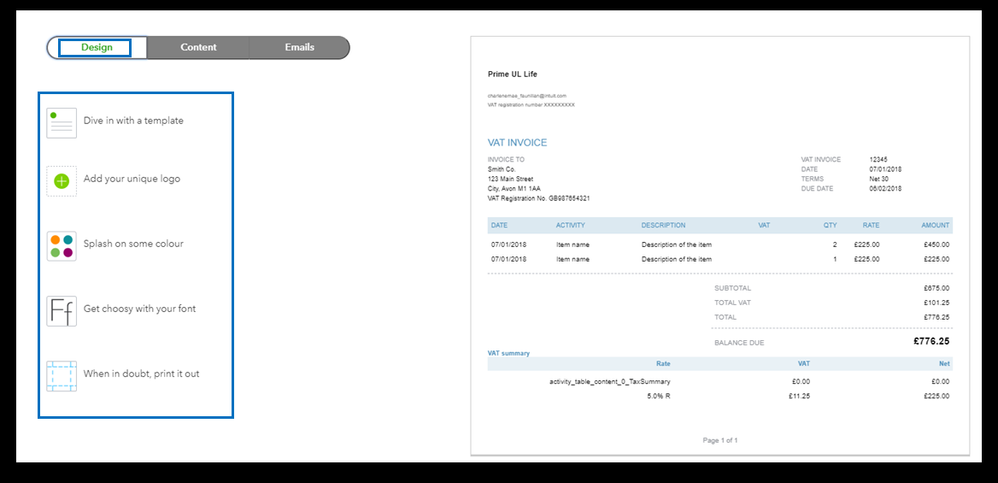
While customizing an invoice template in QuickBooks, you’ll get three different tabs, i.e, Design, Content, and Email.
1. Design– You can customize the look of your invoice by choosing from a pre-designed template. Otherwise, you can also create a new invoice. You can then adjust the layout, colors, fonts, and logos to align according to your brand identity.
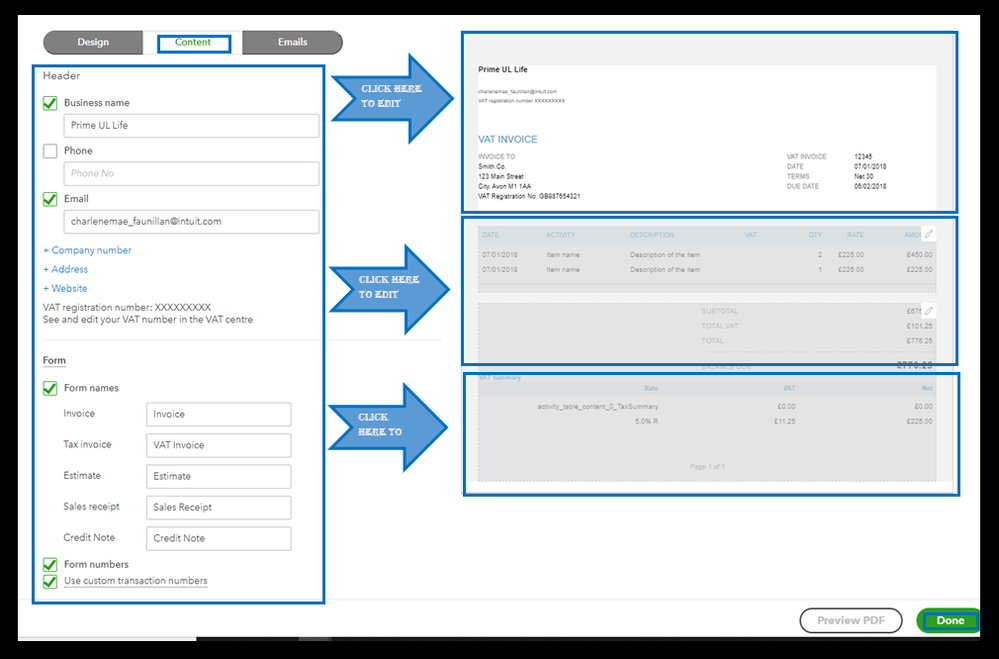
2. Content- Set the invoice details according to your requirements. You can add, edit, and update fields like company name, address, customer details, item descriptions, and more.
3. Email- Design the email message while sending invoices to customers.
- Click on + New and then the Invoices option.
- After this, tap on the Customize option.
- To design the invoice on which you are currently working, head to Edit current. For designing a new template, choose New Style.
- Make sure to provide a new name to your invoice template.
First Step: Choose a Template
You can select a QuickBooks invoice template from six pre-designed QuickBooks Online invoice templates. Otherwise, you can also generate a new invoice template from scratch.
Second Step: Add a Company Logo
The following are some of the points that you must know about the logos.
- You can only add around 10 logos to your account.
- Make sure that the logos are in .gif, .bmp, .jpg, .png, .jpe, or .jpeg format.
- Each logo must be smaller than 10 MB.
- The logo should be in a square shape, as rectangles aren’t compatible with QuickBooks.
- Ensure that the logos are in the standard RGB color space.
- When you are in the Design tab, click Make logo edits.
- Locate and choose your logo according to your choice. Then, hit the Open tab.
- Pick the Add a logo + tab and then choose your logo. Click the Open tab.
- After completing the upload, tap on Save.
- Now, select the size of your logo on the invoice, which can be either Small, Medium, or Large.
- After doing this, make a decision for the placement of the logo, whether it will be right, left, or center alignment. Note that you can’t change the height or width of the logo.
Third Step: Pick a colour scheme and font style
Now, you must select a color scheme and font style that really captures the essence of your brand.
- For selecting the color, click Try another color.
- If your business has any particular brand color, enter the HEX Code. The HEX Code is basically a combination of six letters and numbers that represent the color.
- After doing that, hit Select a different font option.
- At last, change the font size.
Fourth Step: Change Print Settings
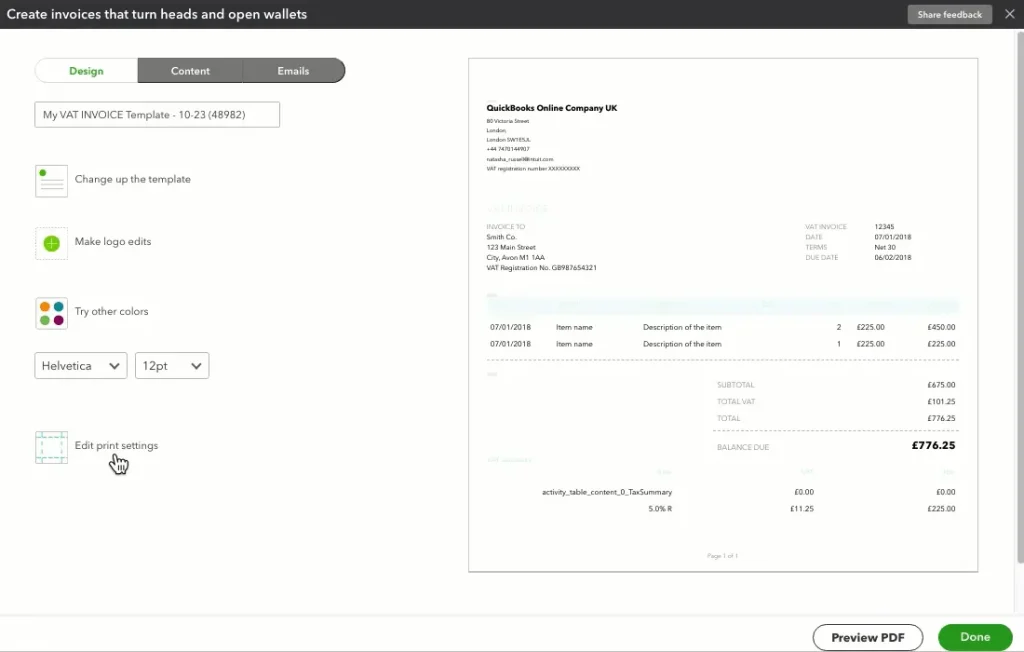
- First, tap onthe edit print settings option.
- If you send printed forms to your customers, adjust the margins.
- Important Tip: You can click Reset to move back to the default margin settings if you need to.
Fifth Step: Update Invoice Details
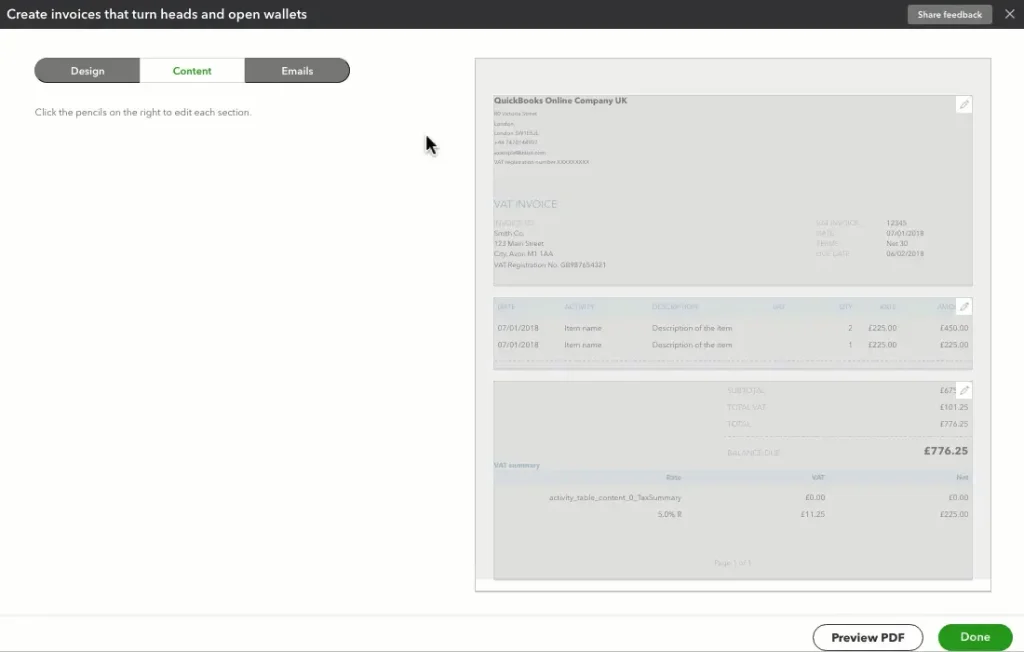
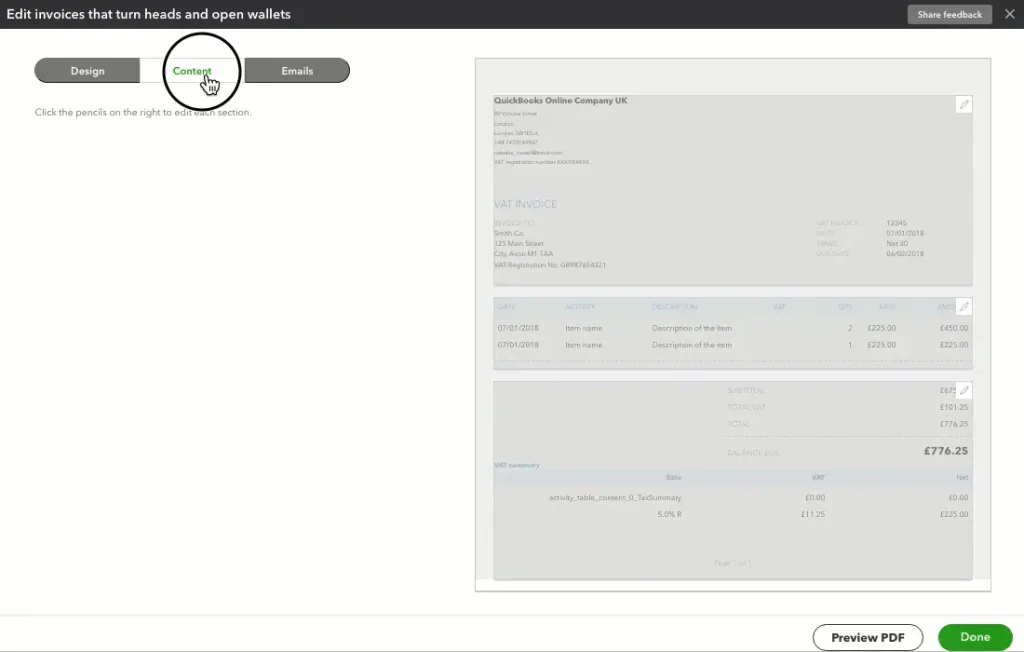
- Initially, click the Content tab.
- After this, you will see three sections, i.e., Header, table, and Footer. You need to edit each section separately by clicking the Edit icon.
Now, pick the heading to show more customization options for each section.
Header (company info, custom fields, and tax)
- Click the Pencil icon to change the Header section.
- Choose the ticks next to the fields you want to display on the invoice. The invoice preview will automatically update as you make changes.
- Also, you can customize what you want your customers to see by adding or removing information. Besides this, you can also update the text fields to edit what displays.
- Select the Form numbers checkbox to have QuickBooks add invoice numbers to your form.
- If your business is tax-registered, you cannot remove the registration number field.
Table (product/service info and sales tax)
- Choose the Pencil icon to make changes to the Table section.
- For having separate columns for item descriptions, quantities, and rates, verify the Description, Quantity, and Rate checkbox.
- If you wish to add the item description in the Activity column, mark the Product/Service checkbox. Then, circle the “Include description here” checkbox.
- Alternatively, you can circle the Description checkbox and then include Quantity and Rate.
- To arrange the columns again, pick and drag the grid icon to a new position on the list.
- If you wish to change the column name or size, opt for Edit labels and width.
- Make changes to the text fields to edit the column names.
- Also, adjust the column width by shifting the sliders.
- After doing this, tap on Show more activity options to edit the following;
- Group Activity By: It lets you group activities according to Day, Week, Month, or Type.
- Collapse activity rows- This function will allow you to combine rows with the same rate and description, excluding dates.
- Show progress on line items (email only).
- Show markup on billable expenses.
- Show billable time: It provides two additional options when selected:
- Include the employee’s name
- Include hours and rate.
- Show tax-inclusive amounts: It shows the VAT-inclusive amount on print previews and invoices sent to customers.
- Show tax type indicators: This will display T, ST, and VAT indicators in the tax column if possible.
Footer (discounts)
- First, tap on the Pencil icon to make changes in the Footer section.
- Circle the Discount checkbox if you wish to offer a discount and show it on the form.
- Also, you can personalize a message to your customer and then include a text in the footer of a form. Besides this, pick the desired font size and/or placement by clicking the drop-down fields.
Sixth Step: Add custom fields
Important Tip: You can see this feature only in QuickBooks Online Plus, Essentials, and Advanced.
- Click on the Content tab and then the Pencil icon to edit the header section.
- After doing this, choose the Manage custom fields. This will redirect you to the custom fields page.
- Move to the Add field option and assign a name to the custom field. Also, pick the data type.
- Now, hit the Transaction option as the category and click Invoice.
- Enable Print on form so that it shows in your form’s header.
- At last, hit the Save option. This will display the custom field on the template.
Seventh Step: Add a Discount
QuickBooks automatically monitors the discounts you give by creating a Discounts given account in your charts of accounts. But first, you must verify whether this setting is enabled.
- Save and then shut down your template.

- Move to the Settings icon and click the Account and Settings option.
- Choose the Sales option.
- From the Sales form content section, hit the Edit icon.
- After this, enable the Discount setting.
- Once the changes are done, click the Save and then Done options.
Return to your invoice template and then start adding the discount field.

- Move to the Settings icon and click the Custom Form Styles option.
- Choose the Invoices tab. For making changes to an existing invoice, select the invoice from the list and click View/Edit.
- After that, tap on the Content tab and hit the Pencil icon to edit the footer section.
- Finally, mark the Discount checkbox.
Your invoice subtotal will include a discount field, which will only be displayed to your customer while adding a discount to it.
Eight Step: Personalise the email
Enhance the customer experience by designing the email message they receive with their invoice. Also, ensure that you have included all the additional details, instructions, or a thankyou message to give a personalised touch.
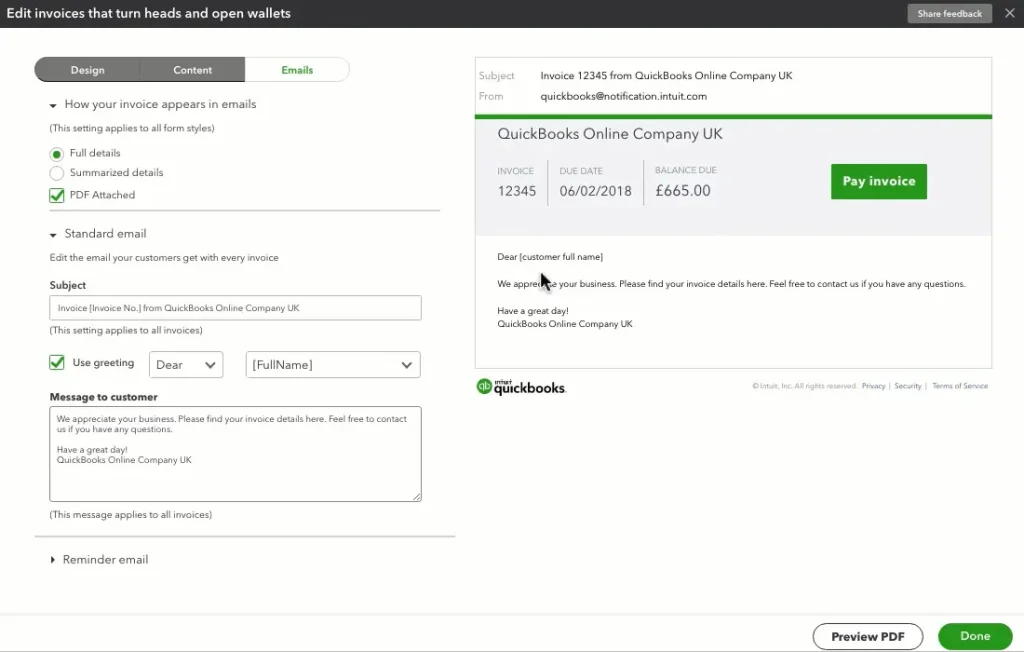
- Choose the Emails tab.
- After this, click either Full Details or Summarised Details, depending on how much information you wish to display on the invoice.
- If you want to add the complete pricing breakdown, tap on the PDF Attached option.
- You also have the option to edit the email your customer will get with each invoice and reminder emails.
Ninth Step: Preview the Invoice
Before you save and close, it’s best to check everything to ensure that the invoice is all good and contains all the information you want.
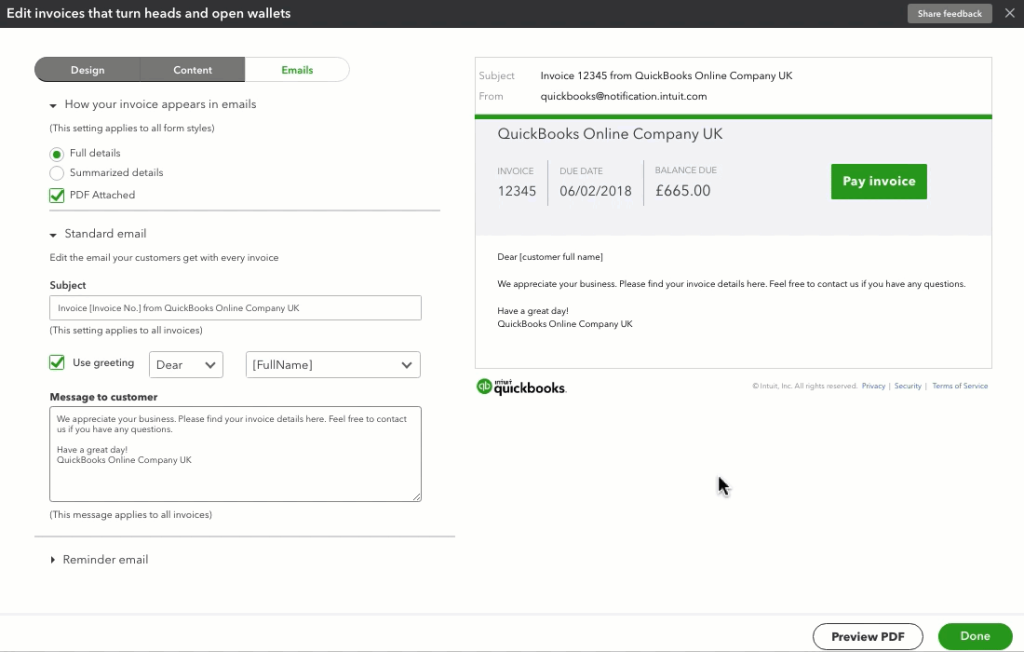
- Initially, tap on the Email tab.
- Choose the Preview PDF option. This will take you to a new window displaying a PDF version of the invoice your customer will see.
- To make any changes, exit from the window to return and do the required changes.
- Once everything is set, clickthe Done option.
Tenth Step: View all templates
- Move to the Settings icon and click Custom Form Styles to get a list of all your saved templates.
- To generate a customized new form, click New Style and pick the correct form. Otherwise, tap on Edit to customize an existing template.
How to Change QuickBooks Invoice Template?
You can change the QuickBooks Invoice template according to your business requirements whenever you want. Whether you are an Online or Desktop user, you can switch between existing templates or create a new customized layout for your invoices.
Change Default Template in QuickBooks Online
Here’s how to change the default template in QuickBooks Online.
- Initially, log in to QuickBooks Online and hit the Settings option.
- Choose the Custom Form Styles option and look for the invoice template you want to use.
- Now, hit the drop-down arrow next to the template.
- Afterwards, go to the Make Default option.
- With this, the selected template will automatically apply to all new invoices.
Change Invoice Template in QuickBooks Desktop
Use the following steps to change the invoice template in QuickBooks Desktop.
- Open the QuickBooks Desktop and generate a new invoice.
- Search for the Template drop-down menu and select the drop-down list.
- Now, pick the invoice template that you want to apply.
- With this, the invoice layout will be updated automatically.
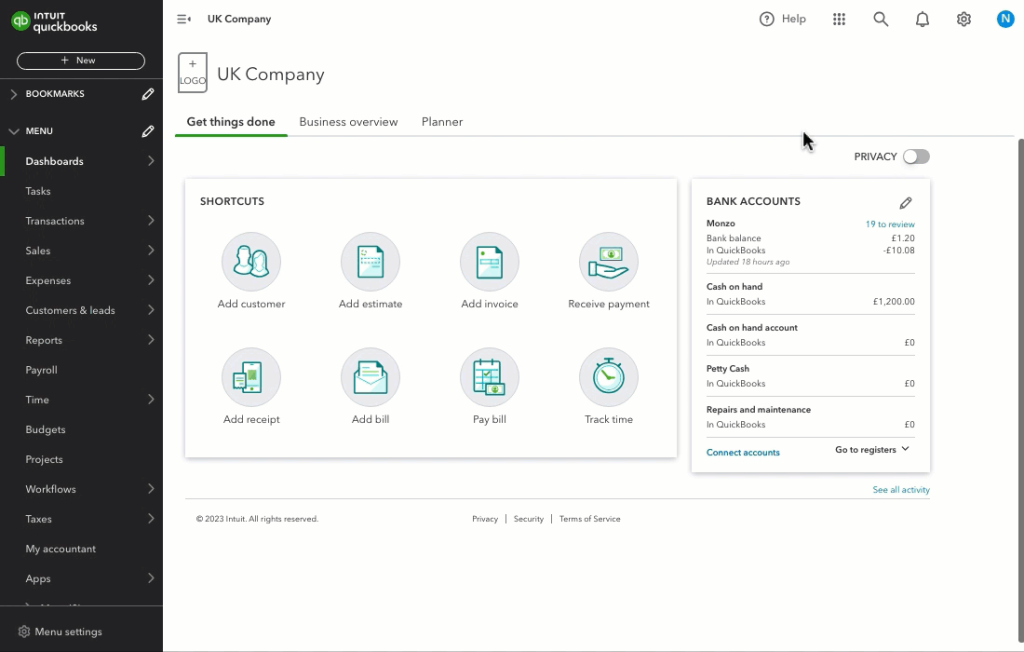
How to Edit the Invoice Template in QuickBooks Online?
QuickBooks Online provides you with an option to generate attractive, professional-looking invoices. Perform the following steps to edit the invoice template.
- Move to the Gear icon and click Custom form styles.
- After doing that, pick the template that you want to customize and hit the Edit menu.
- Alternatively, you can also select the New Style option and then click Invoice.

- From the Edit invoices that turn heads and open wallets, select between the Design or Content tabs.
- Now, you can start customizing and hit the Done option.
QuickBooks Invoice Template Download Options
You can get your QuickBooks Invoice template download using the QuickBooks Free Invoice generator to download in PDF, Word, or Excel versions. Otherwise, you can download customized templates in QuickBooks Desktop.
Method 1: Download Free Templates (PDF, Excel, Word)
- Initially, visit the QuickBooks Free Invoice Templates Page.
- From that page, select a template design that is suitable for your business.
- After this, pick the desired format (such as PDF, Excel, or Word) to download the file directly to your device.
Method 2: Download Customized Templates in QuickBooks Desktop
- First, move to the Lists menu and click Templates.
- Choose the template that you want to customize.
- After that, select the Download Template option.
- Complete the process by saving the template to your desktop.
How to Import & Export QuickBooks Invoice Templates In Easy Steps?
The following are the steps to import and export the QuickBooks Invoice template.
Key Considerations:
- You can’t import customized templates created in the new version of QuickBooks into the older version.
- Also, you can’t import the templates created in one regional version of QB to another.
Steps to import the template
- Initially, open the data file you want to import the template into.
- Go to the Lists menu and choose Templates.
- From the Templates drop-down menu, click Import.
- Now, pick the template you wish to import and choose Open.
- Give a new name to the imported template. Herein, you can either keep its original name or change it.
- Click OK, and you will notice the imported template on the template list.
Steps to export template
- First, move to the Lists menu and click Templates.
- Now, pick the template that you wish to export.
- Hit the Templates drop-down menu and select Export.
- Check your file name and select the file location on your computer.
- When the changes are done, click Save.
What if the QuickBooks Invoice Template is not printing correctly?
The QuickBooks invoice template not printing issue correctly may arise if the template is corrupted or your printer settings are incorrect. So, to fix the issue, perform these steps.
Case 1: Invoice or statements print without lines or borders around fields
You must change the settings in QuickBooks so that you can easily print with or without borders. Here’s what to do to change the line or borders around fields.
- Initially, go to the File menu and tap on Printer Setup.
- From the Form drop-down menu, choose the correct form.
- Now, pick the Blank Paper option.
- Make sure that the Do not print lines around each field remains unmarked and click OK.
Case 2: Changes don’t save when you save your customized invoice template from an invoice
If you access the template on an invoice and you generate another invoice, make sure to show the regular template again. Also, verify that these settings must remain until you change the template.
- Click the Customers > Create Invoices option.
- After this, generate a new test invoice with a standard template.
- Choose the Template drop-down menu and pick any one of the listed Intuit templates.
- Provide the Customer and Item details on the invoice.
- After that, hit the Save and Close option.
- Select the Customers > Create Invoices to check if the Intuit template option is now visible on the default section.
Best Practices for Invoice Templates in QuickBooks
The following are the key factors that you must consider to set up and customize the QuickBooks Invoice Templates properly.
- Upload your company logo and make use of consistent colors.
- Make sure that you have included specific due dates.
- Enable the QuickBooks Payments so that clients can easily pay via credit card or bank transfer.
- Make proper use of the detailed descriptions for services or products.
Conclusion
We hope that with the help of this blog, you can easily set up and customize the QuickBooks invoice template. Thus, it helps businesses in creating professional invoices while improving branding and payment management. Moreover, this guide will also help manage invoice layouts, customize fields, troubleshoot invoice template issues, and minimize the billing process.
If you still need any help, then feel free to connect with our Qbookassist professionals for better guidance.
Frequently Asked Questions
1. How to make an invoice template the Default in QuickBooks Online?
For setting a custom default template;
- First, generate a new sales form and click the Manage icon.
- Go to the Design drop-down menu and choose Remove Default.
- Now, hit the Add/Edit to edit the standard template.
- Click Done to complete the process.
2. Does QuickBooks Online support custom invoice templates?
Yes, QuickBooks Online supports custom invoice templates that allow users to personalize logos, fonts, fields, discounts, and email messages.
3. What file formats are supported for the QuickBooks Invoice template download?
The QuickBooks invoice template is usually downloaded in PDF, Excel, or Word formats, depending on the platform.
4. What is the QuickBooks invoice generator?
QuickBooks invoice generator is a built-in tool that lets businesses create, send, customize, and manage professional invoices.
5. How many invoice templates can I create in QuickBooks?
You can generate multiple invoice templates in QuickBooks for different business uses, customers, or invoice styles.

Recent Posts
QuickBooks Payroll: Service, Setup, Pricing and Support Guide
Read MoreQuickBooks Error Support: Get Instant Help Via Live Chat or Call
Read MoreQuickBooks Error 3371 Explained: Common Causes and 7 Effective Fixes
Read MoreHow to Contact QuickBooks Customer Service and Talk to a Live Expert
Read MoreHow to Update QuickBooks Company File Without Losing Data?
Read More