How to Create, Add, or Delete an Expense Category in QuickBooks?
Managing the expense category in QuickBooks accurately is important for businesses for proper bookkeeping and detailed financial reports. Moreover, categorising the business expenses by type promotes better budget management. No matter whether you have to handle the uncategorized expense in QuickBooks Online, categorise credit card payments, or need to know how to add an expense category in QuickBooks, proper categorisation will help keep the accounts organised.
In this write-up, we have explained how to create, edit, view and delete the categories by improving the QuickBooks categorizing expenses for efficient financial tracking.
How to Create a New Expense Category in QuickBooks Online?
Perform the following step-by-step instructions to create a new expense category in QuickBooks Online.
- Initially, choose the Accounting option from the left panel.
- After this, click the Charts of Accounts.
- Look at the right side next to Run Report, hit the green colored box labelled as New.
- You will get a new prompt with a pop-up for a New account and click the Expense icon.
- Complete the required details for the expense account, and then scroll down to see more boxes and details to be filled.
- Once it’s done, tap on the Save option.
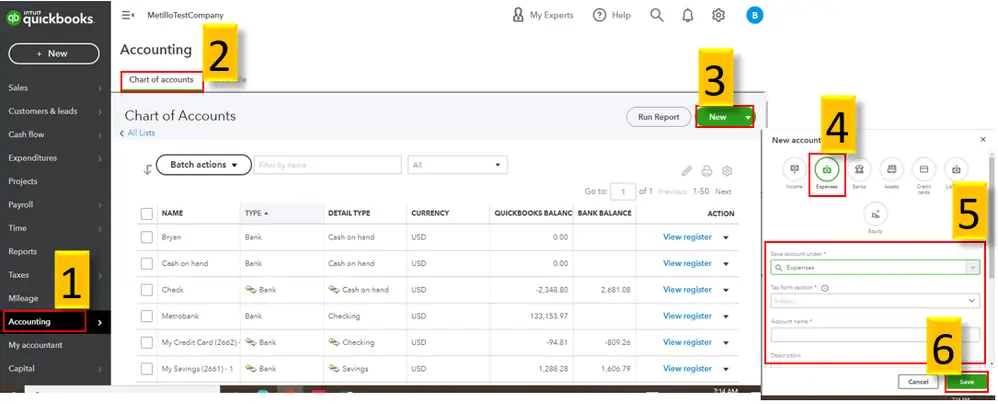
- Now, you can check if the new expense category is successfully created in QuickBooks Online.
How to Add An Expense Category in QuickBooks Online?
The Expense Categories page in the Payroll Settings is used to describe the various employee expense categories accessed by your business.
Add An Expense Category
Here’s what to do to add an expense category.
- Initially, move to the Payroll Settings and click Expense Categories.
- Choose the Add option and provide the name of the expense category.
- Also, provide an External ID for the expense category, if required.
- After adding all the details, click the Save option.
Edit expense category in QuickBooks Online
Perform the following steps to edit an expense category in QBO;
- Choose the name of the category you want to edit.
- It will expand the details of the category for editing.
- After this, you can make the required changes.
- At last, click Save after completing.
You can also delete expense categories from this screen by taking the cursor to the category you want to delete. Then, click the red circle cross that appears.
How to View Expense by Category in QuickBooks Online?
You need to run the Transaction detail by Account report, filter by transaction type (Expense) and group by account to get a summarised breakdown. Here’s what to do to view expenses by category.
- Initially, move to the Reports menu and type Transaction Detail by Account in the search bar.
- Tap on the Customise button and set the Report Period.
- Now, circle the checkbox of Transaction Type and click the Expense option.
- For the Distribution Account, head to the All Expense Account.
- Finally, tap on the Run Report option.
How to Delete an Expense Category in QuickBooks Online?
If you want to delete an expense category, move to the Chart of Accounts in QuickBooks Online to complete the task.
Here are the step-by-step instructions to delete an expense category.
- Initially, move to the Accounting menu.
- From the Charts of Accounts tab, look for the account you wish to make inactive. Alternatively, you can also use the search box to locate the accounts easily.
- Once you get the account, hit the drop-down arrow below the Action column.
- Now, tap on the Make Inactive option to complete the process.
How to Categorise Credit Card Payments in QuickBooks Online?
You can categorise credit card payments in QuickBooks Online with the help of the Pay Down Credit Card function. Follow the steps written below to categorise credit card payments.
- Firstly, hit the + New button and click Pay Down Credit Card.
- Choose the credit card you made the payment to and provide the payment amount.
- Also, mention the payment date and pick the bank account through which you make your credit card payment.
- If the payment is done via cheque, click “I made a payment with a check” and then mention the check number.
- If you have made the payment electronically, mention the EFT number.
- After this, include a memo or attachment as required.
- At last, hit the Save and Close option to finish.
How to Automatically Categorize Expenses in QuickBooks Online?
You can also enable the auto-categorise feature for QuickBooks, which categorizes expenses and automatically categorizes familiar expenses.
What Expenses Can or Cannot Be Auto-Categorized?
QuickBooks Online doesn’t auto-categorized less familiar expenses like;
- Expenses that are categorized by rules you have generated.
- Tricky expenses such as loans, owner’s draw, transfers, and check payments.
- We don’t have enough data on to categorise.
- Any money-in transactions.
How does Auto-Categorise work with other automation features?
When the auto-categorise feature is enabled, while other automation features are enabled, functions will perform in the following order.
- Any tricky or money-in transactions are excluded.
- Any rules that match or categorise transactions trigger.
- The Auto-Categorise feature is applied to the rest of the expenses. Then, it is categorised and added to the books.
- Any remaining transactions are left for you to categorise manually.
Setup Auto-Categorization
- Initially, move to All Apps > Accounting > Bank Transactions.
- Now, click the See how it works option when you see the “Save more time with auto-categorise” message.
- You will get an introduction to how QuickBooks will categorise your expenses. Then, tap on the See a preview option.
- QuickBooks shows some expenses that are identical to the ones you have categorised before, and shows how we can categorise them. After checking, hit the Next option.
- If you see everything is fine, select “Yes, categorise familiar expenses for me.” If you plan not to allow QuickBooks to auto-categorise your expenses, opt for the “No, I’ll Categorise everything.”
- Choose the Confirm option.
- If you click Yes, then you can also choose Review our work, or Go to Bank Transactions.
Review & Edit Auto-Categorized Expenses
QuickBooks application categorises the expenses accurately, but you still need to edit or change how certain transactions are categorised. For that, perform the steps instructed below.
- Initially, head to All Apps > Accounting > Bank Transactions.
- Choose the Categorised tab.
- Apply a filter for the transaction list for Auto-categorised.
- You must check out the categorized expenses for accuracy. If you think that any transactions need to be re-categorized, pick the category to select a different one. Otherwise, click Undo to remove the currently assigned category. It will simply transfer the expense back to the For Review tab.
Manage Auto-Categorization
You have the option to disable or enable the auto-categorization at anytime. For that, use the following steps.
- Move to All Apps > Accounting > Bank Transactions.
- Choose the Settings icon from the top of the transaction list.
- Enable the Familiar Expenses switch On or Off. Editing these settings doesn’t affect any expenses that are previously auto-categorised.
How To Use QuickBooks personal credit card for business expenses?
You need to perform the following steps to use the QuickBooks personal credit card for business expenses.
First Step: Record the Business Expense
Firstly, you need to record the business expense that was paid with personal funds with a journal entry. For that, perform the following steps.
- Initially, open the + New option from the left menu.
- Choose the Journal Entry tab.
- From the first line, select the Expense Account for the purchase and enter the Purchase Amount in the Debits column.
- Within the second line, tap on Partner’s equity or Owner’s equity.
- You must mention the same purchase amount in the Credits column.
- At last, hit the Save and Close option.
Second Step: Reimburse the funds as a cheque or expense
Perform the following steps to reimburse the funds as a cheque or expense.
- Click on + New and then hit the Cheque option.
- After this, select a Bank account to reimburse the personal funds from.
- When in the Category Column, opt for the Partner’s equity or Owner’s equity.
- Mention the reimbursement amount.
- Once all is sorted, click the Save and Close or Save and New option.
Reimburse the funds as an expense
- Initially, click the + New and then hit the Expense option.
- After this, select a bank account for the reimbursement of the personal funds.
- When you are in the Category column, hit the Partner’s equity or Owner’s equity option.
- Mention the reimbursement amount and then click the Save and Close option.
Conclusion
We hope that this post has provided you with enough information to manage expense categories in QuickBooks for accurate reporting. From understanding how to create, add, view, or delete expense categories in QuickBooks, proper setup ensures good control over the business finances. As a result, it will help the businesses in organising expenses properly, which helps in making informed decisions.
If you still need any help, feel free to connect with our QBooksAssist professionals.
Frequently Asked Questions (FAQ’s):-
Question 1: What are categories used for in QuickBooks Online?
Ans. In QuickBooks Online, categories allow you to keep your products and services organised. Also, it provides you with a clear insight into sales and inventory while running reports.
Question 2: How to categorise uncategorized expenses in QuickBooks?
Ans. To categorise uncategorized expenses in QuickBooks, identify them through the Profit and Loss report. After this, you can update the category within the Banking/Transaction tab by choosing the correct expense account.
Question 3: How do I change the name of the expense category in QuickBooks?
Ans. To edit the expense category name in QuickBooks, head to the Gear icon and click Chart of Accounts. Search for the expense category you wish to edit and click on it. After this, hit the Drop-down arrow next to the Run Report link for the Edit option.

Recent Posts
QuickBooks Payroll: Service, Setup, Pricing and Support Guide
Read MoreQuickBooks Error Support: Get Instant Help Via Live Chat or Call
Read MoreQuickBooks Error 3371 Explained: Common Causes and 7 Effective Fixes
Read MoreHow to Contact QuickBooks Customer Service and Talk to a Live Expert
Read MoreHow to Update QuickBooks Company File Without Losing Data?
Read More