All posts by Admin

How to Fix QuickBooks Error 15241 While Updating Payroll?

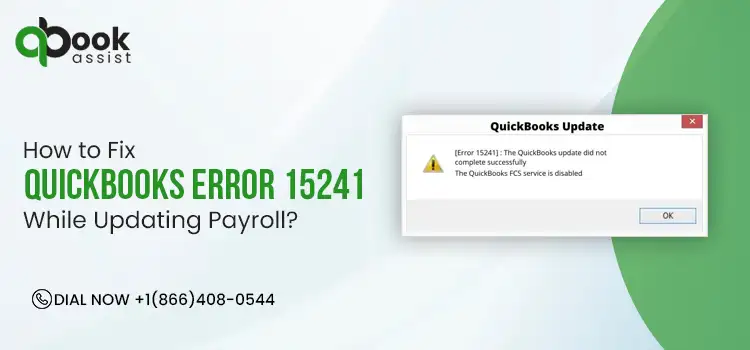
Payroll deadlines are important, and nothing disrupts a business more than a faulty update. QuickBooks Error 15241 often appears while trying to update payroll tax tables, preventing the software from updating. However, when the error comes up, it throws the following error message:

“[Error 15241] The payroll update did not complete successfully.
The QuickBooks FSC Service is disabled.”

This error mainly arises due to issues with the Windows Registry or disabled file copy services. If you are also stuck with this error, you’re not alone. In this detailed post, we are going to explain the root causes and troubleshooting tips to fix the QuickBooks Desktop Error 15241.

QuickBooks Error 15241 belongs to the 15xxx series of errors that occur while downloading the latest payroll tax table update. So, to resolve the issue, enable the QuickBooks FCS Service and update the payroll tax table.

What is Error 15241 in QuickBooks Update?

QuickBooks Error 15241 is a payroll update issue that usually occurs when the QuickBooks File Copy Service (FCS) is disabled. It prevents users from downloading or installing payroll updates. This error may also arise due to damaged installation files, issues with the Windows Installer, or security software blocking the update process.

What are the Factors Causing QuickBooks Update Error 15241?

QuickBooks Update Error 15241 is a complex issue that takes place while downloading the payroll tax table update. It may be caused by numerous reasons. Let’s understand all the causes to fix the error smoothly.

  • Inadequate user permissions can restrict the ability to update the QuickBooks Payroll.
  • Incorrect or faulty installation of the QuickBooks Desktop.
  • Using the unsupported version of the QuickBooks software.
  • Antivirus or Windows firewall is blocking QuickBooks from downloading the latest payroll updates.
  • You have disabled the QuickBooks File Copy Service.
  • The shared download drive isn’t mapped correctly.
  • Invalid or outdated Digital Signature Certificate.
  • Misconfigured Internet Explorer settings can also trigger QuickBooks Error Code 15241.

How to Fix QuickBooks Error Code 1524 Using Top 6 Methods?

After understanding the causes, let’s find out the effective ways to resolve the QuickBooks Error Code 15241 smoothly.

Method 1: Run the Reboot.bat file

Running the reboot.bat file will re-register the QuickBooks-related extensions in Microsoft Windows and help fix the Update Error 15241 in QuickBooks.

  • Exit from the QuickBooks application.
  • Move to the QuickBooks folder containing the reboot.bat file.
    • Right-click on the QuickBooks desktop icon from the desktop and click Properties.
    • Choose the Open File location option.
  • Now, right-click on the reboot.bat file and tap on the Run as Administrator option.
Now, right-click on the reboot.bat file
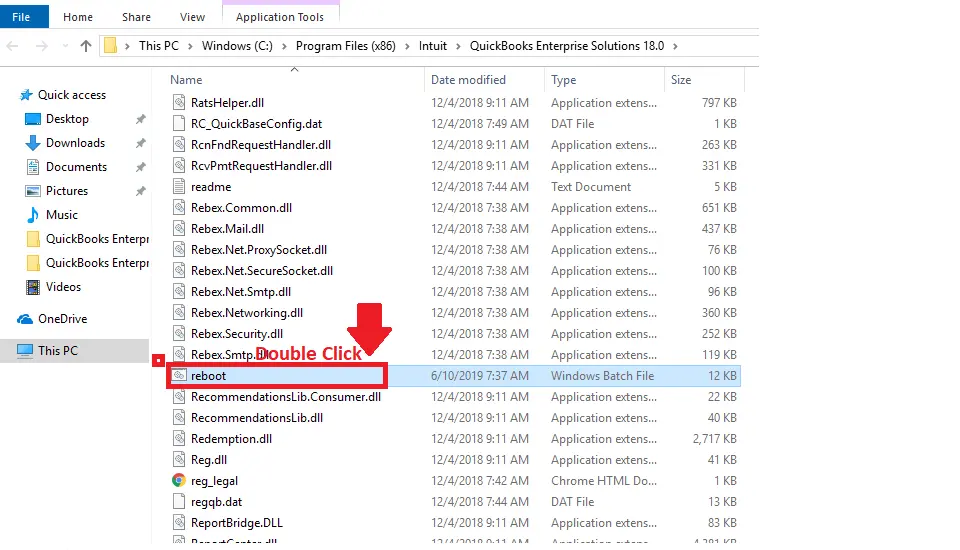
  • As a result, it will launch a Command window with scrolling file names. Make sure not to shut down this window manually. Once the reboot.bat utility is completed, the window will eventually close.
  • At last, relaunch your PC and then launch QuickBooks.

Method 2: Enable the QuickBooks Desktop File Copy Service (FCS)

Here’s how to enable the QuickBooks File Copy Service.

  • Open the Run window and insert COMPMGMT.MSC in the search box.
  • Tap on OK, and it will open the Computer Management window. From there, click the Services and Applications.
  • Tick mark the Services and scroll down to get the Intuit File Copy Service. Then, double-tap on the FCS service.
QuickBooks Desktop File Copy Service (FCS)
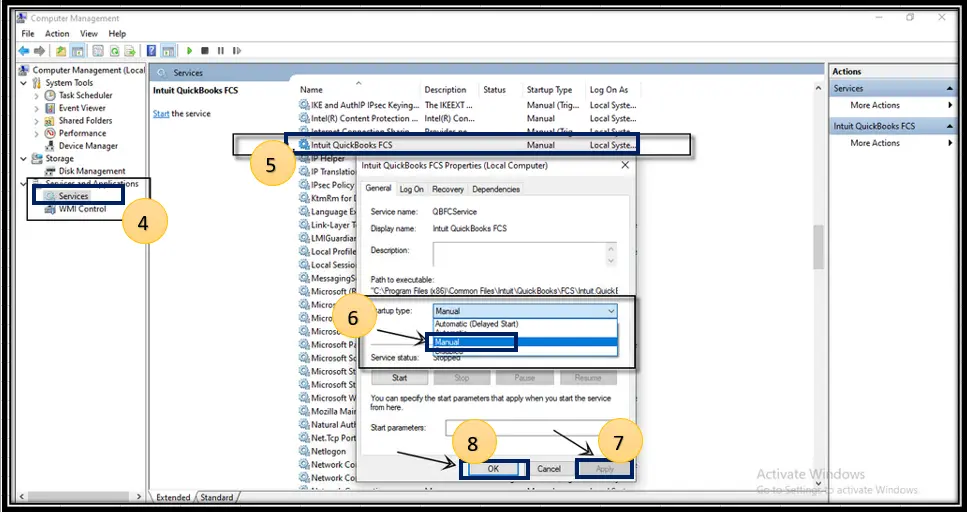
  • Choose the Startup Type option and click the Manual option.
  • Now, head to the Apply and then the OK option.

Method 3: Re-Validate the Payroll Service Key

Perform the following steps to re-validate the payroll service key.

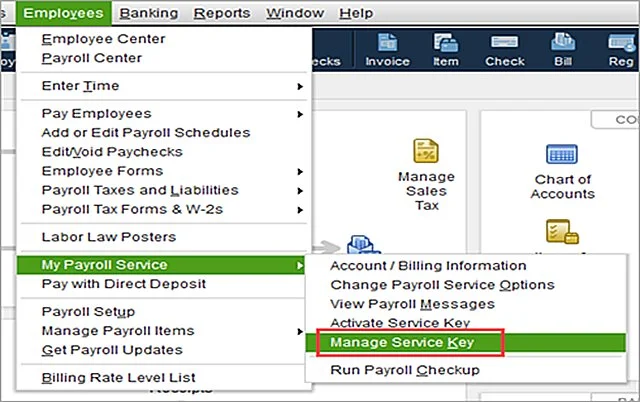
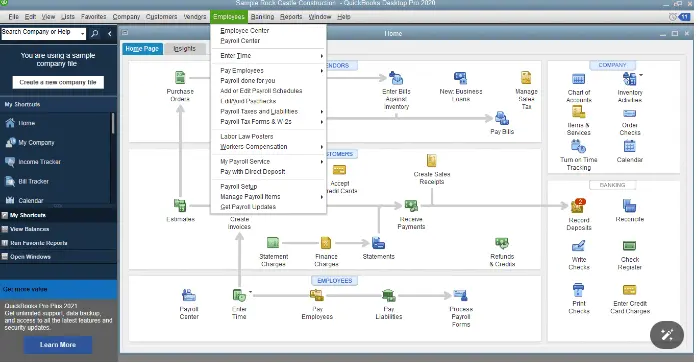
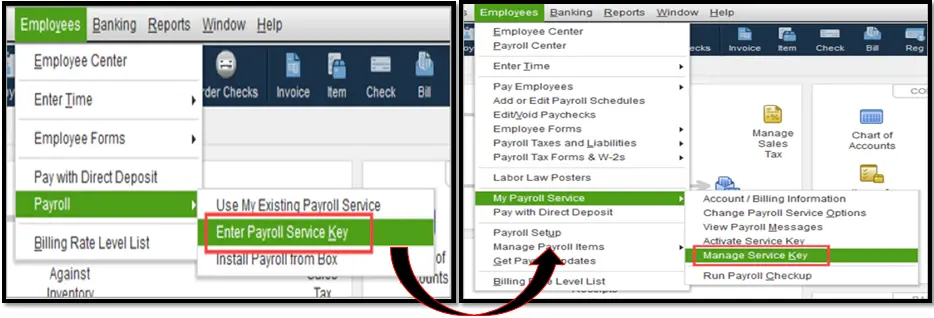
  • Initially, move to the Employees menu from the top menu bar.
  • Select the My Payroll Service and hit the Activate Service Key option.
Select the My Payroll Service
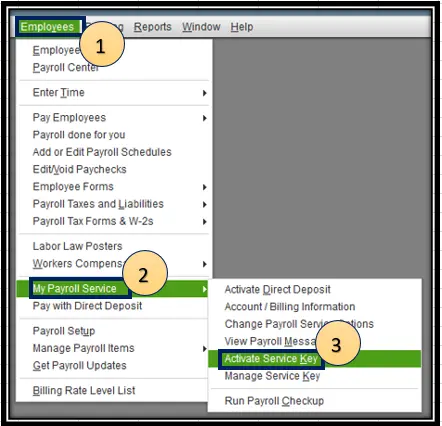
  • After that, highlight the current payroll below the Service Keys and choose the Edit menu.
  • Choose the Next option until you finish up.
  • If the issue still exists, then try another solution to fix the error.

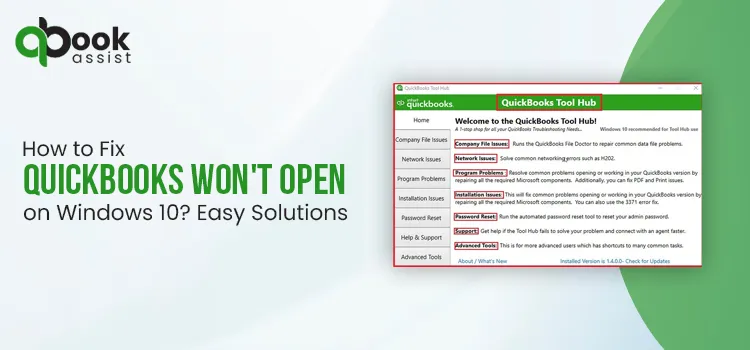
Read More:- QuickBooks Won’t Open

Method 4: Install a Digital Signature Certificate

The Digital Signature Certificate verifies the authenticity of QuickBooks updates to download them uninterruptedly. So, to fix the issue, you must install an updated digital signature certificate by performing these steps.

  • Move to the C:\Program Files\ Intuit\QuickBooks file path.
  • After this, locate and right-click the QBW32.exe file and choose the Properties tab.
  • Go to the Digital Signatures tab and verify if Intuit is chosen from the signature list, and hit the Details tab.
  • When you are on the Digital Signature Details window, select the View Certificate option.
  • Choose the Install Certificate option from the Certificate window.
  • Hit the Next tab unless the Finish option is displayed, and then choose Finish.
  • At last, relaunch your system and then try to download the QuickBooks updates.

Method 5: Download the Updates As Administrator

It is essential to have the proper administrative rights to download and install the latest QuickBooks payroll updates. Here’s how to download the updates as an administrator.

  • Exit from the company file and then your QuickBooks Desktop.
  • After this, right-click on the QuickBooks Desktop icon.
  • Select the Run as Administrator option.
  • From the pop-up message, “Do you want to allow this program to make changes to your computer?”, tap on the Yes option.
  • Start downloading the latest QuickBooks Desktop product updates.
  • Finally, begin downloading the latest payroll tax table update once again.

Method 6: Run Quick Fix My Program

To end all the background running processes in QuickBooks, run the QuickBooks Fix My program from the tool hub. This will immediately run a quick repair on your QuickBooks program and help fix the QuickBooks Payroll Update Error 15241.

Use the Quick Fix My Program Tool

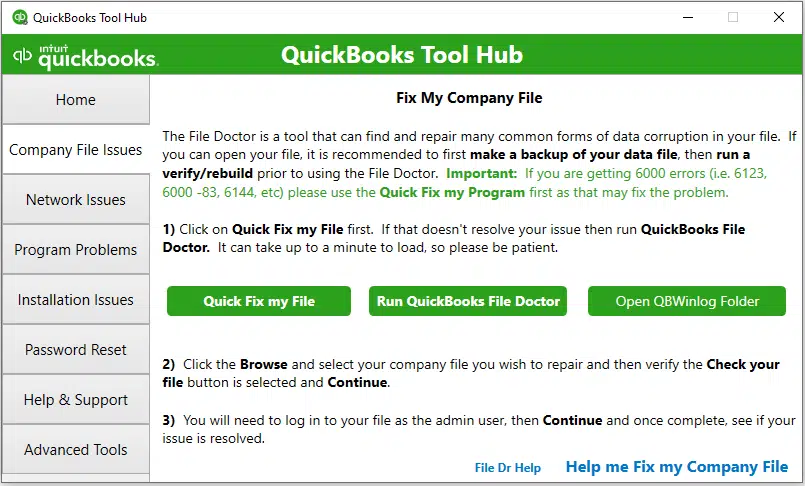
Important Tip: Verify you have downloaded and installed the latest version of the QuickBooks Tool Hub.

  • Double-click on the QuickBooks Tool Hub icon to open it.
  • From the dashboard, choose the Program Problems tab.
  • Click the Quick Fix My Program tab.

Method 7: Map the Network Drive on Windows

Perform the steps below to run a mapped drive on Windows.

  1. Launch the Run window by pressing the Windows + R keys.
  2. Now, insert “File Explorer” in the search panel and launch the File Explorer window.
  3. Go to the left pane and pick the “This PC” option.
  4. Hit the More (…) option and then tap on Map Network Drive.
  5. Browse to the Drive section drop-down menu and choose any available letter.
  6. Move to the Folder section, and note down the folder path or computer. Then, hit the Browse tab and pick the network folder.
  7. To ensure that you connect with the network drive every time you log in, hit the Reconnect Sign-in option.
  8. At last, tap on the Finish tab to wrap up the process.

Method 8: Update Payroll Tax Tables

Running the outdated version of the payroll tax table may give rise to the QuickBooks error 15241 payroll update. Perform the following steps to update the payroll tax table to the latest version.

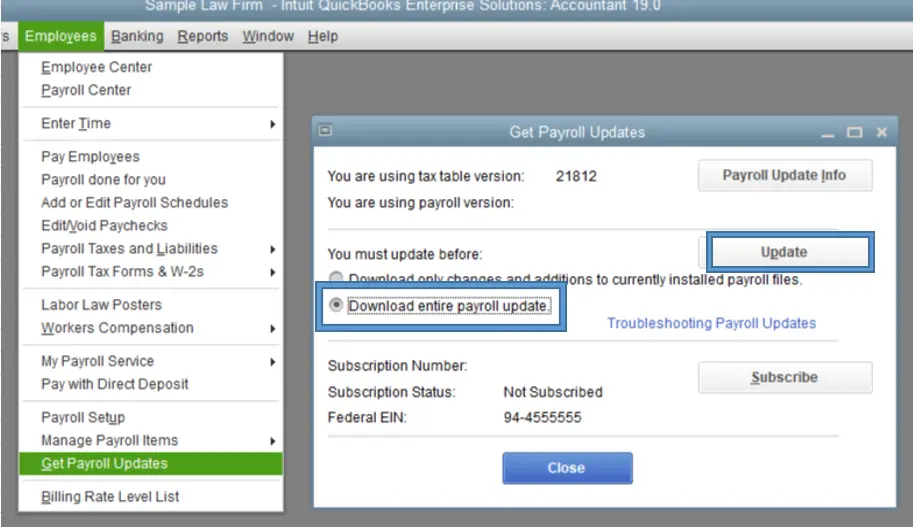
  1. Initially, browse to the QuickBooks Employees menu and click the Get Payroll update option.
  2. Circle the Download Entire Update checkbox and browse to the Update option.
  3. At last, you will get the Download Complete pop-up window on your screen.

Method 9: Repair QuickBooks With QuickBooks Install Diagnostic Tool

The QuickBooks Install Diagnostic tool is used when there is a problem with the installation of the QuickBooks Desktop application. This tool scans for the issues and then runs a quick repair to configure the damage with the QuickBooks installation. Thus, it will help you fix the QB Desktop Error 15241.

Method 10: Reinstall QuickBooks Desktop

Even after applying all the solutions, you still couldn’t fix QuickBooks Error 15241, so try to reinstall QuickBooks Desktop. This will install a fresh version of the QuickBooks software so that you can get the payroll updates smoothly.

Conclusion

QuickBooks Error 15241 is a common payroll update issue that may be caused by incorrect firewall settings, an outdated digital signature certificate or an unstable internet connection. However, you can fix this issue by performing the troubleshooting methods discussed ahead in this blog.

If the error continues, don’t take any stress and reach out to our qbookassist professionals for immediate guidance.

Frequently Asked Questions (FAQ’s):-

Question 1: Why is QuickBooks not updating payroll?

Ans. QuickBooks is not updating payroll due to damaged files, invalid configurations, outdated settings or connectivity issues.

Question 2: What is the File Copy Service in QuickBooks?

Ans. The QuickBooks File Copy Service (FCS) is a background service used by QuickBooks Desktop to apply updates and install payroll components. In case the File Copy Service is disabled, you won’t be able to download the updates.

Question 3: How can I prevent QuickBooks Error 15241 in the future?

Ans. To avoid the QuickBooks Error 15241 from occurring;

  • Make sure that QuickBooks is updated to the latest version.
  • Always ensure that FCS Service is enabled.
  • Verify you have proper admin rights to update the QuickBooks Desktop.

Question 4: Is Error 15241 related to payroll updates?

Ans. Yes, the QuickBooks Error 15241 is often linked with payroll update failures in QuickBooks Desktop.

Learn How to send Direct Deposit paychecks in QuickBooks Desktop Payroll

Direct deposit is one of the easiest and safest methods to pay your employees and contractors without handwriting or printing paychecks. However, it’s essential to set up and use QuickBooks Direct deposit, make sure that your business has a U.S. bank account that’s set for bank transfer ACH transactions. Read this guide to learn more about how to send direct deposit paychecks in QuickBooks Desktop Payroll and how to set up company payroll for direct deposit.

How to Set Up Your Company Payroll For Direct Deposit In Easy Steps?

Before paying the employees or contractors via direct deposit, it’s essential to set up the company for direct deposit. Here’s how to do so.

Direct Deposit Setup Necessities

You must have the following things to set up direct deposit in QuickBooks.

  • Employee’s or contractor’s bank account details
  • Business name, address, and EIN
  • Online bank details, or your company’s bank routing and account numbers.
  • Principal officer’s Social Security number, date of birth, and home address.

First Step: Connect Your Bank Account

You can link your bank account instantly via Instant Bank Verification, which allows you to access direct deposit. Use the following steps for your product.

New Payroll User

  • Move to the All Apps > Payroll > Overview > Get Started option.
  • When you are in the Business section, click the Edit menu.
  • Now, mention your federal tax ID number and other missing details. Then, hit the Next option.
  • Click the Add new bank account option and locate your bank name. Herein, you must provide your online banking user ID and password.
  • If you are unable to connect automatically, hit the Enter bank info manually option. Also, provide your routing number and account numbers. Then, hit the Save option.
  • Once you’re done, hit the Accept and Submit option.

Important Tip: Whenever you update your bank details, insert the new code sent to your phone number to save the changes.

QuickBooks Desktop Payroll

  • Initially, launch the QuickBooks application and log in using the QBO login details.
  • Move to Employees > My Payroll Service > Activate Direct Deposit > Get Started option.
My Payroll Service > Activate Direct Deposit
  • If you can’t get the Get Started screen;
    • Browse to the I’m the admin, and I’m the primary person who can …… and then mention the admin’s email address or User ID.
    • Click on Continue and provide the email or User ID and password for your Intuit account. Then, hit the Sign In tab. If you don’t have an Intuit account, tap the Create an Account link. If you have previously logged in to your Intuit account in QuickBooks, you will not get this screen.
    • Choose the Get Started option.
  • Browse to the Business tab, click Start, and complete the necessary details.
  • Provide the Principal Officer details and hit Next > Add new bank account.
  • Also, provide your bank name and online bank details, or bank routing and account numbers.
  • Generate a new PIN that you can use every time while sending payroll.
  • Now, enter the PIN twice for confirmation and then click Submit.
  • Hit the Next > Accept and Submit option.
  • When asked, confirm the Principal officer’s full Social Security Number and click Submit again.

Once the submission is done, you will get a confirmation message. If your bank account gets connected instantly, you can go straight to the 3rd step. If not, then first verify your bank account.

Second Step: Verify Your Bank Account (if required)

If you can’t connect your bank account instantly, Intuit will send a test debit of less than $1.00 to your account. After this, it may take around two business days to reflect in your bank account. Once it gets debited, mention the exact amount in QuickBooks for authorizing your account for payroll transactions.

Third Step: Set Up Employees & Contractors For Direct Deposit

After setting up and verifying your company’s bank account, you can add your employees and contractors bank details.

3.1 To pay employees, set up direct deposit for them

The following are the stepwise instructions to pay employees via direct deposit.

Step 1: Set Up Direct Deposit for your company

You must perform the above steps to set up direct deposit for your company.

Step 2: Get a Direct Deposit Authorization Form

You must need the bank details from your employee to set up direct deposit for them. To get this information, you can either use the voided check or a direct deposit authorization form.

QuickBooks Online Payroll

Your employees have to complete the form, sign it, and then date a direct deposit authorization form. Also, you have to attach a voided check from their bank account. Make sure that the voided check is not a deposit slip. It is used for record purposes only.

  • Navigate to the All Apps > Payroll > Payroll Taxes > Filings > Employee Setup option.
  • Now, beside the Authorization for Direct Deposit feature, click the Bank Verification.
  • At last, hit the View option.

QuickBooks Desktop Payroll

You must request a voided check or specific banking details, like bank account and routing number, directly from your employee.

Step 3: Add Direct Deposit Information for your Employee

Once the company account is set up and you have your company details, add it to your account.

QuickBooks Online Payroll

To include the employee’s direct deposit information, use these steps.

  • Click the All Apps > Payroll > Employees menu.
  • Choose your employee and from the Payment method area, click Start or Edit.
  • Thereon, tap on the Direct Deposit option and then select a direct deposit method.
    • Direct deposit to one account
    • Direct deposit to two accounts (split by dollar amount or percentage)
    • Direct deposit with a balance as a check
  • Now, provide the routing and account numbers from the employee’s voided check.
  • When all the changes are done, tap on Save.

QuickBooks Desktop Payroll

  • Initially, move to the Employees menu and click Employee Center.
  • Choose the employee’s name, and hit the Payroll Info tab.
  • Hit the Direct Deposit button and circle the checkbox of Use Direct Deposit for [employee’s name].
  • Now, select whether you wish to deposit the paycheck into one or two accounts.
  • Herein, provide the employee’s financial institution details like
    • Bank Name
    • Routing No.
    • Account No.
    • Account Type
  • If you select two accounts, provide the amount or percentage for the first account. Then, the reminder will directly go to the second account.
  • At last, click OK to save and then enter your direct deposit PIN when asked.

Result

Once you’re done, the employee’s next paycheck will be issued via direct deposit.

3.2 To pay contractors, set up and manage direct deposit for your contractors

To set up the direct deposit feature for your contractors, perform these steps.

QuickBooks Online Payroll

You can invite your contractor to add your own W-9 and bank details. Otherwise, you can also add it yourself.

  • Move to the All Apps > Payroll > Contractors.
  • Now, for a new contractor, hit the Add a Contractor option. Otherwise, you can opt for an existing contractor.
  • After this, click the Bank Account option.
  • As required, mention the following details:
    • Account Number
    • Account Type
    • Routing Number
    • Account holder Phone Number
    • Account holder Full Name
  • Finally, click Save to confirm the changes made.

QuickBooks Desktop Payroll

  • Initially, launch the Vendor Center and then double-click on the vendor.
  • Tap on the Additional Info tab and hit the Direct Deposit option.
  • Circle the checkbox of Use Direct Deposit for:[Vendor Name] and mention the bank details.
  • Choose the Send confirmation direct deposits to [email address] if you’d like a payment confirmation. Then, QuickBooks will send you an email two days prior to the direct deposit posting to your contractor’s account. Also, ensure that the following details are included in the email.
    • Your company name
    • The amount of payment
    • The date the direct deposit will be posted to your contractor’s account.
    • The last four digits of the independent contractor bank account number.
  • At last, provide your Direct Deposit PIN and click the Continue option.

Once the above steps are completed, you’re all set to pay your team with direct deposit.

How to Send Direct Deposit Paychecks in QuickBooks Desktop Payroll?

After setting up the company for direct deposit, let’s now understand how to send direct deposit paychecks in QuickBooks Desktop Payroll.

How to Send Direct Deposit Paychecks in QuickBooks Desktop Payroll

Send Payroll to Intuit

  • Initially, move to the Employees > Send Payroll Data option.
  • When you are in the Send/Receive Payroll Data window,
    • Click View to check the direct deposit paychecks before sending them.
    • Click the Send All option to send the direct deposit payroll.
  • After this, mention your Direct Deposit PIN and click OK. When you get the message, “QuickBooks can’t find the following account”, implement these steps:
    • Choose the bank account you use for payroll fees by clicking the Accounts drop-down menu when you have just changed your direct deposit bank account.
    • Pick the Payroll Service Asset Account by hitting the Accounts drop-down menu. In case you are sending a zero payroll after voiding a paycheck. QuickBooks will assess this account for posting any tax credit (overpaid) as a result of the void.

Why is QuickBooks Direct Deposit Not Working?

Users often face the QuickBooks Direct Deposit not working issue due to an incorrect bank account or routing number on the employee profile. It may also occur due to an issue or hold at the employee’s bank, or when you have submitted the payroll after the 5 PM Pacific Time cutoff.

Conclusion

We hope that you have now understood how to send direct deposit paychecks in QuickBooks Desktop Payroll. Thus, it will help to pay your employees on the same day without any hindrance. If you are still facing any issues, check your bank details and make sure you have provided all the details correctly.

For further guidance, you must connect with our Qbookassist professionals for immediate help.

Frequently Asked Questions (FAQ’s)

Question 1: Which version of QuickBooks Payroll includes same-day direct deposit?

Ans. The QuickBooks Online Payroll Premium and QuickBooks Online Payroll Elite both provide the same-day direct deposit feature.

Question 2: When to submit QuickBooks Payroll for direct deposit?

Ans. It is mandatory that you submit QuickBooks Payroll for direct deposit by 5:00 PM PT (8:00 PM PT) at least two banking days before the check date to pay on time. However, for the next day submission, you can submit it by 5:00 PM PT the day before payday. Herein, the weekends and holidays will not be counted as your banking days.

Question 3: How to verify direct deposit in QuickBooks Desktop?

Ans. To verify the direct deposit in QuickBooks Desktop.

  • Launch QuickBooks and log in as a QuickBooks admin.
  • Go to the Employees > My Payroll Service > Activate Direct Deposit.
  • Log in to your Intuit account and provide the debit amount twice, and click Verify.
  • Provide the payroll PIN, click the Submit, and then the OK tab.

Question 4: Do direct deposits have limits?

Ans. Yes, there is a company’s total limit and a per-employee limit to safeguard against fraud. The QuickBooks Online Payroll users can view the limit in Payroll Settings below the Direct Deposit section. However, you can request a direct deposit limit increase when your payroll crosses its limit or for paying bonuses.

Question 5: Can I pay anything else with direct deposit?

Ans. No, you can only access the Direct deposit feature to pay your employees and contractors. You have to access a different payment method to pay off any other company expenses.

Question 6: What are the prerequisites required for setting up direct deposit for contractors?

Ans. To set up direct deposit for contractors, you must have:

  • A valid and active QuickBooks subscription.
  • Your company’s direct deposit setup.
  • Your contractor’s bank account details.

How to Fix QuickBooks Won’t Open on Windows 10? Easy Solutions

Does your QuickBooks not open on Windows 10 while performing an important business task? It may occur due to the damaged or missing QBWUSER.INI file and corruption in your hard drive. Other factors causing this error include a damaged Windows operating system, a damaged program or QuickBooks Desktop installation, or a large company name. However, it’s essential to get rid of this issue to continue with your ongoing business task smoothly. In this blog, we have explained all the causes and troubleshooting solutions on how to fix QuickBooks that won’t open on Windows 10.

The QuickBooks won’t open issue can be fixed by renaming the QBWUSER.INI file, using Quick Fix My Program, or the Install Diagnostic tool to repair the damaged installation.

Why won’t QuickBooks open on my computer?

The ” QuickBooks Desktop won’t open issue usually occurs due to a damaged or missing QBWUSER.INI file. This issue may also be caused by numerous causes, including;

  1. Damaged QuickBooks Desktop installation or program files.
  2. The company name contains characters that are not actually allowed.
  3. Corruption in your hard drive.
  4. Damaged Windows operating system.
  5. Windows Firewall is blocking QuickBooks Desktop from running properly.

How to fix QuickBooks won’t open on Windows easily?

The following are the troubleshooting methods to resolve the QuickBooks Desktop won’t open issue.

Method 1: Run Quick Fix My Program from the Tool Hub

Important Tip: Verify that you have set up the latest version of QuickBooks Tool Hub (1.6.0.8).

  • Go to your desktop and launch the QuickBooks Tool Hub on your computer.
  • After this, tap on the Program Problems tab.
  • Choose the Quick Fix My Program tab.
  • At last, launch the QuickBooks Desktop and then launch your company file.

Method 2: Check If the Issue is With Your File or the Prograsm

You may often experience the QuickBooks Desktop won’t open issue due to a damaged company file. So, to fix the issue, you must figure out whether the issue lies with QuickBooks or your data file itself. QuickBooks might try to launch your previous company.

First Step: Open your file with all windows closed

  • Launch the QuickBooks Desktop application on your computer.
  • When you are in the No Company Open window, pick the company file that is having issues.
  • Press and hold down the Alt key and hit the Open tab. Make sure to leave the Alt key till the time the file opens. If you are prompted to log in, leave the Alt key, provide the password, and hold down the Alt key. Then, choose the OK option.

Second Step: Suppress the QuickBooks Application

  • Press and hold down the Ctrl key and then double-tap on the QuickBooks Desktop icon.
    • Important Tip: Don’t leave the Ctrl key unless you get the No Company Open window, QuickBooks freezes, or gives you an error.
  • After that, choose a company file and pick the Open option.

If the error persists, then try another solution.

Method 3: Use the QuickBooks Install Diagnostic Tool From the Tool Hub

If you are still encountering the QuickBooks won’t open issue, then try to run the QuickBooks Install Diagnostic Tool. This utility will scan for potential damage with the QuickBooks installation and then run a repair to fix the issue. For that perform the steps listed below.

  • Launch the QuickBooks Tool Hub installed on your device.
  • From there, head to the Installation Issues tab.
  • Hit the QuickBooks Install Diagnostic Tool. Give some time to run the tool and repair the damage with the QuickBooks installation.
  • Relaunch your PC after running the tool.
  • At last, open the QuickBooks Desktop and then your company file to see if the issue still exists.

Method 4: Reinstall the QuickBooks Desktop Application

Sometimes, reinstalling the QuickBooks Desktop may install a fresh version of the software and remove the technical glitches present in the software. As a result, it will help fix the QuickBooks won’t open on Windows issue.

  • Go to the Control Panel, switch to Programs and Features or Uninstall a Program option.
  • Choose the QuickBooks Desktop version that you want to remove.
  • Thereon, tap on the Uninstall/Change, Remove, and then click on the Next option.
  • Launch the File Explorer by clicking on the Start menu.
  • Access the folder holding your QuickBooks company files. This is mainly your QuickBooks folder. You can get it by browsing through the following locations:
    • C:\ProgramData\Intuit\QuickBooks (year)
    • C:\Users\(current user)\AppData\Local\Intuit\QuickBooks (year)
    • C:\Program Files\Intuit\QuickBooks (year)
    • 64-bit version C:\Program Files (x86)\Intuit\QuickBooks (year)
  • Now, right-click on the folder and hit the Rename option.
  • Thereon, include .OLD at the end of the file name, and it will prevent QuickBooks from opening it when you reinstall.
  • At last, reinstall QuickBooks Desktop again using the steps given on the screen.

Method 5: Rename the QBWUSER.INI file

Users often end up with the QuickBooks Desktop won’t open issue due to the damaged or missing QBWUSER.INI file. So, to fix the error, rename the QBWUSER.INI file. Here’s how to rename the file.

  • Launch the QuickBooks folder that stores your QBWUSER.INI file.
    • The file is mainly located in the following location: “Users[Your user name]AppDataLocalIntuitQuickBooks [year].”
  • After this, right-click the QBWUSER.INI file and tap on the Rename option.
  • Rename the file by adding .OLD at the end of the file name. You will see the file name written as “QBWUSER.INI.OLD”.
  • Also, rename the EntitlementDataStore.ecml file.
  • Restart the QuickBooks Desktop application, and if the program opens after changing the file name, try opening the sample company file.
  • If you are able to access the sample company file but not your own, try copying the file to a different folder. Try to open it from a new location, and if the file opens up easily, it means the issue is due to a damaged folder or folder permissions.
  • If you fail to log in to your file, it seems that your data file is damaged. Then, try restoring an earlier backup of the file.
  • If you couldn’t open the sample company file or QuickBooks won’t start, it simply indicates the QuickBooks installation is damaged.

Method 6: Run QuickBooks As An Administrator

If the QuickBooks Desktop won’t open, then it may happen due to a lack of admin privileges. So, to fix the issue, make sure to open QuickBooks Desktop as an administrator.

  • Exit from all active programs on your device.
  • After this, relaunch your computer.
  • Tap on the QuickBooks Desktop icon and expand the menu.
  • At last, click the Run as administrator option.

Method 7: Shut down all apps on Task Manager

  • Initially, hit the Ctrl, Shift, and Esc keys on the keyboard to access the Task Manager.
  • After this, search for the QuickBooks program(QBW32.exe) in the Processes section.
  • Now, right-click it and click the End Process button.

Conclusion

Through this blog’s help, we hope that now you have the answer for how to fix QuickBooks won’t open on Windows 10. You can address the issue by restarting your PC and changing the QBWUSER. INI file name, using the QuickBooks Install Diagnostic tool, or by reinstalling the software. If the issue still exists, then connect with our qbookassist professionals for quick assistance.

Frequently Asked Questions:

Question 1: How do I fix the QuickBooks won’t open issue?

Ans. To resolve the QuickBooks Desktop won’t open issue, relaunch your computer and then try using QuickBooks as an administrator. Also, you can fix the issue by using Quick Fix My Program or the QuickBooks Install Diagnostic Tool.

Question 2: What to do if QuickBooks won’t open after windows update?

Ans. If QuickBooks won’t open after a Windows update, then suppress your company files to repair the QuickBooks program or repair the QuickBooks installation using the Control Panel.

Question 3: Why my QuickBooks app won’t open?

Ans. QuickBooks app won’t open due to numerous reasons, including damaged company files, corrupted installation, pending updates, or interruption from the antivirus software.

Question 4: Why isn’t QuickBooks Online won’t open?

Ans. The QuickBooks Online app won’t open due to a damaged company file, pending updates, or due to an interruption from the antivirus software.

How can I Resolve QuickBooks Black and White Screen Issue? Easy Solutions

Has your QuickBooks suddenly started displaying black fields instead of white while performing accounting tasks?

This is a common QuickBooks display issue that usually occurs due to incorrect Windows DPI settings, outdated graphics drivers, screen resolution conflicts, or a damaged QBW.ini file.

When this issue appears, users may experience:

  • Black or blank screens
  • Fields displaying black instead of white
  • Distorted fonts or fuzzy icons
  • QuickBooks Desktop display glitches

If you’re wondering, “How Can I Resolve QuickBooks black and white screen issue?” — this guide provides complete step-by-step troubleshooting methods to fix the issue quickly.

Looking for the proper steps to fix QuickBooks black and white screen issues? Contact our QB professionals at +1-866-408-0544 and obtain the best possible assistance quickly.

Why My QuickBooks Turned Black and White?

The QuickBooks black and white screen issue may occur due to the problems with either the QuickBooks Desktop or your system settings. Apart from this, there are other factors that may trigger this issue, which are as follows;

  • Not running the supported version of the QuickBooks Desktop.
  • Operating the outdated video drivers that are incompatible with QuickBooks.
  • Issues between QuickBooks and the graphics drivers.
  • Incorrect settings of the QuickBooks or Windows display resolution.
  • Damage or corruption of the QuickBooks program files may also cause QuickBooks black and white screen issues.

How to Resolve QuickBooks Desktop fields display black instead of white issue?

If you are struggling with the QuickBooks Desktop fields display black instead of white issue, then we have got you covered. Herein, we have provided all the possible troubleshooting methods to fix the issue.

Solution 1: Change the QuickBooks DPI Settings

You have to edit the QuickBooks display and then view choices before doing any Windows modifications.

  • Go to the desktop, right-click on the QuickBooks icon.
  • After this, choose the Properties option.
  • Move to the Compatibility tab and tap on Disable display scaling on high DPI settings.
  • When the changes are done, click on Apply and then OK.
  • Finally, launch QuickBooks and check to see if the windows are available.

Read More:- Fix QuickBooks Online Login issue

Solution 2: Set the Windows Display Settings

The QuickBooks application runs perfectly with the Windows Display settings. Any modifications made to these settings may result in display problems. So, it’s essential to understand that any changes made to Windows DPI settings will eventually impact the QuickBooks application also.

  • You must follow Microsoft’s guidelines to restore the default display settings for Windows 10 and Windows 8.
  • Now, set the minimum screen size to 1024 X 768. Whereas the ideal screen size is 1920 X 1080.
  • After this, relaunch your PC, open QuickBooks, and then your data file.

Solution 3: Change the Desktop View Preference

Incorrect Desktop view preferences may also create trouble and cause display issues. So, you must change the Desktop view preferences by using these steps.

  • Initially, launch your company file and hit the Edit menu.
  • After this, head to the Preferences tab.
  • Now, click the Desktop View and then the My Preferences option.
  • Next, switch the view from Multiple Windows to One Window.

Learn More:- QuickBooks Desktop Keeps Crashing

Solution 4: Use the Quick Fix My Program Tool

To fix the damage or corrupt QuickBooks program, you must run the Quick Fix My Program tool from the QuickBooks Tool Hub. For that, perform the following steps.

  • Move to the desktop and double-click the QuickBooks Tool Hub 1.6.0.8 to open it.
  • From there, head to the Program Problems tab.
  • Choose the Quick Fix My Program option.

Solution 5: Ensure that the Video Card Drivers Are Updated to the Latest Release

Running the outdated video card drivers might create display issues in QuickBooks. So, to resolve the issue, you must update the drivers so that you can get a better display view.

  • Open the Run window on your screen and then type dxdiag.
  • After this, choose the Display 1 option. Then, note down what your Manufacturer/Model is.
  • Now, start downloading the required updates successfully.

Solution 6: Change the Windows Theme to Basic

Changing the Windows Theme to Basic may also help in fixing the QuickBooks display issues.

  • Initially, right-click anywhere on the desktop and choose the Personalize option.
  • Now, pick any one of the Windows Basic Themes.
  • Restart your Windows PC and then open QuickBooks to see if the error still continues.

Solution 7: Edit the QBW.ini File

Making changes to the QBW.ini file can restore the display settings and help you fix the QuickBooks black and white glitch.

  • Exit from the QuickBooks application if it’s already open.
  • Now, hit the Windows key on the keyboard.
  • After this, copy and then paste the correct file path into the search box.
    • QuickBooks 2020:
    • Enterprise Solutions 20.0
    • QuickBooks 2019
    • Enterprise Solutions 19.0
    • QuickBooks 2018
    • Enterprise Solutions 18.0
  • Move to the end of the file, then copy and paste the following text within the file [COLOURS] Classic= 0.
  • Next, you must save the QBW.ini file.
  • At last, launch the QuickBooks application and see if the issue is resolved.

Solution 8: Re-Registering The QuickBooks Program Files

  • Launch the folder containing the QuickBooks company files, search for the .bat files, and right-click on them.
  • Next, hit the Run as Administrator option.
  • You need to ensure that the bat files run with the Windows Administrator privileges.
  • As a result, it will show a command window displaying the file path. It will shut down once the bat file utility finishes.
  • Now, put an end to the background running QBW32.exe process from the Task Manager, use these steps;
    • Tap on the Windows icon, insert taskmgr into the search console, and press Enter to launch the Task Manager.
    • Go to the Processes tab and find the QuickBooks 32-bit or QBW32.exe.
    • Now, right-click each instance and pick the End Process to stop it.

Final Thoughts

So, now we hope that you got your answer regarding How can i resolve QuickBooks black and white screen issue. By performing the above solutions, you can definitely deal with the display issues and work with QuickBooks smoothly. To prevent this error from occurring, keep the video-card drivers updated, configure Windows DPI settings accurately, and run the latest version of the QuickBooks application.

If you need any expert help, then feel free to consult our certified QB professionals at Qbookassist, who will provide you with the best possible assistance.

Frequently Asked Questions (FAQ’s):-

Question 1: Why did QuickBooks go black and white?

Ans. The QuickBooks black and white issue is mainly caused by the corrupt or outdated video card drivers. You may get the black screen if there is any corruption in your graphics card or system memory.

Question 2: How do I change the screen color in QuickBooks?

Ans. To change the screen color, launch any account register. After this, from the upper right side, click on the Color drop-down menu. Otherwise, you can opt for Other to open the color palette.

Question 3: Why is my QuickBooks screen black?

Ans. Generally, the QuickBooks screen turns black due to display issues, outdated video card drivers, incorrect DPI settings, or failed QuickBooks updates.

Question 4: What are QuickBooks display issues?

Ans. The QuickBooks display issue mainly triggers if QuickBooks suddenly starts displaying incorrect fonts, fuzzy icons, or incorrectly sized Windows. Also, this issue mainly occurs on high screen resolution monitors, 1920 X 1200 or higher.

Why is My QuickBooks Desktop Running Slow? Here’s How to Fix

Are you continuously looking for “Why is My QuickBooks Desktop running slow?” If yes, then we have got you all covered. This issue is generally caused by multiple factors, including outdated software, large company file size, or damaged program files. Also, it may happen when your system doesn’t meet the basic system requirements to run the QuickBooks Desktop.

Consequently, the QuickBooks running slow issue may interrupt you from performing urgent business tasks. So, it’s essential to get rid of this issue asap using the troubleshooting methods explained ahead in this post.

Wondering why is my QuickBooks Desktop running slow? Call us at +1-866-408-0544, and our QB experts will provide you with a quick resolution for this query.

Why Is QuickBooks Desktop Suddenly so slow?

Below, we have described the reasons for the unexpected behaviour or performance issues with the QuickBooks Desktop.

  • Running the unsupported version of QuickBooks Desktop.
  • The computer doesn’t fulfil the basic system requirements to run QuickBooks.
  • Another reason is damage or a missing QBWUSER.INI file.
  • You may experience a QuickBooks issue that is very slow due to damaged program files or a QuickBooks Desktop installation.
  • Damage or running the older Windows operating system.
  • Also, it may be caused by a corrupted hard drive.

How to Fix QuickBooks Running Slow issues?

If you are continuously struggling with the QuickBooks Running slow issue, then use the following troubleshooting methods to fix the issue.

Solution 1: Update the QuickBooks Desktop

Update the QuickBooks Desktop

Users often struggle with the QuickBooks Desktop running slow Windows 11 while running the older QuickBooks version. So, to rectify the issue, you must update the QuickBooks Desktop to the latest version.

Solution 2: Review Your System Configuration

At times, users may experience that the QuickBooks application may take longer than usual to launch over the network. This situation generally appears when your system is unable to fulfil the basic system specifications to run QuickBooks. Therefore, it’s crucial to review the system requirements thoroughly.

  • You must require a Core 2 Duo Intel Processor and 2.4GHz of storage space.
  • 4 GB RAM and 5 gigabytes of free disk space are required for the installation.
  • Screen size must be 1280 X 1024 to get a better view.
  • U.S. version of Windows operating system 10, 8.1, or 7.
  • The latest Google Chrome version is required to operate the QuickBooks Desktop.

Solution 3: Renaming the QBWUSER.INI File

A damaged or missing QBWUSER. Ini file is another major reason that triggers the QuickBooks Desktop running slow issue. So, to fix the issue, you must rename the file by performing these steps.

Renaming the QBWUSER.INI File
  • Launch the QuickBooks folder that stores the QBWUSER.INI file. The location to find the file is “Users[Your user name]AppDataLocalIntuitQuickBooks [year].”
  • After this, right-click the QBWUSER.INI file and hit the Rename option.
  • Renaming the file by adding.OLD at the end of the file name.
  • Now, you also have to rename the EntitlementDataStore.ecml file.
  • Once again, open the QuickBooks Desktop application, and if you are able to access the program, try opening your sample company file. You can open it from a new location. If you are able to access the file, it means that the folder is either damaged or the folder permissions are incorrect.
  • If you are unable to sign in to your file, it shows that your data file is damaged. All you require is to restore the earlier backup of that file.
  • In case you can’t access the sample company file or QuickBooks won’t start, it indicates that the QuickBooks installation is damaged.

Solution 4: Operate the QuickBooks Install Diagnostic Tool

You must run the latest version of the QuickBooks Install Diagnostic tool to repair the damage or missing components in the installation of the QuickBooks software.

QuickBooks Install Diagnostic Tool - Fix Installation Errors
  • Firstly, launch the QuickBooks Tool Hub by clicking on its respective icon.
  • From the Tool Hub, browse to the Program Problems option.
  • Click the QuickBooks Program Diagnostic Tool and allow the tool to operate.
  • Once the tool finishes repairing, relaunch your PC and then open the QuickBooks application.

Solution 5: Run the Verify & Rebuild Data Utility Tool

verify and rebuild data in quickbooks online

Any damage or corruption to the QuickBooks company file data may affect the performance of the QuickBooks application.

Verify Your Company data

  • Initially, move to the window and click the Close All tab.
  • Now, move to the File menu > Utilities option.
  • Choose the Verify Data option.

Results

  • “QuickBooks detected no problems with your data” It shows that your data is clean, and you don’t have to do anything else.
  • An Error message: You have to browse for the specific error message on the QuickBooks Desktop support site to see the guidelines on how to fix it.
  • Your data has lost integrity: The users may found the data damage in the company file. Move to rebuild your company file data to resolve the issue.

Rebuild Your Company Data

If the verify tool detects the data damage, run the rebuild data utility to configure your company file. You must require a backup of the company file before you rebuild.

  • Move to the File > Utilities > Rebuild Data option.
  • After this, QuickBooks will prompt you to generate a backup of the file before rebuilding it.
  • Thereon, hit OK and pick the suitable location to save the file. Make sure not to replace it with another backup file.
  • Now, provide a new name in the File name section and hit the Save option.
  • At last, when you get the “Rebuild has completed” message, click OK.

Solution 6: Review the Company File Size

The users must verify that the size of the company file does not exceed what is actually required by QuickBooks. With the increase in the file size, your QuickBooks Desktop starts working slowly. Therefore, to troubleshoot the issue, check the file size by performing these steps.

  • Move to the QuickBooks company file folder, right-click the file, and click the Properties tab.
  • If you are using the QuickBooks Pro Edition and the file size exceeds 150 MB, run the Condense Data Utility. By running this tool, you can reduce the company file size.
  • If you are an Enterprise User, make sure that the file size doesn’t exceed 1 GB.
  • Now, to condense the company file, open the QuickBooks application and head to the File menu.
  • Browse to the Condense Data tab below the Utilities tab.
  • Tick-mark the checkbox of the “Keep all transactions, but remove audit trail info to date” option.
  • Hit the Next tab unless you get the message stating “Your company file has been successfully condensed.”
  • At last, hit the Close option and then run the QuickBooks application again. If your issue still continues, proceed to the next solution.

Solution 7: Test the UNC Path from the Server

If the above solutions don’t work, examine whether the UNC path on the server running QuickBooks is working properly. For that, you must use the following instructions:

  • Press the Windows + E keys together and it will show the server name which is present below the network location field.
  • Once you receive the server name, open it. Herein, you will also see the mapped drive in the following order, i.e., “X, Y, Z”.
  • Also, ensure that your server name also includes two backslashes (/).
  • After getting the server name, note it down in a safe place.
  • Add the server name and shared folder name “\ ServerName \ SharedFolderName.” Then, you must note down the pathname.
  • Open the QuickBooks application and hit the Open or Restore Company file.
  • Choose your company file and complete the UNC Path in the required text field.
  • Now, pick the suitable data file and open QuickBooks to review if the issue is resolved.

Solution 8: Perform the Disk Defragmentation Process to Rectify the Error

  • Firstly, verify that your QuickBooks company file is placed on the desktop. This will open the path for restoring the company file.
  • Now, try the disk defragmentation after creating the portable company file.
  • Once done, tap on the Start option and move to the All Programs option.
  • Choose the Accessories > System Tools and hit the Disk Defragmentation.
  • At last, head to the Defragmentation tab and perform the instructions given on the screen to rectify the performance issues.

Solution 9: Review Your Internet Connection Speed

  • To check the internet speed, launch the Chrome browser and insert Speed Test in the search console.
  • Move to the Run Speed Test option and then wait for some time for the results to complete.
  • Now, look at the results and see if the internet speed is at least 1.5 mbps. However, the suggested speed to operate the QuickBooks Online application is 3 mbps.
  • After getting the required internet speed, run the QBO application to see if the issue is resolved.

Conclusion

Hopefully, by reading this post, you get to know why my QuickBooks Desktop is running slowly and the solutions to fix the issue. Thus, it will help you continue with your ongoing business operations smoothly. If you are still struggling, ensure that you are running the latest QuickBooks and Windows operating system.

For any additional help, connect with our Qbookassist professionals to get the best possible assistance within no time.

Frequently Asked Questions (FAQ’s):-

Question 1: Why does QuickBooks run slowly?

Ans. The QuickBooks Desktop may start running slowly, either if the company file size is too large or when numerous tasks are running in the background. However, this issue may also trigger when your computer doesn’t have enough RAM to run the QuickBooks software smoothly.

Question 2: Why is QuickBooks Desktop running slowly on all computers?

Ans. The QuickBooks Desktop starts running slowly on all computers due to an incorrect company file setup on the host computer.

Question 3: Why QuickBooks takes forever to open over network?

Ans. QuickBooks takes forever to open over the network due to numerous reasons, including outdated software, inability to meet the system requirements, corrupted files, or network issues.

Question 4: How to speed up QuickBooks Desktop?

Ans. To improve the performance of the QuickBooks Desktop, verify the system requirements, update the software, manage your files, and review your computer settings.

Question 5: How to reduce file size in QuickBooks?

Ans. You can reduce the file size in QuickBooks by running the Condense Data Utility. To run this tool, move to the File menu > Utilities > Condense Data. Thereon, pick whether you wish to condense data while keeping all transactions or wish to delete specific transactions.

Question 6: What should be the QuickBooks maximum company file size?

Ans. The maximum company file size for QuickBooks depends on its version. For the Pro & Premier Edition, 250 MB is suggested, and up to 1.5 GB for the Enterprise users.

How to Get in Touch with QuickBooks Live Bookkeepers? Easy Guide

If you are a QuickBooks user and require expert support, knowing how to get in touch with QuickBooks Live bookkeepers can save you time and help you manage your business finances more efficiently. Whether you are running a small business, working as a freelancer, or managing a startup, you can get access to the QuickBooks-certified experts who can help you keep your books up-to-date.

They also keep you prepared for the tax season by managing your accounts. Above all, this service provides clear insights into your company’s financial position.

Read this guide and learn the step-by-step instructions to get the 24/7 QuickBooks Online bookkeeping support.

Wondering how to get in touch with QuickBooks Live Bookkeepers and need help? Connect with our QB professionals, and they will assist you with the step-by-step instructions.

What is QuickBooks Live bookkeeping?

The QuickBooks Live Bookkeeping is a service provided by Intuit to ensure that your accounts remain up-to-date and ready for the tax season. This service provides access to a dedicated QuickBooks-certified bookkeeper who understands your business and supports you along with their team. After this, they organize the transactions, reconcile the bank accounts, and offer you the updated reports. Above all, the experts are always ready to give answers to all your queries.

Who can use the service?

QuickBooks Live service is provided to businesses operating the QuickBooks Online and have filed taxes in the previous calendar year. However, you won’t be eligible for this service if;

  • Your business is very complicated
  • You deal in foreign or cryptocurrency
  • Your business is only legal at the state level, but it’s not necessary that it’s also at the federal level.
  • Your business and personal expenses are heavily combined.

What’s Included & Not Included in QuickBooks Live Expert Full-Service Bookkeeping?

The QuickBooks Live Bookkeeping is divided into two different phases, i.e., cleanup and monthly bookkeeping.

1. Cleanup-

At the time of the first appointment, the bookkeeper will tell you about the QuickBooks Live Bookkeeping and help to set up the charts of accounts, connect your banks, and upload your documents. After getting all the required details, they begin the cleanup, which consists of organizing transactions and reconciling accounts. The time taken for cleanup is around 30 days from the time they get everything they require from you.

2. Monthly Bookkeeping

The QuickBooks Live Bookkeeping doesn’t include the services listed below.

  • Financial or Tax advice
  • Filing income or sales tax returns, or creating and sending 1099s.
  • Managing payroll
  • Managing inventory, accounts receivable, or accounts payable
  • The bookkeeper doesn’t provide training on how to use QuickBooks Online.

How much does QuickBooks Live Bookkeeping cost?

Users having a minimum of 2 months of data in QuickBooks get a flat fee for cleanup & setup for the first month of the service. After that, pricing for Live Bookkeeping depends upon your company’s average expenses. However, after every three months, QuickBooks Live Bookkeeping will automatically adjust according to your business preferences by re-examining your average expenses and pricing tier.

Read the table below to get a clear insight into the QuickBooks Live Bookkeeping pricing.


Live PriorityLive Expert AssistedLive Full-Bookkeeping Service

Get specialized product experts that will assist you through onboarding and training on features along with extended hours and priority access.Experts will guide you on your books, taxes & cash flow. Also, give insights to track and help in growing your business.QuickBooks-certified expert will cleanup your old books and take care of monthly bookkeeping.
Expert Help Get unlimited access to real expertsSpecialized product expertsQuickBooks-certified bookkeepersQuickBooks-certified bookkeepers
Customer service, tech, and product support It consits of basic product support with QBO
Bookkeeping Guidance
QuickBooks onboarding & training
Financial Coaching
Tax Resource Support
Past Books Cleanup

Full-Service Ongoing Bookkeeping

How Do I Contact My Intuit QuickBooks Live Bookkeeper?

If you have previously signed up for QuickBooks Live Bookkeeping, you can connect with your bookkeeper at regular monthly appointments. After that, the entire month, you can get in touch via the Document and Request Center. Otherwise, you can also take assistance from a product expert. Let’s learn how to connect with your bookkeeper or a QuickBooks product expert to get the best guidance.

Schedule an Appointment With Your Bookkeeper

Below, we have described how to schedule a monthly live call with your bookkeeper via mobile app or your web browser.

Method 1: Schedule an Appointment from the QuickBooks Mobile App

You can make and view your appointments using your Live Bookkeeper via the QuickBooks mobile app. Perform these steps to schedule a new appointment with the bookkeeper.

  • Log in to the QuickBooks Mobile app and click Live Expert > Schedule an appointment.
    • Important Tip: If you can’t see the Live Expert on the mobile app, check that your QuickBooks mobile app is updated.
  • After this, you will get the available appointment. If it’s suitable for you, click Schedule appointment. Otherwise, for choosing another date/time, go with Find a different time and pick a date/time suitable for you, and tap on Continue.
  • Add the following details;
    • First & Last Number
    • Email Address
    • Phone Number

Note: To get the text reminder, enable the Remind me with a text message option. Then, you will receive a text reminder within 30 minutes before your appointment.

  • Once again, click Schedule appointment. With this, you’re all set, and you will get a confirmation regarding the appointment date and time.
  • To add the appointment to your calendar, click Add to Calendar > OK.

Steps to view, change, or cancel your scheduled appointment from the mobile app:

  • Log in to your QuickBooks mobile app and choose the Live Expert.
  • Now, you can check your upcoming appointments. For editing or cancelling the appointment, click on the appointment.
  • Move to the Edit appointment.
  • You have different options for managing your appointment.
    • Edit Date or time of appointment- click Choose a different date or time
    • Change the Phone Number- Click Update Phone Number and provide a new number. Then, click Done > Update Phone Number.
    • Cancel Appointment- Choose Cancel appointment > Yes, cancel to confirm.
    • Text reminders – You will get the email reminders regarding your appointment.

Method 2: Schedule an Appointment on your computer browser

  • Initially, log in to the QuickBooks Online application.
  • Choose the Live Bookkeeping and then click the Schedule appointment.
  • Complete the details and then pick an appointment time.
  • Once you are set, you will obtain a confirmation email and SMS message notifying your appointment is booked.

If you want to cancel your appointment, access the link from the confirmation email. You can always get your upcoming scheduled appointment in QuickBooks Live Bookkeeping.

Talk with your bookkeeper through the Document and Request Center

In between the monthly meetings, you and your bookkeeper can talk via comments in the Document and Request Center. After this, you will obtain an email notification everytime your bookkeeper drops a new comment on a request. Also, you can log in, view the comment, and then reply to your bookkeeper. Follow these steps to view comments or make a new comment on a document.

  • Move to All Apps > Accounting > Live Experts option.
  • Now, choose the request that you want to view or enter comments on.
  • After this, head to the Comments field. Herein, you will get new comments from your bookkeeper.
  • If you want to leave a new comment, write the message and click Post.

Read More:- Suspense Account in QuickBooks Online

Chat with a product expert through QuickBooks Live Bookkeeping

Using the Live Bookkeeping Messaging, you can easily connect with a QuickBooks product expert. With the help of this feature, the experts will provide you with specific bookkeeping advice. Also, they can provide you with answers to your questions about QuickBooks or connect you with the right resources for bookkeeping help. Follow these steps to chat with a product expert.

  • Initially, move to the All Apps > Accounting > Live Experts option.
  • When you are in Live Experts, choose the Send a message option.
  • As a result, it will connect you with a product expert who can answer all your queries about QuickBooks or help you get a message from your bookkeeper.

How to Contact Your QuickBooks Live Expert Assisted Bookkeeper?

If you have previously signed up for the QuickBooks Live Expert Assisted Bookkeeping, you can request a callback. Otherwise, you can also schedule a time to talk to a bookkeeper whenever you need them.

Schedule & Manage Appointments With a Bookkeeper

Follow these steps to request a callback or book an appointment with a QuickBooks Live Expert Assisted Bookkeeper via your QBO account.

  • Log in to your QuickBooks Online account.
  • Move to the All Apps > Accounting > Live Experts.
  • Choose any one of these options to pick the right expert.
    • Bookkeeping
    • Payroll
    • Tax
  • Now, you have the option to schedule a callback or book an appointment as per your convenience.
    • To schedule an appointment, click Schedule appointment. You will get the next available appointment time. If it’s good for you, click Schedule appointment. Otherwise, click Find a different time and choose a date and time according to your preference. Then, hit the Continue tab.
    • To schedule a call back, move to the Have us call you option.
  • At last, add your first and last name, email address, and the phone number on which you wish your bookkeeper to call you.

View, change, or cancel your scheduled appointment

  • Log in to your QBO account and click the All Apps option.
  • Choose the Accounting and then hit the Live Experts option.
  • After this, pick the option you have previously scheduled an appointment for:
    • Bookkeeping
    • Payroll
    • Tax
  • Now, you can check the upcoming appointment. For editing or cancelling your appointment, pick the current appointment.
  • Move to the Edit appointment option.
  • Next, you need to manage your appointment.
    • Change the date or time- Choose a different date or time.
    • Change the Phone Number- Select Update your phone number and provide a new phone number. Then, hit the Done > Update phone number option.
    • Cancel your appointment- Opt for the Cancel appointment and then hit the Yes, for confirmation.

Final Words

With this, we ensure that now you have the answer to how to get in touch with QuickBooks Live Bookkeepers. Also, you can get complete support in keeping your books of accounts updated, organizing the transactions, and getting the reports.

Furthermore, if you still require any additional help, then communicate with our Qbookassist professionals instantly.

Frequently Asked Questions (FAQ’s):-

Question 1: When are my bookkeepers available?

Ans. The bookkeepers are available from Monday to Friday between 6 AM and 6 PM PT. For example, one bookkeeper is available 8 hours per day, 3 days a week, and another one is available 5 hours per day, 5 days a week. Whereas, at the time of onboarding, the bookkeepers will match with your availability.

Question 2: When will my books be cleaned and updated?

Ans. Mainly, the books get cleaned and updated within 30 days after getting all the required documentation.

Question 3: How do I subscribe to QuickBooks Live Bookkeeping?

Ans. If you previously had a QBO subscription, you can subscribe to the live expert-assisted service.

  • Move to the All Apps > Accounting > Live experts and then log in as a Primary or Company admin.
  • Click See Price to view the Pricing section and pick an option describing your last business tax year you filed.
  • Again, hit the See Price > Try Now and update the billing details.
  • Tap on Subscribe and then schedule an appointment with an onboarding expert.

Question 4: What are the customer benefits of QuickBooks Live Full Service Bookkeeping?

Ans. Using the QuickBooks Live Full Service Bookkeeping provides you with peace of mind knowing that your books of accounts will remain up-to-date. However, monthly check-ins will keep the bookkeepers prepared for the tax season. Thus, it also provides users with a clear image of the company’s financial health.

Question 5: How to cancel QuickBooks Live bookkeeping?

Ans. If you won’t need any further help from your bookkeeper, then cancel the subscription at any time.

  • Move to the Settings menu and click Billing & Subscription.
  • When you are in the QuickBooks Live Expert Full Service Bookkeeping tile, choose Cancel.
  • At last, confirm your cancellation on the next screen.

Question 6: Can I switch plans or cancel at any time?

Ans. Yes, you can switch between QuickBooks Online plans or cancel them at any time. The QuickBooks Live customers can cancel them at any time.

Get Started with QuickBooks Payroll Setup For Easy Tax Filing

QuickBooks Payroll setup is a process to activate the service, which requires company and employee details, connecting your bank account, and configuring payroll tax preferences. Once payroll is set up, you can process employee payments accurately, handle taxes, and ensure timely payroll submissions.

If you are also looking for the detailed steps for QuickBooks Online payroll setup, read this guide. We have also covered the steps for payroll setup with QuickBooks Desktop.

how to setup payroll in quickbooks desktop

Need QuickBooks payroll setup help to handle the payroll tasks? Contact our QB professional, and they will provide you with the best assistance.

How Do I Get Started With QuickBooks Online Payroll Setup?

Follow the steps below for the QuickBooks Online Payroll Setup.

Access the payroll setup:

  • Log in to your account as a primary administrator.
  • Move to All Apps > Payroll and click the Overview option.

If you are a QuickBooks Payroll Elite user, you can get help from any one of the experts to set up payroll. You can visit the Expert Setup section for placing a call or for scheduling an appointment.

  • Cick on Get Started and choose whether you paid employees the following year.
  • Pick the date from when you begin paying your employees via QuickBooks.
  • Mention your main business address accurately.
    • Provide a physical address (not a PO box). Your work location will identify your tax responsibilities.
    • In case you have multiple work locations, include them at the time of adding your employees.
  • Now, insert your main payroll contact details.
    • Herein, add the details of the person liable for paying your employees. After adding the details, the payroll contact person will receive the notifications from QuickBooks. Then, the users can talk with the payroll experts regarding the payroll account.
  • Afterwards, choose how you have run your payroll in the past.
    • Depending on your reply, you can import employee and pay history details. You don’t have to enter such details manually.
  • Herein, start adding your employees and tap on Add your team to get the details.
  • In case you haven’t paid your employees in the current year, you can choose to pay them via paper check if necessary. Otherwise, you can skip the setup part and continue with the rest of the setup tasks.

Important Tip:

1. If you choose to pay the employees now, you will be liable for any payroll taxes due unless the payroll setup is done.

2. On the other hand, if you pay your employees in the current year, you need to perform more tasks before running the payroll.

Set Up Tasks

1. Add Your Team

For adding the employees, you must require the following information.

  • A complete W-4 Form, or any other state equivalent forms, are applicable.
  • Hiring date
  • Birth Date
  • Pay Date
  • Bank account or pay card details for direct deposit
  • Sick, vacation, or paid time off (PTO) accrual rates and balances.
  • Any paycheck deduction, such as contributions to insurance, retirement, or wage garnishments.

2. Provide Your Tax Details

Within this task, you are required to include your federal, state, and local payroll tax details.

  • Federal Employer Identification Number (EIN)
  • State Withholding/unemployment account numbers.
  • Local tax withholding account numbers (if applicable)
  • Federal, state, or local tax deposit frequency: how often the IRS, state, or local tax agency informs you to pay your taxes.
  • State tax rates: unemployment, surcharges, state disability, and paid family leave.

3. Connect Your Bank

You need to connect your payroll bank account with QuickBooks to access the direct deposit feature. Thus, it will allow you to pay and file payroll taxes accurately. For instant connection, you can use the direct deposit feature. The following are the details that you may require:

  • Principal officer’s name, home address, Social Security Number, birth date, and authorized signer on payroll bank account.
  • Business bank account online user ID and password. Otherwise, give the routing and account number for the account you have to use for direct deposit and payroll taxes.

Read More:- QuickBooks For Small Business

4. Include your Payroll History if you already paid employees this year.

Herein, provide the year-to-date paycheck details for each employee you have paid this year. This information will be helpful for reporting wages and taxes on the W-2 form and other payroll tax forms.

You may require the following information:

  • Pay Stubs or payroll reports for each employee paid within this calendar year.
  • Payroll reports with company totals of wages and taxes for each paycheck date in the current quarter.

5. Set Your Tax Preferences (if you haven’t paid any employees this year)

In this task, you have to notify how you wish to manage your payroll tax payments and filings. Below are a few options you can use to handle it.

  • I want QuickBooks to automatically pay and file my taxes (this is the default).
  • I’ll initiate payments and filings using QuickBooks (e-pay and e-file).
  • I’ll pay and file the right agencies through their website or by mail (manual).

6. Tell us which taxes you’ve paid this year if you already paid employees.

You have to perform the following steps.

  • Double-check the payroll taxes that you have previously paid this year. You can compute this detail from the pay history you added in QuickBooks.
  • Now, you have to tell how you want QuickBooks to handle your taxes and forms.
    • Have us pay and file automatically on your behalf.
    • You can e-pay and file via QuickBooks.
    • You pay and file to the agencies (manually)
  • After this, your principal officer will electronically sign the authorization forms.

The following is the information that you require:

  • Payroll tax liability reports, or receipts of tax payments you made this year.
  • Allow the Principal Officer to answer the questions and electronically sign your forms.

7. Take Care of Your Team

Herein, you can find out workers’ comp policies, 401 (k) plans, or health plans. Intuit does the partnership with providers to provide you with excellent services so that they can integrate with payroll easily.

How to Setup Payroll in QuickBooks Desktop Easily?

Before paying employees, it’s essential to setup QuickBooks Desktop Payroll Enhanced.

First Step: Activate Your Payroll Subscription

QuickBooks Desktop Payroll Enhanced subscription

After buying the QuickBooks Desktop Payroll Enhanced subscription, you must activate it. However, the steps may vary according to your purchase, whether it’s done online, by phone, or through a retail store.

Case 1: If purchased online or by phone

If you have bought the payroll online or by phone, you will get a 16-digit service key via email. All you need is to enter the key in QuickBooks to access the payroll features easily.

If you won’t get the service key, look into your junk or spam folder. Otherwise, you can also access the automated Service Key Retrieval tool. For that, you must log in to your Intuit Account.

  • Firstly, launch the QuickBooks Desktop company file.
  • Move to the Employees menu and click the Payroll option.
  • After that, pick the Enter Payroll Service key option and select the Add option.
  • Mention the service key and click Next > Finish.
  • Finally, wait until the new tax table is downloaded accurately.
Case 2: If you buy from a retail store
  • Initially, access your QuickBooks Desktop company file.
  • Now, head to the Employees > Payroll > Install Payroll from Box option.
  • You must provide the Payroll License and Product Information in the Payroll Activation page. All you require is to get your license and product details on a yellow sticker available on the CD folder inside the box.
  • Choose the Continue option.
  • Finally, do as per the instructions provided on the screen to complete the payroll activation.

Second Step: Accomplish Your Payroll Setup Tasks

In this step, add all your employees, set up federal and state payroll taxes, and then mention paychecks plus tax payments you already paid this year.

You have to wait, as it may take some time to get your payroll details into QuickBooks. Considering this, the setup is designed in such a manner that it lets you add details as per your preference and then save them.

  • Move to the Employees menu and click the Payroll Setup option.
  • After this, use the on-screen instructions to add your employees, set up company payroll items, and taxes. Then, provide the pay history (if possible).
1. Add Employees

Herein, you must include your payroll details and then invite your employees to add some of their own details via QuickBooks Workforce if you are using QuickBooks Desktop Payroll Enhanced.

The following is the information that you require for each employee.

  • A complete W-4 form and any state equivalent forms, if possible.
  • Hire Date
  • Pay Rate
  • Sick, vacation, PTO accrual rates and balances
  • Bank account or pay card details for direct deposit
  • Paycheck deductions like contributions to insurance, wage garnishment, or retirement.
2. Set up company (pay items, deductions, PTO)

Herein, select from the given list of pay items, insurance benefits, and retirement deductions, or set up customer items. In case you provide employees paid vacation or sick time off, include those details also.

After setting up payroll items and time off, access the Assign to employees button. With this, you can apply the items to multiple employees at the same time.

3. Setup taxes

Herein, you must add your federal and state payroll tax details. The QuickBooks Desktop Payroll Enhanced users can set up their payroll taxes electronically.

The following is the information that you require:

  • Federal and state deposit frequencies: it means how frequently you are required by the IRS and the state to pay your taxes.
  • Federal Employer Identification Number (FEIN)
  • State tax rates: Unemployment, surcharge, state disability, paid family leave, etc.
  • State Withholding and/or Unemployment account number: You can connect with your state agencies to register.
4. Enter Pay History

When you have previously paid employees this year, you have to add those paychecks and any tax payments you have made. You will get all these details on your employees’ W-2s at the end of the year.

If you still haven’t paid your employees this year, you don’t need to complete the setup.

The following is the information you require:

  • Tax liability reports, tax payment receipts, or statements
  • Pay stubs or payroll reports for each employee paid this year.
5. Review and Finalize

Herein, if you have mentioned the pay history, you have to provide your federal and state filing details for the closed quarters. QuickBooks will check out all the pay history details and then identify the errors. As a result, it will ensure that tour employees’ W-2s are accurate at the end of the year.

The following are the details that you require:

  • Provide the Quarterly and state payroll tax forms for closed quarters (941, State Unemployment Insurance, etc).

Final Thoughts!

So, here we conclude this post and hope that now you can easily perform the QuickBooks Payroll setup. Thus, it will help in managing your employees’ payroll easily to pay them accurately. If you need expert assistance with QuickBooks Payroll setup or troubleshooting, connect with Qbookassist payroll professionals today.

Frequently Asked Questions (FAQ’s):-

Question 1: How does payroll work with QuickBooks?

Ans. Once you run payroll with QuickBooks, you can give approval timesheets from hourly employees and generate payroll checks. Also, you can print paychecks with paystubs or pay employees via the direct deposit feature.

Question 2: What is the first step when setting up payroll in QuickBooks Desktop?

Ans. To set up payroll in QuickBooks Desktop, move to the Employees and then click the Payroll Setup option. After this, perform the on-screen instructions to add employees, set up payroll items, and then add pay history.

Question 3: How to set up QuickBooks for payroll?

Ans. To set up QuickBooks for payroll, go to the payroll option from the left menu. Choose your plan and pick the suitable plan for your business requirements. Provide the Business details and then your contact information.

Question 4: Does QuickBooks automatically do payroll?

Ans. QBO Payroll saves your precious time by automatically managing paychecks for salaried and hourly team members who work for a set number of hours.

Question 5: How to turn on payroll in QuickBooks?

Ans. To turn on payroll in QuickBooks, perform these steps:

  • Firstly, move to the Settings menu and click Subscriptions and billing below the Your Company heading.
  • Afterwards, head to the QuickBooks Payroll.
  • Hit the Subscribe option, and if you don’t have a credit card on file, you will be asked to enter the Payment details.