How to Reconcile in QuickBooks Online Without Mistakes? Easy Guide
For new QuickBooks users, reconciling accounts for the first time may seem challenging. However, once they learn how to reconcile in QuickBooks Online, it becomes straightforward to maintain accurate financial statements and spot discrepancies easily. In this comprehensive guide, we’ll walk you through QuickBooks reconciliation steps, how to undo a reconciliation, reconcile for previous years, or how to reconcile undeposited funds.
What does it mean to reconcile an account?
Reconciling an account in QuickBooks Online is the process of comparing your transaction records with your bank or credit card statement to ensure accuracy. This process lets you find out discrepancies and ensure that your accounts are up-to-date.
Quick Pre-Reconciliation Checklist for Accurate Results
Before reconciling the account in QuickBooks, it’s essential to sort out a few things.
- Ensure all bank transactions are reviewed and correctly categorized. Un-categorized or misclassified transactions will prevent successful reconciliation.
- Your bank or credit card statement is the final reference. So, make sure to reconcile with them, not what’s displayed in QuickBooks.
How to reconcile in QuickBooks Online for the first time?
Perform the steps instructed below for reconciling in QuickBooks Online for the first time.
- Move to the Accounting menu and click the Reconcile option.
- Choose the account that you wish to reconcile and verify the opening balance given in QuickBooks.
- Now, mention your
- Ending balance
- Ending date (from your bank statement)
- After this, click the Start Reconciling option.
- Start comparing each transaction with your bank account.
- Next, mark them as cleared when they match.
- You must continue until the difference becomes zero.
If you see that the opening balance doesn’t match your bank statement.
- Check the earlier transactions.
- Look for the missing or duplicate entries.
- Prevent forcing adjustments.
Once everything tallies and the difference is zero, it means that your first transaction is complete.
How to Reconcile in QuickBooks Online With Easy Steps?
Performing the reconciliation in QuickBooks Online will ensure that your records match bank or credit card statements. As a result, it will help in preventing any discrepancies or errors. Here’s how to reconcile a credit card in QuickBooks Online.
First Step: Select an account to reconcile
After getting your monthly bank or credit card statement, you can reconcile your accounts. If you have to reconcile for more than one month, do one statement at a time and start from the older one first.
- First, click the Gear icon from the top-right corner.
- Choose Reconcile and then pick the account you wish to reconcile. For that, click the account from the drop-down menu list.
- Verify that the account you choose tallies with the account you want to reconcile your bank or credit card statement.
Second Step: Start the reconciliation
If your bank accounts are linked with online banking, ensure that you match and categorize all of your downloaded transactions.
Important Tip: If you get a message regarding a previous reconciliation, fix it before you move ahead. For that, choose “We can help you fix it.”
- Check the Beginning Balance. Verify that the beginning balance in QuickBooks must tally with the one mentioned on your statement.
- Now, mention the Ending balance and Ending date as it is given on your bank or credit card statement. A few banks call the ending balance a new balance or a closing balance.
- If you see it, check the Last statement ending date. This is basically the end date of your last reconciliation. Your present bank statement will begin the day after it.
- Finally, hit the Start reconciling option to finish the reconciliation process.
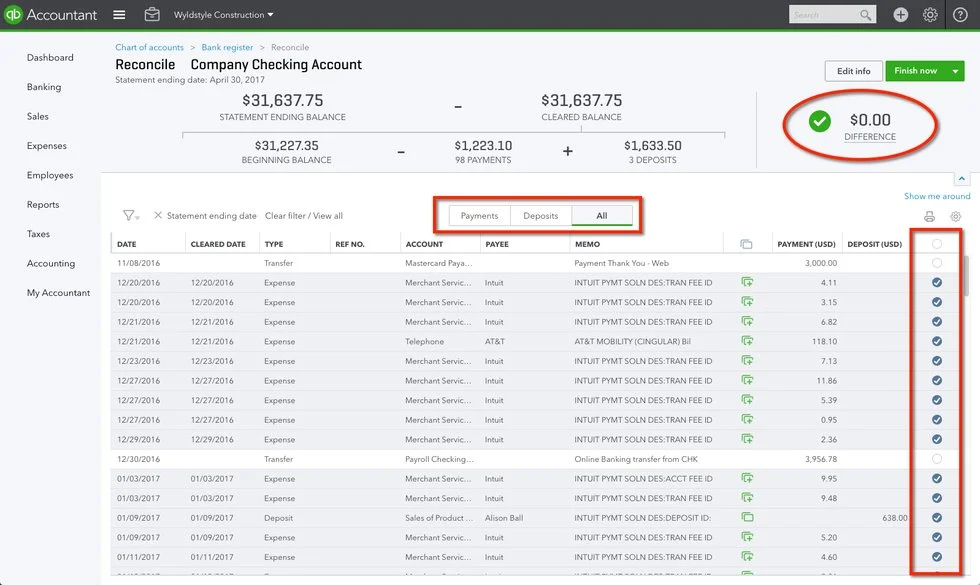
Third Step: Review and match transactions
Once you enter the statement date and ending balance, you will get a list of transactions that must be checked and matched.
- When you are in the Reconciliation window, match the first transaction on your statement with the one listed in QuickBooks.
- If the transaction matches, circle the checkbox to mark it as Reconciled. If the transaction in QuickBooks isn’t available on the statement, avoid marking the checkbox.
- Now, repeat the same process for all transactions given on your statement.
- If your transaction matches but has incorrect details, say the payee, choose the transaction to expand it. Then, click Edit and do the required corrections to tally your statement.
Fourth Step: Finish the reconciliation
Once all transactions are marked, make sure that the difference is CA $0.00.
- If the difference is $0.00, click Finish now to complete the reconciliation.
- If you need to stop, you must save your progress and finish later.
Fifth Step: Review past reconciliations
To check the previous reconciliations, run a reconciliation report to check your work.
- Click the Settings icon and choose Reconcile (Take me there).
- Hit the History by account option.
- Now, using the drop-down menus, choose the account and date range. Otherwise, either print or export your reconciliation reports if you want to share them.
Sixth Step: Edit completed reconciliations
Herein, you can do the necessary changes to past reconciliations, but changes made to the completed reconciliations may unbalance your accounts and other reconciliations. However, it may also hamper the beginning balance of your next reconciliation.
Now, begin the process by checking your previous reconciliation report. If any transaction is reconciled by mistake, then you need to un-reconcile it. However, if you have adjusted a reconciliation by mistake, or you need to start over, consult with your accountant.
How to reconcile undeposited funds in QuickBooks Online?
To reconcile the undeposited funds in QuickBooks Online, you first have to view the Undeposited Funds account using the steps below.
- Initially, choose the Accounting menu and click Charts of Accounts.
- After this, look for Undeposited Funds from the list.
- Choose the View Register option.
Now, to reconcile the transactions that are in our Undeposited Funds account, you can deposit these payments to the corresponding bank accounts. From there, you can reconcile the bank from which you can deposit the funds. For reference, proceed with the steps we discussed in the above section.
How to reconcile previous month/ year in QuickBooks Online?
Perform the below-given steps to reconcile previous month or year transactions, perform the steps instructed below.
- Initially, head to the Banking menu and click Reconcile.
- After doing that, click the Account drop-down menu and pick the bank account you wish to reconcile.
- Now, pick the date from the financial statement and mention the ending balance from your statement.
- After this, match the amount on the Beginning Balance with the opening balance on the oldest statement you wish to reconcile. If the beginning balance won’t match, the reconcile window beginning balance is zero or incorrect.
- Provide the total Service Charge and Interest Earned.
- Start adding the service charge from all financial statements for the year or portion of the year you want to reconcile. Then, enter the total into the Service Charge field.
- Also, list the statement date from the chosen financial statement.
- Click the Account drop-down and pick the accurate account for the service charge.
- Repeat the same steps from 6a through 6 c for interest earned, and mention the amount in the Interest Earner field.
- Choose the Continue option to launch the Reconcile window.
- Click Hide transactions after the statement’s end date in the upper right corner of the screen. With this, QuickBooks starts displaying only the transactions that are dated on or before the statement date.
- Circle the checkbox column beside each transaction that displays on the financial statement you choose.
- Next, check the difference amount in the bottom right corner of the Reconciled window.
- If the amount you see is 0.00, click Reconcile Now. It states that your account is reconciled.
- If you see that the amount isn’t 0.00, it means that the account doesn’t balance for the period. You need to pick any one of the following options;
- Repeat the same steps again, ensuring all amounts and transactions have been recorded properly.
- Choose the Reconcile Now tab and then Enter Adjustment. Then, QuickBooks will provide an adjustment for you to reconcile the account. Note down all the adjustments you have done so that you can tally them with your accountant.
How to undo a reconciliation in QuickBooks Online?
You must have a QuickBooks Online Accountant subscription to undo an entire past reconciliation. Here are the steps.
Option 1: Undo an entire reconciliation in QBO Accountant
You must know that the Undo option is only available to accountants who are linked with the QBO account. If you haven’t sent an invitation to your accountant, connect them. Once connected, complete this on your behalf by performing these steps.
- Access your client’s company file in the QBO application. Choose All Apps > Accounting > Reconcile.
- Now, click History by Account and choose the account you wish to unreconcile with the date range.
- Look for the reconciliation you want to undo.
- Go to the Action column, click the drop-down ▼, then select Undo.
- Now, click Yes and select the Undo option.
Option 2: Manually unreconcile transactions one at a time (All QuickBooks Online users)
Perform the following steps to change a transaction’s status from reconciled (r) to uncleared.
- Open All apps, then go to Accounting and select Chart of accounts.
- Find the account that includes the transaction and click View register.
- In the list, look for the specific transaction—reconciled entries are marked with an “R” in the checkmark (✔) column.
- Click the transaction to expand its details.
- Then click the “R” box in the checkmark column repeatedly until it becomes blank. This will change the status from R (Reconciled) to C (Cleared) and finally to Blank (Uncleared).
- Click Save.
- Repeat these steps for each transaction you want to unreconcile.
Read More:- QuickBooks Online Login
Conclusion
We hope that now you have understood how to reconcile in QuickBooks Online for maintaining accurate financial records and spotting discrepancies. By following the steps listed above, you can easily reconcile a bank, credit card account, or undeposited funds to prevent certain mistakes.
If you are still having any doubts, feel free to connect with our Qbookassist professionals to get the right assistance.
Frequently Asked Questions (FAQ’s):-
Question 1: How to reconcile a bank statement in QuickBooks Online?
Ans. To reconcile a bank statement in QBO;
- Move to the Settings icon and click the Reconcile option.
- After this, provide the statement ending date and balance.
- Match the transactions to ensure that the difference is $0.00.
Question 2: How to re-reconcile in QuickBooks Online?
Ans. To re-reconcile in QuickBooks Online;
- Open the QuickBooks Online app and go to the Bookkeeping option.
- After this, choose Reconcile and then History by Account.
- Once done, click Undo on the desired report.
Question 3: What are the QuickBooks reconciliation mistakes to avoid?
Ans. The following are the QuickBooks reconciliation mistakes to avoid:
- Make sure that the opening balances match the statement.
- Delete or edit the transactions that were reconciled in the last month.
- Sometimes, trusting automated bank feeds can create duplicates.
Question 4: What does it mean to reconcile an account on QuickBooks Online?
Ans. Reconciling in QuickBooks Online is a process that enables you to match your internal bank records with your bank or credit card statement to ensure accuracy.

Recent Posts
QuickBooks Payroll: Service, Setup, Pricing and Support Guide
Read MoreQuickBooks Error Support: Get Instant Help Via Live Chat or Call
Read MoreQuickBooks Error 3371 Explained: Common Causes and 7 Effective Fixes
Read MoreHow to Contact QuickBooks Customer Service and Talk to a Live Expert
Read MoreHow to Update QuickBooks Company File Without Losing Data?
Read More