QuickBooks Database Server Manager Stopped: Causes & Fixes
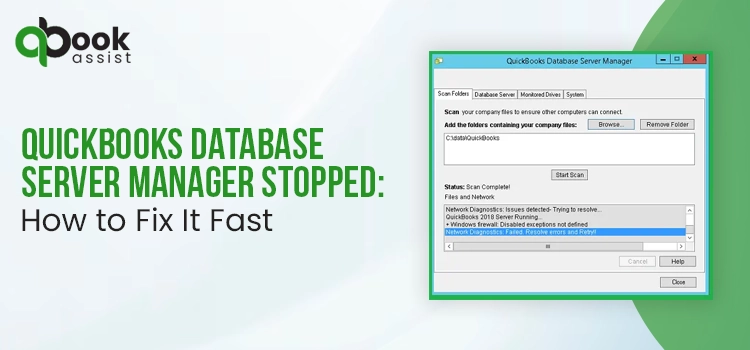
Did you encounter errors like “QuickBooks Database Server Manager stopped working,” “QBDBMgrN not running on this computer,” or “QuickBooks Database Server Manager not responding,” while hosting?
This issue usually means the QuickBooks database service has stopped or failed to start correctly. It commonly affects multi-user mode and prevents workstations from accessing the company file stored on the server.
Some users may also encounter the QuickBooks Database Server Manager Network Diagnostics Failed error while accessing company files over the network. In this guide, we’ll explain the causes behind these errors and provide step-by-step solutions to restart QuickBooks Database Server Manager, repair QBDBMgrN issues, and restore multi-user access.
What is QuickBooks Database Server Manager?
The QuickBooks Database Server Manager is a utility that lets multiple users access the same company file over a network. Without this tool, you won’t be able to run the multi-user mode properly and may come across the following errors;
- QBDBMgrN not running
- QuickBooks Database Server Manager is not working
- QuickBooks Database Server Manager won’t start
Common Causes Of QuickBooks Database Server Manager Not Starting
To fix the issue smoothly, it’s essential to first understand what causes the QuickBooks Database Server Manager not starting issue.
- Corrupt or incomplete installation of QuickBooks Database Server Manager.
- Using the outdated version of QuickBooks Desktop.
- Firewall is blocking QuickBooks Database Server Manager processes.
- Inadequate admin rights to start the QuickBooks Database Server Manager service.
- Damaged company file folder or incorrect hosting settings.
- The QuickBooksDBXX service is either disabled or not running as a Windows service.
- Missing or damaged system files required for QBDBMgrN to run.
Here’s How to Resolve the QBDBMgrN Not Running on This Computer Issue
Now, let’s go through the proven solutions to fix the QBDBMgrN on this computer issue and restore multi-user mode functionality.
Method 1: Turn On Hosting
- Make sure that you have enabled the hosting on all of your server computers.
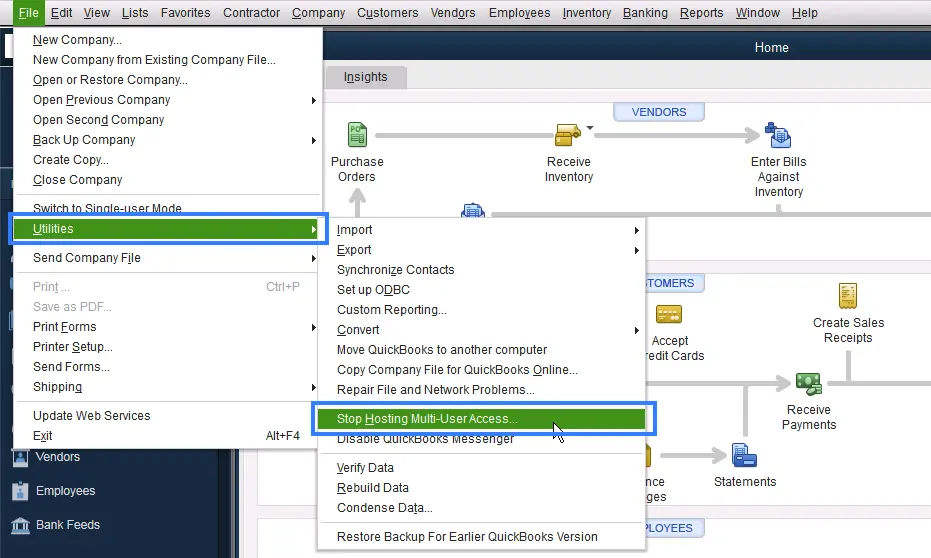
- Go to the File menu, click Utilities and then select Host multi-user access option.
- When you are on the Host multi-user access window, click Yes.
Method 2: Configure Services
Also, you must verify that the services required to run QBDBMGrN are configured properly.
- Open the Run window using the Windows + R keys.
- Now, type “services.msc” in the text field and click OK.
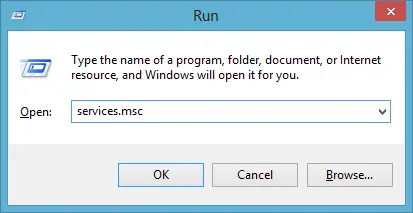
- Search for services.msc in the Windows search bar.
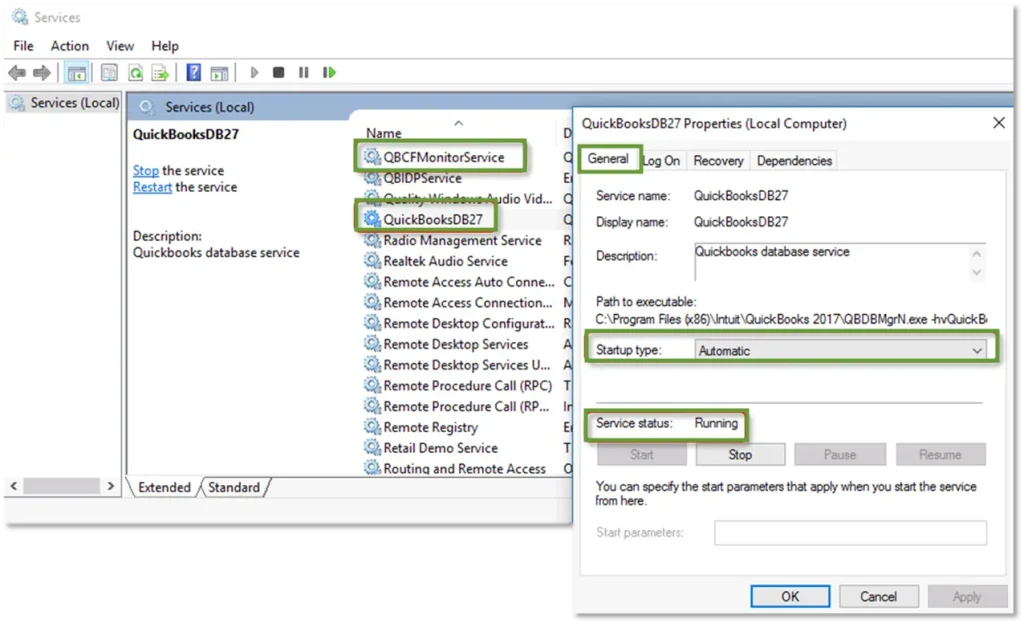
- In the services window, locate the QuickBooksDBXX service that matches along with your version.
- QuickBooks 2020: QuickBooksDB30
- QuickBooks 2019: QuickBooksDB29
- QuickBooks 2018: QuickBooksDB28
- Double-click on the QuickBooksDBXX service.
- Now, configure these settings:
- Startup Type: Automatic
- Service Status: Running or Started
- Move to the Recovery tab.
- ChooseRestart the Service from the First Failure drop-down menu. It will automatically restart the QuickBooks DB service if it’s stopped. You need to perform the same for Second Failure and Subsequent Failures.
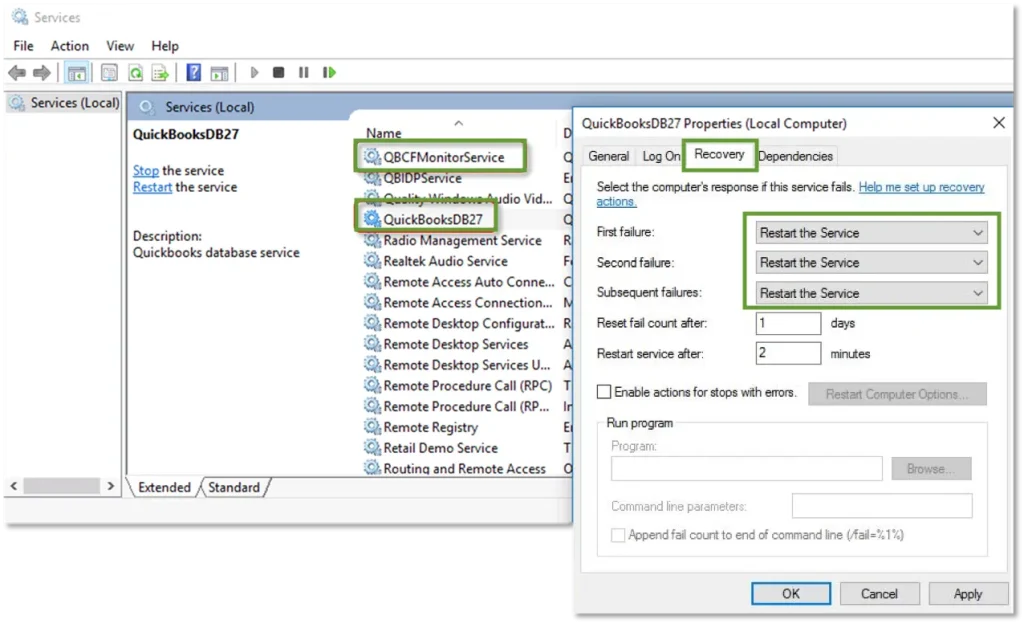
- Click OK to apply the changes and then restart your computer.
Method 3: Recreate QBDataServiceUserXX
Note: If you are getting an error stating that your Windows user account doesn’t have sufficient permissions, then log in as a Windows administrator. Otherwise, you may ask for help from an IT expert.
- Exit from the QuickBooks program.
- Press Windows + R to bring up the Run window.
- Now, type “services.msc” and click OK.
- Right-click on the service that matches your version and click Properties.
- QuickBooks 2020: QuickBooksDB30
- QuickBooks 2019: QuickBooksDB29
- QuickBooks 2018: QuickBooksDB28
- Move to the Logon tab and set the services to This Account.
- Important Tip: Avoid choosing Local System. There are only a few setups that let you work on the Local System.
- Remove the QBDataServiceUserXX account.
- Launch the Run window and type Control Panel.
- Choose the User Accounts and click Remove User Account.
- Opt for the qbdataserviceuserXX that matches your version and hit Delete.
- Open QuickBooks again.
- Important Note: If you have enabled the hosting, disable it and then turn it back on again. If hosting isn’t started, then turn it on.
- If you get a notification to run QuickBooks Database Server Manager, click OK.
- Finally, launch the Database Server Manager and scan the file. It will recreate the QBDataServiceUser.
Method 4: Restart the QuickBooks Database Service Manager
If your QuickBooks Database Server Manager not working, it’s recommended to restart the service on your server computer (the one that hosts the company file). To restart, perform the steps outlined below for your current setup.
Case 1: If you installed QuickBooks Desktop & Database Server Manager
- Launch QuickBooks Desktop on your server computer and click the File menu.
- Choose the Open or Restore Company.
- Go to the Open a company file option. Locate and open your QuickBooks company file.
- Circle the Open file in multi-user mode checkbox and choose Open.
- Now, log in to your company file and go to the File menu again.
- Hit the Close Company/Log Off option, and it will close your data file on the server.
- Launch the Start menu and add Database in the search box. Then, launch the QuickBooks Database Server Manager.
If everything is working well, then you can proceed further. However, if your QuickBooks database server manager keeps stopping, perform the steps in the “If you only installed Database Server Manager section.”
Case 2: If you only installed Database Server Manager
- Click the Start menu and open the Control Panel.
- After this, launch Administrative Tools and choose Services from the list.
- Right-click the QuickBooksDBXX service and hit Restart.
- Note: XX represents the year of Database Server Manager.
If you still fail to restart the Database Server Manager, then restart your server computer. Then, perform these steps again.
Method 5: Reinstall QuickBooks Database Server Manager
If you get the QuickBooks database server manager stopped working issue while trying to update or install QBDBMgrN, apply the following steps to fix the issue.
A. Uninstall the Database Server Manager
- Open the Run window and type appwiz.cpl in the search box.
- Click OK and choose the QuickBooks Database Server Manager.
- Now, click the Uninstall/Change option.
B. Rename the Installation Folder
Perform the following steps to rename the installation folder.
- Move to your installation folder location.
- Open the Run window by pressing Windows + R.
- After this, copy and paste the location of the folder.
- Now, right-click the folder and select Rename. Then, rename the folder by adding .OLD at the end of the folder name.
C. Reinstall QuickBooks Database Server Manager
Once completed, reinstall the QuickBooks Database Server Manager.
- Exit all the open programs on your server computer, including QuickBooks.
- Launch the installed file “Setup_QuickBooks.exe”. Then, perform the instructions given on the screen.
- Choose Custom or Network Options when asked to select an install type and click Next.
- Pick the suitable option for network setup and click Next. Using both these options, you can install the Database Server Manager. If you notice that QuickBooks is previously installed on your server computer, it won’t overwrite any existing company data.
- Choose “I’ll be using QuickBooks Desktop on this computer, AND I’ll be storing…..” option to run both QuickBooks Database Server Manager and QuickBooks Desktop on your server computer.
- To run only Database Server Manager on your server computer, pick “I will NOT be using QuickBooks Desktop…” option.
- Finally, hit the Install option.
Method 6: Update Your Firewall
An outdated Windows Firewall configuration can block QuickBooks hosting services, which can cause the QBDBMgrN Not Running on This Computer error.
- Open the Run window and type Control Firewall.cpl in the text box.
- Hit the Enter key and open Windows Firewall.
- Choose the Update Your Firewall option.
- Now, tap on Update Now and Use Recommended Settings. Then, see if any latest updates are available.
- Relaunch your PC.
If you find that the error still persists, restart QuickBooks Database Server Manager.
Method 7: Set Windows Access Permissions to Share Company Files
Proper administrator access is required to run QuickBooksDBXX and QBCFMonitorService smoothly on your server computer. Use the steps given below to set Windows access permissions to share data files.
A. Check that the permissions are set correctly
- Open the Start menu and then open File Explorer.
- Now, right-click on the folder and choose Properties.
- Go to the Security tab and click Advanced.
- Choose QBDataServiceUserXX and select Edit.
- Make sure that the following settings are set to Allowed:
- Traverse Folder/Execute File
- List Folder/Read Data
- Read Attributes
- Read Extended Attributes
- Create Files/Write Data
- Create Folders/Append Data
- Write Attributes
- Write Extended Attributes
- Read Permissions
If permissions aren’t set properly;
- Right-click on the QuickBooks company file folder and click Properties.
- Go to Security and choose the Edit menu.
- Pick the QBDataServiceUserXX and tap on Full Control > Allow.
- Now, hit Apply and OK.
B. Change Folder Permissions
To adjust folder permissions,
- Click on the Start menu and launch File Explorer.
- Locate and right-click on the following folders.
- C:\Program Data\Intuit\Entitlement Client\v8
- C:\Program Data\Intuit\Entitlement Client\v6.0
- C:\Program Data\Intuit\Entitlement Client\v5
- C:\Program Data\Intuit\Entitlement Client\v3
- C:\Program Data\Intuit\Entitlement Client
- C:\Program Data\Intuit\QuickBooks Enterprise Solutions X.0 (X = version) or C:\Program Data\Intuit\QuickBooks 20XX (XX = year)
- C:\Program Data\COMMON FILES\INTUIT
- C:\Program Data\COMMON FILES\INTUIT\QUICKBOOKS
- C:\Users\Public\Public Documents\Intuit\QuickBooks\FAMXX (XX = year)
- C:\Users\Public\Public Documents\Intuit\QuickBooks\Company Files
- C:\Users\Public\Public Documents\Intuit\QuickBooks\Sample Company Files\QuickBooks Enterprise Solutions X.0 (X = version) or C:\Users\Public\Public Documents\Intuit\QuickBooks\Sample Company Files\QuickBooks 20XX (XX = year)
Implement these steps for any folder listed below. Make sure you do not have all of these folders. A few of them are restricted to certain QuickBooks Desktop versions.
- Right-click on the QuickBooks folder and click Properties.
- Move to the Security tab and choose Everyone.
- Important Tip: If Everyone isn’t mentioned in the Group or User Name checkbox, click Add and type Everyone. Then, hit OK.
- Choose the Full Control, Apply and then OK option.
Set Windows Access Permissions to share company files
Ensure that QuickBooks has enough permissions to help avoid future issues while working with your data files over the network.
Windows 10
- Open the Start menu and launch File Explorer.
- Right-click on the company file folder and click Properties.
- Choose Sharing and then hit the Share Add option.
- Now, pick the corresponding QBDataServiceUserXX for your version.
- Make sure that the permission levels of both users are set to Full Control and click the Share option.
Method 8: Configure Your Windows Firewall Settings
At times, Windows Firewall blocks QuickBooks services from communicating over the network, which may cause issues such as QBDBMgrN not running, QuickBooks Database Server Manager stopped working, or multi-user mode errors. To resolve this issue, allow QuickBooks through the firewall and open the required ports.
Add Firewall Port Exception
If you are using multiple versions of QuickBooks on the same computer, use the following steps for each version.
- Click the Start menu and type “Windows Firewall” into the text field.
- Open the Windows Firewall and choose Advanced Settings.
- Now, right-click on Inbound Rules and hit New Rule.
- Pick the Port and then the Next option.
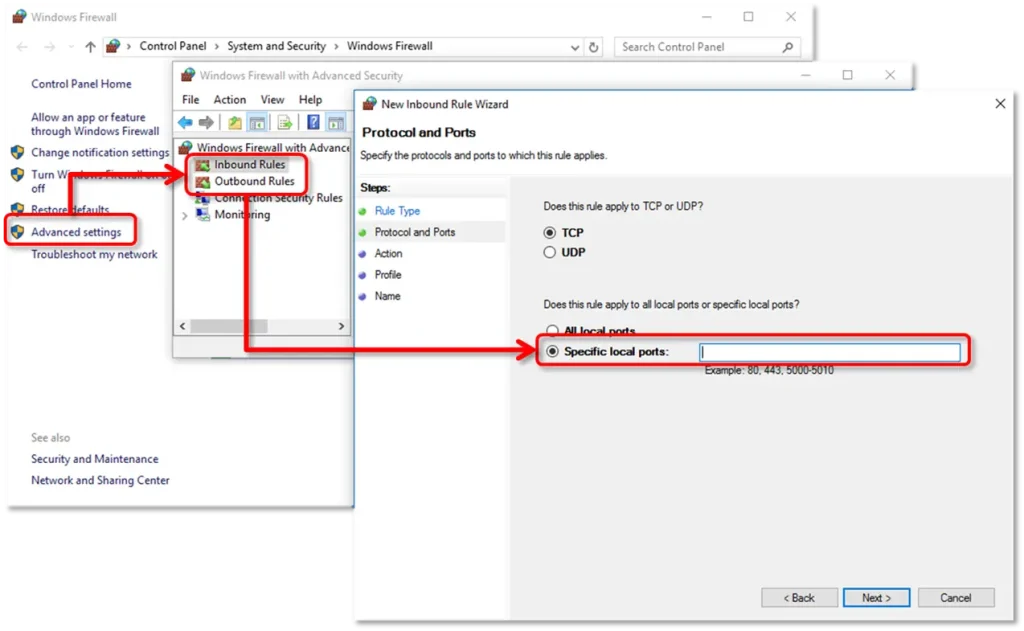
- Ensure that TCP is selected.
- After that, mention the specific ports required for your QuickBooks year version:
- QuickBooks Desktop 2020 and later: 8019, XXXXX.
- QuickBooks Desktop 2019: 8019, XXXXX.
- QuickBooks Desktop 2018: 8019, 56728, 55378-55382.
- QuickBooks Desktop 2017: 8019, 56727, 55373-55377.
| Note: The QuickBooks Desktop 2019, 2020, and future versions access dynamic ports. These are some specific firewall ports which are assigned during installation which ensure QB Desktop gets exclusive use of a given port. |
- To get the dynamic port number, launch the Start menu and type QuickBooks Database Server Manager. This will open the QBDBMgrN and move to the Port Monitor tab. Look for your QuickBooks version. Note down the Port Number. You can use it for your firewall port exceptions.
| Important Tip: You can edit the assigned port number by clicking Renew. If you change it, move to Scan Folders tab and click Scan Now to update the firewall permissions. Remember that you can only renew ports for Desktop 2019 and later versions. The ports can’t be renewed for the older versions. |
- After providing the Port number, click Next.
- Choose Allow the Connection and hit Next.
- When asked, make sure all profiles are marked and click Next.
- Now, create a rule and name it as “QBPorts(year).”
- Once all the changes are done, click Finish.
Use the same steps again to create outbound rules. Repeat all the same steps, except Outbound Rules on Step 4.
Launch QuickBooks Desktop and switch to multi-user mode. You can also launch QuickBooks over the network from one of the host computers.
Create Windows Firewall Exceptions for QuickBooks programs
QuickBooks accesses executable files (.exe) to run various tasks.
Use the following steps to create exceptions for each executable on the table:
- Open the Start menu, type Windows Firewall and open Windows Firewall.
- Choose the Advanced Settings and right-click Inbound Rules. Then, click the New Rule option.
- Select the Program and then the Next option.
- Now, tap on This Program Path and click Browse.
- Locate and choose one of the executable files from the table below and hit Next.
- After that, click Allow the Connection and then hit Next.
- At last, generate a new rule and give it a new name, QBFirewallException(name.exe).”
Resume the same steps given above and create outbound rules. Follow all the same steps, except click Outbound Rules on Step 4.
| AutoBackupExe.exe | C:\Program Files\Intuit\QUICKBOOKS YEAR |
| Dbmlsync.exe | C:\Program Files\Intuit\QUICKBOOKS YEAR |
| DBManagerExe.exe | C:\Program Files\Intuit\QUICKBOOKS YEAR |
| FileManagement.exe | C:\Program Files\Intuit\QUICKBOOKS YEAR |
| FileMovementExe.exe | C:\Program Files\Intuit\QUICKBOOKS YEAR |
| QuickBooksMessaging.exe | C:\Program Files\Intuit\QUICKBOOKS YEAR |
| QBW32.exe | C:\Program Files\Intuit\QUICKBOOKS YEAR |
| QBDBMgrN.exe | C:\Program Files\Intuit\QUICKBOOKS YEAR |
| QBServerUtilityMgr.exe | C:\Program Files\Common Files\Intuit\QuickBooks |
| QBCFMonitorService.exe | C:\Program Files\Common Files\Intuit\QuickBooks |
| QBLaunch.exe | C:\Program Files\Common Files\Intuit\QuickBooks |
| QBUpdate.exe | C:\Program Files\Common Files\Intuit\QuickBooks\QBUpdate |
| IntuitSyncManager.exe | C:\Program Files\Common Files\Intuit\Sync |
| OnlineBackup.exe | C:\Program Files\QuickBooks Online Backup |
How You Can Avoid QuickBooks Database Server Manager Won’t Start?
Consider the following pointers;
- Keep your QuickBooks software up-to-date.
- Check that your network connection is stable.
- Make sure to scan your company file folders regularly.
- Always ensure proper installation of Intuit QuickBooks Database Server Manager.
- Avoid sudden system shutdowns.
Final Thoughts
The QuickBooks Database Server Manager stopped working error can disrupt multi-user access and network connectivity. But, it can be fixed by using the correct troubleshooting methods like restarting the service, checking the Windows firewall, turning on hosting settings, configuring services or setting Windows access permissions. However, maintaining proper network configuration and keeping your software updated can help prevent these errors in the future.
Frequently Asked Questions
Why is QBDBMgRN not running on this computer?
The “QuickBooks Database Server Manager not running on this computer” issue may occur due to Windows blocking the connection, a corrupt network data (.ND) file, stopped background services or improper installation.
Where is the QuickBooks database server manager?
To get the QuickBooks Database Server Manager, open the Start menu and type Database in the text field. Then, open QBDBMgrN.
What does the QuickBooks Database Server manager do?
The QuickBooks Database Server Manager enables multiple users to use company files stored on a server. It creates and then manages network data files that allow smooth communication between servers and workstations.

Recent Posts
Tried Everything? Here’s How to Fix QuickBooks Error Code 80070057
Read MoreQuickBooks Enterprise Online Support: Your Complete Help Guide
Read MoreIntuit QuickBooks Customer Service: How to Contact Support
Read MoreQuickBooks Payroll: Service, Setup, Pricing and Support Guide
Read MoreQuickBooks Error Support: Get Instant Help Via Live Chat or Call
Read More